@ econoalchemist
2025-01-16 20:51:53
<h1>A Spark of Defiance</h1>
<b>By: The 256 Foundation</b>

<i>A monthly newsletter</i>
January 2025
<h2>Introduction:</h2>
Welcome to the first newsletter produced by The 256 Foundation! If you have enjoyed [POD256](https://www.pod256.org/) or technical guides from [econoalchemist](https://x.com/econoalchemist) in the past, then you are going to love this newsletter.You can expect newsletters to be published on a monthly basis going forward. The content will generally focus on topics aligned with The 256 Foundation’s mission to “Dismantle the proprietary mining empire to liberate Bitcoin and freedom tech for all”. More specifically, the focus of this newsletter will be on the state of the Bitcoin network, mining industry developments, progress updates on grant projects, actionable advice for getting involved with Bitcoin mining, and more (to be announced...wink wink).
Open-source development in Bitcoin mining up until the Bitaxe has been non-existent but The 256 Foundation is breaking the chains of closed and proprietary development. After all, two out of three pillars supporting the Bitcoin ecosystem are openly developed – nodes and applications; why not mining? The majority of mining hardware is closed and proprietary; same with the firmware, even the after-market solutions are closed-source. If you have tried using a miner in some unconventional way like home heating, dehydrating food, or installing one in your living space just so you don’t have to submit KYC documents to get bitcoin then you will appreciate the ability to freely modify your miner.
Despite the constraints on creativity caused by closed-source firmware and hardware, many individuals have demonstrated impressive developments. For example, [Diverter](https://x.com/Diverter_NoKYC) who wrote the groundbreaking guide on the subject, [Mining For The Streets](https://web.archive.org/web/20230521030129mp_/https://diverter.hostyourown.tools/mining-for-the-streets/), at a time when the general consensus was that small-scale mining was a foregone pursuit. [Zack Bomsta](https://x.com/zbomstaz) developed the [Loki Kit](https://pivotalpleb.com/collections/frontpage/products/loki-kit) enabling users to power miners from 120-volt power sources instead of the less common 240-volt power sources. [Michael Schmid](https://x.com/Schnitzel/status/1610311138004144128) developed a way to heat his home using four Antminer S9s; offsetting his energy bills with mining rewards. [Rev. Hodl](https://x.com/HodlRev) has integrated Bitcoin mining into a variety of homesteading functions like [dehydrating his elderberry harvest](https://yakihonne.com/notes/nevent1qgsy6q3ua80awknlxp6m368qssqghct6ra6scca4meepumhcswkuwegqyz2kztqsguqdyksa6ry4g0ws0kzu59p02vgmkeyxe97cmxk43jej5xl9zce). In fact, the resourcefulness and determination of individuals to integrate Bitcoin mining into their unique situations has proven to be nothing short of a full on movement. Defiantly building and iterating despite the naysayers, excuse makers, and protests that claim “you can’t compete with big miners! You’re better off just buying from an exchange! You won’t get your ROI!”.
Against all odds, using closed-source miners, and with little more than a shoestring budget and a can-do attitude people have forged a way forward and collectively pushed the Bitcoin mining industry to a tipping point. Closed-source solutions are not keeping up with innovation and won’t even make economic sense compared to the open-source solutions just over the horizon. The 256 Foundation is here to kick the old ways of Bitcoin mining development to the curb in favor of free and open development; providing funding for developers and educators to do what they do best and usher in the era free and open Bitcoin mining.
The 256 Foundation is laser focused on a select handful of projects that are going to break the entire Bitcoin mining industry wide open and make freedom tech accessible to anyone. These select projects are long term support initiatives, not short term touch-and-go exercises. Education is a key component and why The 256 Foundation provides educational resources, tools, and support to demystify Bitcoin and freedom tech, empowering individuals to engage with and benefit from this revolutionary system.
If that sounds like the kind of timeline you’re interested in then keep reading and watch for updates every month in your inbox, on Nostr, or at [256foundation.org](https://256foundation.org/).
<h2>Definitions:</h2>
MA = Moving Average
Eh/s = Exahash per second
Ph/s = Petahash per second
Th/s = Terahash per second
MW = Mega Watt
T = Trillion
J/Th = Joules per Terahash
$ = US Dollar
VDC = Volts Direct Current
PCB = Printed Circuit Board
GB = Gigabyte
TB = Terabyte
OS = Operating System
SSH = Secure Shell
<h2>State of the Network:</h2>
Hashrate on the 14-day MA according to [mempool.space](https://mempool.space/graphs/mining/hashrate-difficulty#1y) increased from ~525 Eh/s in January 2024 to ~784 Eh/s in December 2024, marking ~49% growth for the year. Last month alone, December 2024, witnessed roughly 34 Eh/s come online marking ~4.5% overall growth for the month. Using some rough ball-park figures, 34 Eh/s coming online means something like 170,000 new-gen 200 Th/s miners were plugged in and supported by ~595 MW of electrical infrastructure.
Difficulty is currently 110.4T as of Epoch 436 and set to decrease roughly 0.2% on or around January 26, 2025. But that target will constantly change between now and then. The previous re-target increased difficulty by 0.6%. In 2024, difficulty went from 72.0T to 109.7T making it 52.3% more difficult to solve for a block; fairly consistent with the estimated 49% hashrate increase during the same time frame.
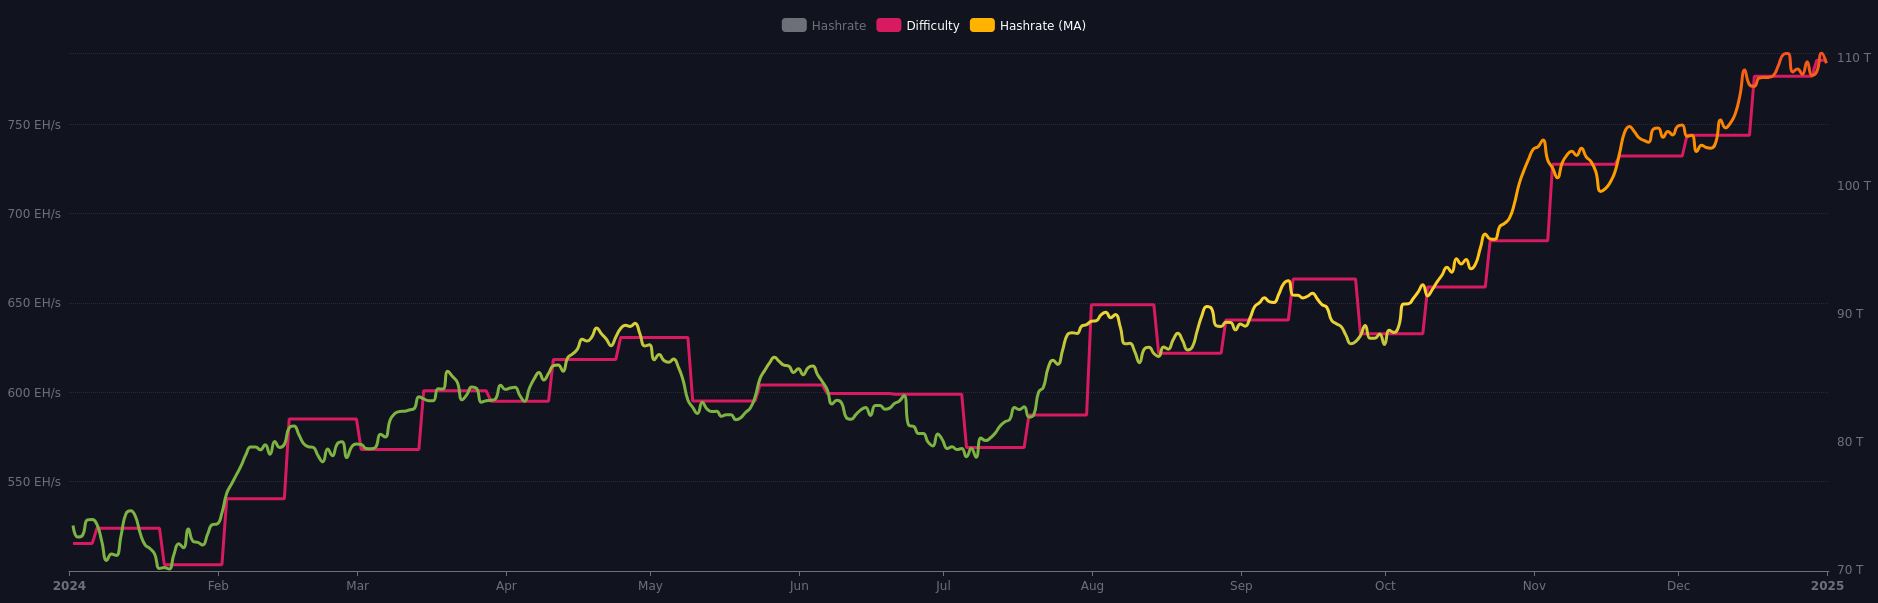
<font size=1>[IMG-001] 2024 hashrate/difficulty chart from mempool.space</font>
New-gen miners are selling for roughly $28.14 per Th using the Bitmain Antminer S21 XP 270 Th/s model from [Kaboom Racks](https://x.com/kaboomracks) as an example. According to the [Hashrate Index](https://data.hashrateindex.com/asic-index-data/price-index), less efficient miners like the <19J/Th models are fetching $18.18/Th, models between 19J/Th – 25J/Th are selling for $13.31/Th, and models >25J/Th are selling for $3.53/Th.
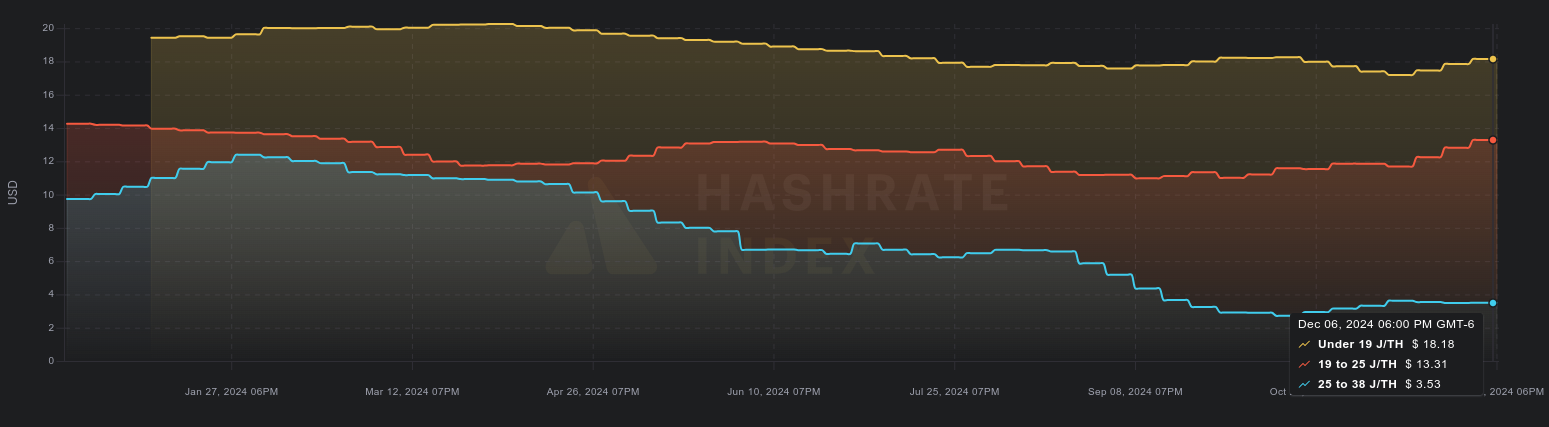
<font size=1>[IMG-002] 2024 Miner Prices from Luxor’s Hashrate Index</font>
Hashvalue is currently 58,000 sats/Ph per day, down slightly from December 1, 2024 when hashvalue was closer to 63,000 sats/Ph per day according to [Braiins Insights](https://insights.braiins.com/en). Hashprice is $58.00/Ph per day, down slightly from $60.00/Ph per day at the beginning of December 2024, [IMG-003]. Overall, hashvalue is down 76% from 242,000 sats/Ph per day a year ago and hashprice is down 43% from $103.00 per Ph/day a year ago. But keep in mind, the block subsidy was 6.25 bitcoin per block a year ago and is currently 3.125 bitcoin per block.
The next halving will occur at block height 1,050,000 which should be in roughly 1,159 days or in other words 170,594 blocks from time of publishing this newsletter.
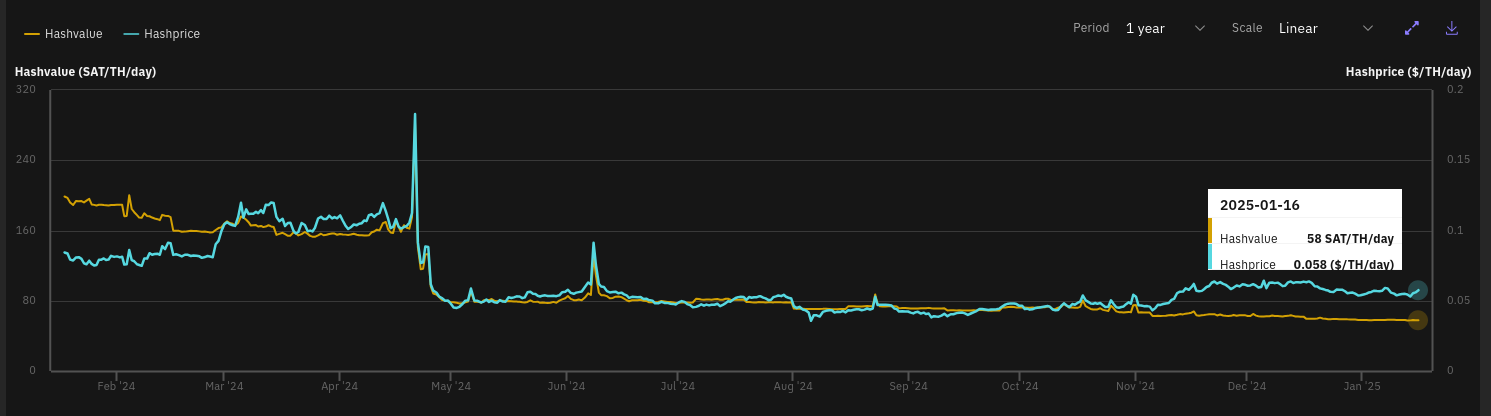
<font size=1>[IMG-003] Hashprice/Hashvalue from Braiins Insights</font>
<h2>Mining Industry Developments:</h2>
2024 marks the year that open-source Bitcoin mining hardware became a thing. Prior to the [Bitaxe](https://bitaxe.org/), there was no open source Bitcoin mining hardware. A small but mighty platform, the Bitaxe project has proved that it is possible to have a complete Bitcoin mining system developed, built, and maintained in the open by a community of enthusiasts.
The impressive part about Bitaxe is that [Skot](https://x.com/skot9000) instigated a project that satisfied a burning desire in the open-source community to develop a mining system by reverse engineering Bitmain’s ASIC chips and integrate them onto a new open-source hardware platform, with accompanying open-source firmware, [esp-miner](https://github.com/skot/esp-miner). Fast forward to today and thousands of individuals have joined the [Open Source Miners United](https://discord.gg/osmu) Discord group and their combined contributions have made Bitaxe what it is today. This required delicate work to unsolder the ASIC chips from Bitmain’s hashboards and then re-solder them onto the Bitaxe circuit board. The genius part of the project is that the open-source foundation supports commercially viable ventures built on top of it. For example, Bitaxe is the open-source project that develops and designs models but does not manufacture, market, or distribute any units; a list of companies that have sprung up selling Bitaxes can be found [here](https://bitaxe.org/legit.html).
The Bitaxe was the inspiration for the title of this month’s newsletter, <i>A Spark of Defiance</i>, because it was a small and seemingly inconsequential development that ignited a raging fire that will engulf the closed and proprietary Bitcoin mining empire. Additionally, the project was defiantly manifested through persistent and painstaking effort despite what many claimed was too insignificant of a hashrate, too uneconomical of a price point, and too cute to be anything other than a toy. The significance of the Bitaxe project is not in the nominal hashrate of a single unit or the cost per terahash; the significance is that there is now a proven open-source Bitcoin mining hardware option available for anyone to build themselves and modify as they see fit that supports commercial applications. The idea of open-source Bitcoin mining hardware is still early in it’s formation but the next iteration is already under way.
Small scale miners like [FutureBit’s Apollo II](https://www.futurebit.io/) and the Bitaxe help decentralize hashrate. Even though each individual miner doesn’t amount to much, the aggregate hashrate contributed to the network is significant; both in terms of nominal hashpower and in terms of distribution. The more people who control mining hardware means fewer miners condensed in hostile jurisdictions and the more individuals who need to be compliant with unjust demands in order for those demands to be effective. These are critical steps towards a more censorship-resistant network and the arch of progress is measured in years, however there is more needed to bolster Bitcoin’s neutral and permissionless attributes which guide The 256 Foundation’s projects.
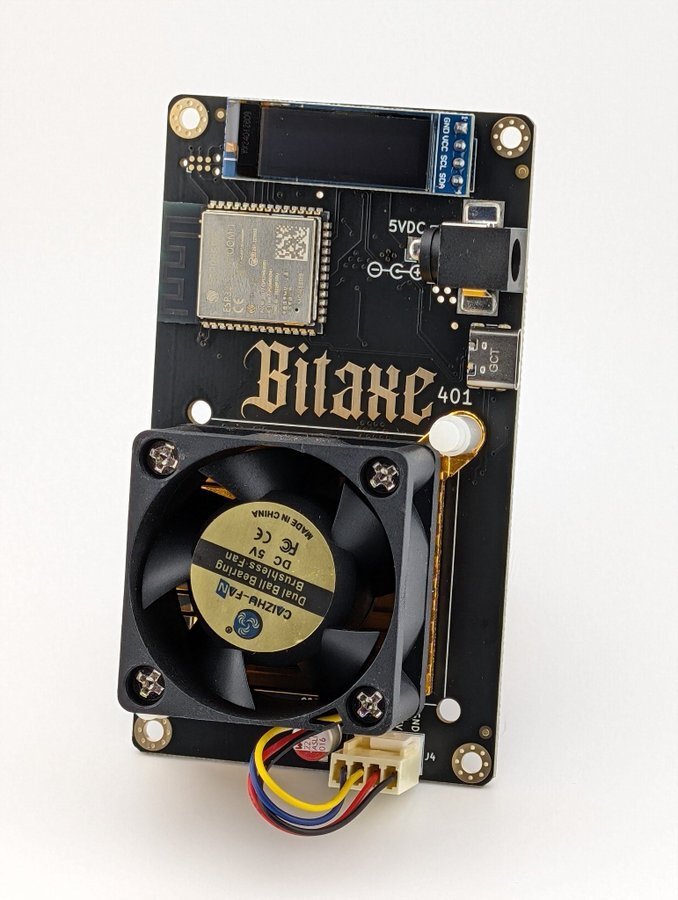
<font size=1>[IMG-004] Picture of a Bitaxe 401 from Public-Pool</font>
<h2>Grant Project Updates:</h2>
In November 2024 The 256 Foundation [announced](https://www.pod256.org/episodepage/057-from-sweden-to-silicon-bitcoins-global-journey) the first fully funded grant project, Ember One. This project builds on the momentum of the Bitaxe project and takes it to the next level. Ember One provides funding for up to two engineers and one project manager for a duration of six months to design and develop a validated ~100 Watt hashboard standard. This hashboard features a USB adapter to connect to a variety of controllers, variable input voltage from 12VDC to 24VDC to facilitate integration into a wide range of applications, and a standardized PCB footprint to make expansion seamless regardless of series.
The first series in the Ember One line up will feature twelve Bitmain S19j Pro BM1362 ASIC chips, a decision made based on availability and affordability. The corresponding heat-sink will be included with the project. Subsequent Ember One series hashboards will feature a range of different ASIC chips from different manufacturers, possibly including those that should be released any day now from a company who’s name starts with “B” and ends with “lock”.
Much like the Bitaxe project, certain peripherals are not included in the Ember One project. For example, Ember One does not include firmware architecture or implementation, enclosure design, manufacturing support, sales, distribution, marketing, or customer technical support; those are all areas of opportunity for commercial applications to thrive. Unlike the Bitaxe project, Ember One is not a complete mining system design but only the standardized hashboard. The Ember One project is being leveraged as a springboard to launch the next two projects which is 1) the complete mining system built with any of the Ember One series hashboards including design details for everything needed to produce a plug and play unit and 2) an open-source, multi-driver compatible, Linux based Bitcoin mining firmware. More details to be announced.
Stay tuned to [POD256](https://www.pod256.org/) for updates and watch out for the next [256 Foundation](https://256foundation.org/) newsletter.
<h2>Actionable Advice:</h2>
Here are steps you can take to solo mine using your own Bitcoin node, your own Stratum server, and your own miner. In this section, you will see how to spin up a BitcoinCore full node, run an instance of a Public-Pool Stratum server, and configure a Bitaxe to mine directly to the Bitcoin network without any third party involvement.
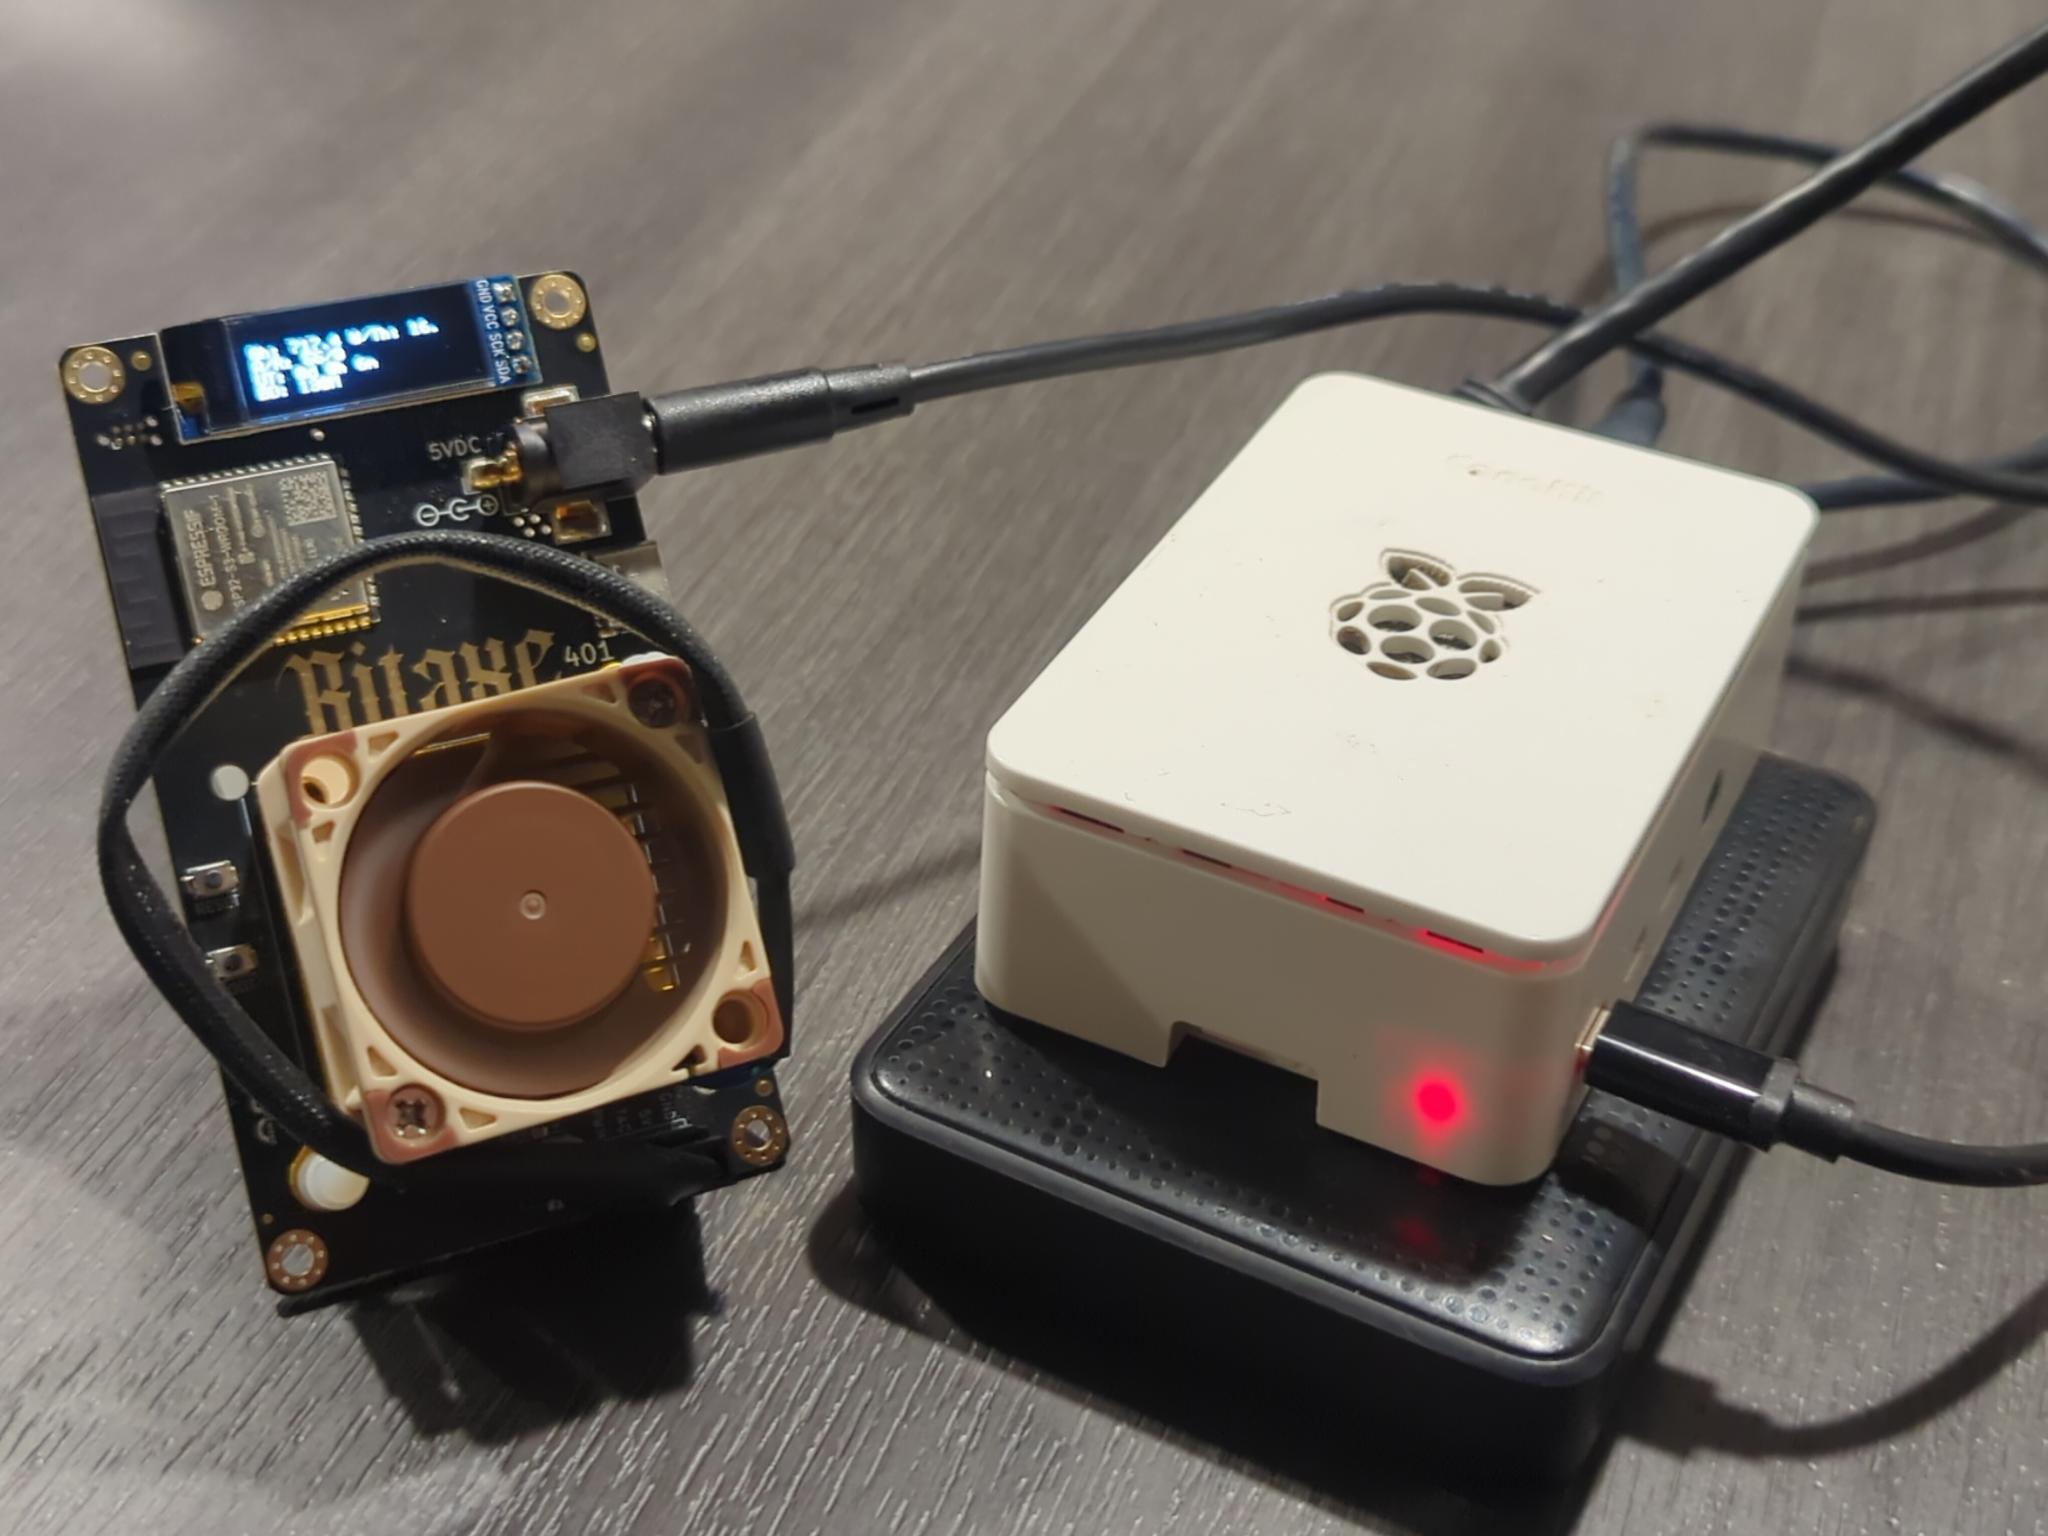
Materials: You don’t need any fancy or expensive equipment to follow along. Everything you will see in this guide was done with an old Raspberry Pi, an old external solid state drive, and a Bitaxe 401. The Raspberry Pi is a model 4B with 4GB of RAM. If you want to purchase a Raspberry Pi, then check [here](https://www.raspberrypi.com/products/raspberry-pi-4-model-b/) for distributors. Be forewarned that using a Raspberry Pi with 4GB of RAM to synchronize the full blockchain will take at least three weeks if not a month. Also, you will probably get better stratum server performance from using better hardware. This was really just an exercise in using the lowest barrier to entry hardware for demonstration purposes. There is no reason you could not complete this kind of project on a refurbished ThinkPad like any of [these](https://www.lenovo.com/us/outletus/en/laptops/).You may want to use an external storage volume with at least 2TB of storage capacity for the complete copy of the blockchain. The [Samsung T7](https://semiconductor.samsung.com/us/consumer-storage/portable-ssd/t7/) is a good option if you need one. You will also need a microSD card, 64GB is more than enough capacity and [these](https://www.samsung.com/us/computing/memory-storage/memory-cards/evo-select-adapter-microsdxc-64gb-mb-me64ka-am/) are a decent option if you need one. If you don’t have a Bitaxe already, you can buy one for less than $200 from any of [these vendors](https://bitaxe.org/legit.html).
This guide assumes you’re running Linux on your primary computer that you will be using to communicate with the Raspberry Pi and Bitaxe, if you’re running Windows or MacOS then you should be able to find system specific instructions that differ from this guide in the linked resources.
<h3>Step 1 – Prepare The Raspberry Pi</h3>
You will need a microSD card to install the Raspberry Operating System on. Then you can download the Raspberry Pi Image from:
https://www.raspberrypi.com/software/operating-systems/
Raspberry Pi OS Lite Bookworm 64-bit was used for this guide.
The SHA256 digest is available on the download page, open a terminal window and run the following command from the same folder (usually /Downloads) as the compressed file you just downloaded and compare the results to verify. Use the name of your specific file in place of this example:
`$ sha256sum 2024-11-19-raspios-bookworm-arm64-lite.img.xz`
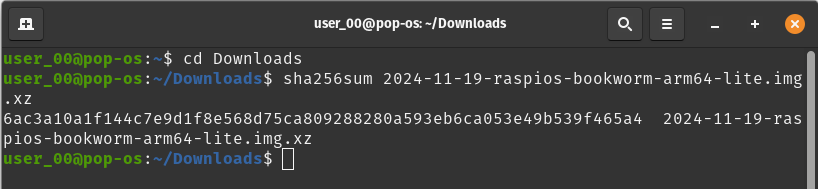
<font size=1> [IMG-005] Raspberry Pi OS SHA256 Checksum</font>
With the compressed image file verified, flash the image to a freshly formatted microSD card using the [Raspberry Pi Imager](https://www.raspberrypi.com/software/) or [Balena Etcher](https://etcher.balena.io/) or similar flashing program.
In the Raspberry Pi Imager, you can add the SSH file and “userconf” file in the boot partition during the flashing process. If you are using Balena or a similar program instead, the directions are pretty straight forward, just follow the prompts in the software. Basically you will just select the image file you want to flash, then select the microSD card you want to flash that image to, and then the software takes care of the rest.
After flashing, in a terminal window, change directory to the boot partition of the microSD card and enable SSH functionality by writing a blank file titled "ssh" with no file extension in the root of the boot partition. You can open a terminal window directly in the file path you want by looking at it with the file explorer, clicking on the 3-dot menu next to the file path at the top of the explorer window, and selecting “Open in Terminal”.
`$ sudo touch ssh`
Now you can create the login credentials and save them to the “userconf” file you are going to generate. First you need to decide on a password and then you need to encrypt it. Open a second terminal window and from your default home file path run:
`$ echo INSERTYOURPASSWORD | openssl passwd -6 -stdin`
You should receive a response that looks like a random string of characters and maybe there are some dollar signs or periods in it. You want to copy the entire string in that response by highlighting it, right clicking on it, and selecting “copy”.
Then back in the first terminal window from the microSD card boot partition path run:
`$ sudo touch userconf`
then
`$ sudo nano userconf`
Those two commands just created a file named “userconf” and then opened that file so you can put some text in it. On a single line, type your Raspberry Pi username, a colon, and the encrypted password string you generated (which should be on your clipboard, so just right-click and select “paste”). For example:
<kbd>pi:$6$wRLGhmKbL0bheJKh$0L60E09x.dQ.M4DvBjTvNETG0CtW.PGuzQwTEtTvadngclQXkzVFiJD2z.WIYeyvV.hUZT6HdYDjiSYgx0Arc0</kbd>
Then hit ctrl+o to write, enter to save, and ctrl+x to exit.
Now eject the microSD card, insert into the Raspberry Pi, and turn on the power.
From your primary computer, open a new terminal window and run:
`$ ssh pi@192.168.1.69` (or whatever your local Raspberry Pi IP address is). If you don’t know what your Raspberry Pi’s local IP address is then log into your router and check your DHCP leases and look for the one with a “raspberrypi” hostname. Your router is typically accessible from your web browser at IP address 192.168.0.1 or 10.0.0.1 or something similar. Do an internet search for your router’s specifics if you need to. If you don’t have access to the router then you can use a program like [AngryIP](https://angryip.org/) to scan the network and give you the same information.
`$ sudo apt update`
then
`$ sudo apt upgrade -y`
Now your ready to connect the external storage volume.
<h3>Step 2 – Connect External Storage Volume</h3>
Plug in a freshly formatted storage volume, like a 2TB SSD, to the Pi. Then through your SSH terminal window run:
`$ sudo fdisk -l`
You should get a response with information about the connected drives, one of them being the microSD card and the other being your external hard drive. You want to identify the device name of your external storage volume. For example, "/dev/sda1".
Write that device name down or just remember it for a moment.
Now make a directory where you can mount your external storage volume by running:
`$ sudo mkdir /mnt/ext/`
Then mount the external storage volume there by running:
`$ sudo mount /dev/sda1 /mnt/ext/`
Then refresh by running:
`$ sudo systemctl daemon-reload`
Be aware that each time you power off the Raspberry Pi you will need to run those last two commands again to mount the storage volume if you have it connected. If you want to have the “fstab” file permanently modified to reflect this storage volume then you can edit it following instructions like [these](https://youtu.be/A7xH74o6kY0?si=qC8vB5GemVEOJEG7). That’s it for connecting and mounting the external storage volume. Easy right? You’re doing great and now you’re ready to install Docker onto your Raspberry Pi.
<h3>Step 3 – Install The Docker Engine</h3>
Docker gets installed before BitcoinCore because there are some dependencies that BitcoinCore needs that are included when installing Docker. First, you will need the Git tools, from the home directory on the SSH terminal window run:
`$ sudo apt install git-all -y`
Now you can start getting Docker installed, these directions can be found in more detail here if you need them:
https://docs.docker.com/engine/install/raspberry-pi-os/
Run the following commands to install all the various Docker packages, make sure you fetch the correct URL for each package by first checking:
https://download.docker.com/linux/raspbian/dists/
Then select your Raspberry Pi OS version (Bookworm in this case), go to "Pool" > "stable", then select the applicable architecture (armf in this case), then run the following six commands ensuring that you are getting the latest available versions of each package:
For the containerd package run:
`$ sudo wget https://download.docker.com/linux/raspbian/dists/bookworm/pool/stable/armhf/containerd.io_1.7.24-1_armhf.deb`
For the docker-buildx-plugin package run:
`$ sudo wget https://download.docker.com/linux/raspbian/dists/bookworm/pool/stable/armhf/docker-buildx-plugin_0.19.3-1~raspbian.12~bookworm_armhf.deb`
For the docker-ce-cli package run:
`$ sudo wget https://download.docker.com/linux/raspbian/dists/bookworm/pool/stable/armhf/docker-ce-cli_27.4.1-1~raspbian.12~bookworm_armhf.deb`
For the docker-ce-rootless-extras package run:
`$ sudo wget https://download.docker.com/linux/raspbian/dists/bookworm/pool/stable/armhf/docker-ce-rootless-extras_27.4.1-1~raspbian.12~bookworm_armhf.deb`
For the docker-ce package run:
`$ sudo wget https://download.docker.com/linux/raspbian/dists/bookworm/pool/stable/armhf/docker-ce_27.4.1-1~raspbian.12~bookworm_armhf.deb`
For the docker-compose-plugin package run:
`$ sudo wget https://download.docker.com/linux/raspbian/dists/bookworm/pool/stable/armhf/docker-compose-plugin_2.32.1-1~raspbian.12~bookworm_armhf.deb`
You can verify your downloads by getting the GPG public key file from one step back in the directory path from the "dists" folder where it says "gpg", run:
`$ sudo wget https://download.docker.com/linux/raspbian/gpg`
Now add that key to the system key-chain with:
`$ sudo gpg --import gpg`
Then run the gpg command with the verify flag and file name for all six of the packages you downloaded:
`$ sudo gpg --verify containerd.io_1.7.24-1_armhf.deb`
`$ sudo gpg --verify docker-buildx-plugin_0.19.3-1~raspbian.12~bookworm_armhf.deb`
`$ sudo gpg --verify docker-ce_27.4.1-1~raspbian.12~bookworm_armhf.deb`
`$ sudo gpg --verify docker-ce-cli_27.4.1-1~raspbian.12~bookworm_armhf.deb`
`$ sudo gpg --verify docker-ce-rootless-extras_27.4.1-1~raspbian.12~bookworm_armhf.deb`
`$ sudo gpg --verify docker-compose-plugin_2.32.1-1~raspbian.12~bookworm_armhf.deb`
You should get a response for each verification, you are looking for a "good signature" to the public key you imported, for example:
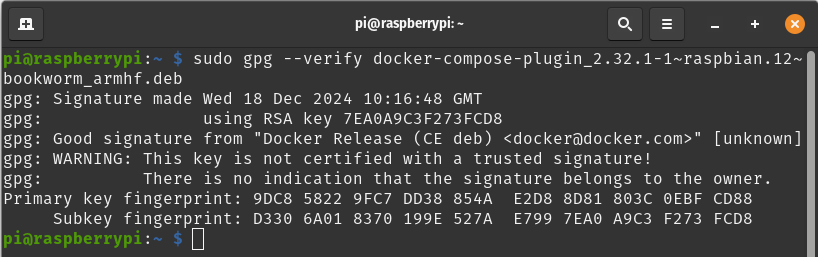
<font size=1>[IMG-006] Docker Package Verification</font>
The warning is just trying to tell you that you have not certified the public key which is an additional verification step and beyond the scope of this guide. Basically, it is trying to encourage you to contact the developer and verify that their signature fingerprint matches the one in your terminal ending with E2D8 8D81 803C 0EBF CD88. [Keybase](https://keybase.io/) is a good place to start if you want to find publicly posted keys for helping you verify and certify.
Now you need to decompress and install all six of those packages buy running:
`$ sudo dpkg -i containerd.io_1.7.24-1_armhf.deb`
`$ sudo dpkg -i docker-buildx-plugin_0.19.3-1~raspbian.12~bookworm_armhf.deb`
`$ sudo dpkg -i docker-ce-cli_27.4.1-1~raspbian.12~bookworm_armhf.deb`
`$ sudo dpkg -i docker-ce-rootless-extras_27.4.1-1~raspbian.12~bookworm_armhf.deb`
`$ sudo dpkg -i docker-ce_27.4.1-1~raspbian.12~bookworm_armhf.deb`
`$ sudo dpkg -i docker-compose-plugin_2.32.1-1~raspbian.12~bookworm_armhf.deb`
You might encounter errors about missing dependencies with a couple of those packages. If you do, then run the following command to correct them and after running that command, try decompressing and installing the package again:
`$ sudo apt --fix-broken install`
The Docker daemon should start automatically. Ensure Docker is working by running:
`$ sudo service docker start`
then
`$ sudo docker run hello-world`
You should get a response like: "Hello from Docker! This message shows that your installation appears to be working correctly."
If you made it that far then you have successfully installed Docker and you are ready to install BitcoinCore.
<h3>Step 4 – Install BitcoinCore</h3>
From your SSH terminal window and from the home directory make a working folder for all the Bitcoin related files by running:
`$ sudo mkdir /bitcoin`
Then change directories into that folder with:
`$ cd /bitcoin`
Navigate to the [BitcoinCore download](https://bitcoincore.org/en/download/) page in the web browser from your primary computer and copy the download link for the latest version of BitcoinCore for your system. BitcoinCore v28.0 was used here, specifically “bitcoin-28.0-aarch64-linux-gnu.tar.gz”.
Copy the link for the package you want (ARM Linux 64-bit in this example) and then paste that link in the following command of your SSH terminal window:
`$ sudo wget https://bitcoincore.org/bin/bitcoin-core-28.0/bitcoin-28.0-aarch64-linux-gnu.tar.gz`
If you want to verify your download, which is good practice, download the “SHA256SUMS.asc” signature file along with the “SHA256SUMS” hash values file by running the following two commands:
`$ sudo wget https://bitcoincore.org/bin/bitcoin-core-28.0/SHA256SUMS`
then
`$ sudo wget https://bitcoincore.org/bin/bitcoin-core-28.0/SHA256SUMS.asc`
Check that the SHA256 hash for the downloaded file exists in the SHA256SUMS file by running:
`$ sha256sum --ignore-missing --check SHA256SUMS`
You should get a response back like: `bitcoin-28.0-aarch64-linux-gnu.tar.gz: OK`
You will need some developer keys in order to verify the SHA256SUMS file accurately represents what the developers signed with their signatures, you can find all the developer signatures at:
https://github.com/bitcoin-core/guix.sigs/blob/main/builder-keys/
You can download any of those keys by running the `sudo wget` command and appending the whole URL for the raw GPG file you want, for example:
`$ sudo wget https://raw.githubusercontent.com/bitcoin-core/guix.sigs/refs/heads/main/builder-keys/fanquake.gpg`
Continuing with the fanquake example, import that downloaded key by running:
`$ sudo gpg --import fanquake.gpg`
You should get a response indicating that the file was imported.
Then run the following command to verify the signature matches:
`$ sudo gpg --verify SHA256SUMS.asc`
You should get a response for each of the signatures, even the ones you did not download a public key for. You are looking for "good signature" next to one of the public keys you imported, for example:
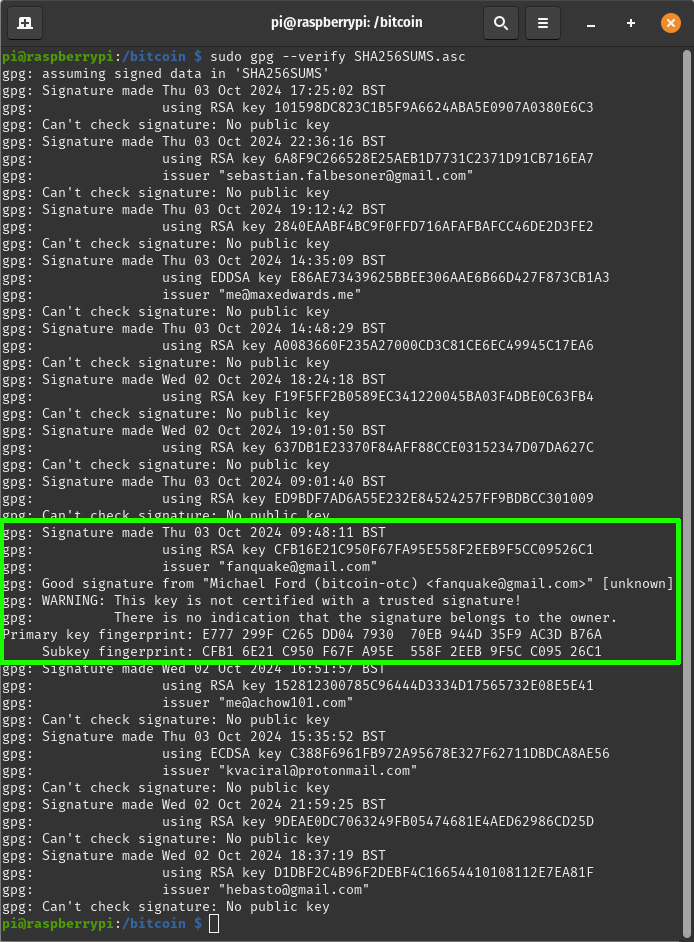
<font size=1>[IMG-007] BitcoinCore Verification</font>
The warning is just trying to tell you that you have not certified the public key which is an additional verification step and beyond the scope of this guide. For all intents and purposes, we have downloaded our file, verified that the hash value for that file is written in the accompanying verification file, then verified that the developers agree that is the correct hash value by signing off on the .asc file.
With the download verified, now decompress it by running the following command using which ever file name matches your download:
`$ sudo tar -xzf bitcoin-28.0-aarch64-linux-gnu.tar.gz`
This will have created a directory called “bitcoin-28.0”. You can verify this by checking the contents of the directory you are currently in with the `ls -la` command. Now you want to install BitcoinCore here by running:
`$ sudo install -m 0755 -o root -t /bitcoin bitcoin-28.0/bin/*`
This is a good point to make a few configuration changes in the “bitcoin.conf” file before running bitcoind. Return to your home directory with this command:
`$ cd ~`
Then copy/paste the default “bitcoin.conf” file from the `/bitcoin/bitcoin28.0` directory to where you will have your Bitcoin data directory setup on the external hard drive with this command:
`$ sudo cp /bitcoin/bitcoin-28.0/bitcoin.conf /mnt/ext`
Then change into the directory where you just pasted that configuration file with:
`$ cd /mnt/ext`
Then open the “bitcoin.conf” file to edit it by running:
`$ sudo nano bitcoin.conf`
There are many configuration changes here that you can make if you want, only the bare minimum six configurations for the purpose of this guide will be covered here.
1) Scroll down to the line that reads <kbd># Enable publish raw block in < address ></kbd> and below that, delete the hashtag in front of <kbd>#zmqpubrawblock=< address ></kbd> then replace <kbd>< address ></kbd> with <kbd>tcp://*:3000</kbd>. For example, the end result should look like this:
<kbd> # Enable publish raw block in < address >
zmqpubrawblock=tcp://*:3000</kbd>
2) Scroll down to where it says <kbd># Allow JSON-RPC connections from specified source.</kbd> and below that, delete the hashtag in front of <kbd>#rpcallowip=< ip ></kbd> and replace <kbd> < ip > </kbd> with the Docker IP address, <kbd>172.16.0.0/12</kbd> (the `ifconfig` command can help you find various network interfaces and the corresponding IP address for each one). For example, the end result should look like this:
<kbd># Allow JSON-RPC connections from specified source. Valid values for < ip > are a single IP (e.g. 1.2.3.4), a network/netmask (e.g. 1.2.3.4/255.255.255.0), a network/CIDR (e.g. 1.2.3.4/24), all ipv4 (0.0.0.0/0), or all ipv6 (::/0). This option can be specified multiple times
rpcallowip=172.16.0.0/12</kbd>
3) Scroll down to where it says <kbd># Bind to given address to listen for JSON-RPC connections.</kbd> and below that, you want to add three IP addresses. Delete the hashtag and replace <kbd> < addr >[:port]</kbd> with your Raspberry Pi's local IP address, your Docker IP address, and your local host IP address. You can leave the port out of it since BitcoinCore default's to port 8332. For example, the end result should look like this:
<kbd># Bind to given address to listen for JSON-RPC connections. Do not expose the RPC server to untrusted networks such as the public internet!
This option is ignored unless -rpcallowip is also passed. Port is optional and overrides -rpcport. Use [host]:port notation for IPv6. This option can be specified multiple times (default: 127.0.0.1 and ::1 i.e., localhost)
rpcbind=192.168.1.119
rpcbind=127.0.0.1
rpcbind=172.16.0.0/12</kbd>
4) Scroll down to where it says <kbd># Password for JSON-RPC connections.</kbd> and below that, delete the hashtag in front of <kbd>#rpcpassword=< pw ></kbd> and replace <kbd> < pw > </kbd> with whatever you want your password to be in order to make RPC calls to your Bitcoin node. For example, the end result should look like this:
<kbd># Password for JSON-RPC connections
rpcpassword=INSERTYOURPASSWORD</kbd>
5) Scroll down to where it says <kbd># Username for JSON-RPC connections.</kbd> and below that, delete the hashtag in front of <kbd>#rpcuser=< user ></kbd> and replace <kbd> < user > </kbd> with whatever you want your username to be in order to make RPC calls to your Bitcoin node. For example, the end result should look like this:
<kbd># Username for JSON-RPC connections
rpcuser=INSERTYOURUSERNAME</kbd>
6) Lastly, scroll down to where it says <kbd># Accept command line and JSON-RPC commands </kbd> and below that, delete the hashtag in front of <kbd>#server=1</kbd>. For example, the end result should look like this:
<kbd># Accept command line and JSON-RPC commands
server=1</kbd>
Then hit ctrl+o to write, hit enter to save, and hit ctrl+x to exit.
You can return to your home directory with this command:
`$ cd ~`
Then change directory to the `/bitcoin` folder and run this command to start bitcoind, making sure you have your data directory defined:
`$ sudo ./bitcoind -datadir=/mnt/ext`
You should see several lines of text scroll by, scroll up to the beginning of those responses and double check that bitcoind is using the directory that you want and the configuration file you want. For example, the text should read something like this:
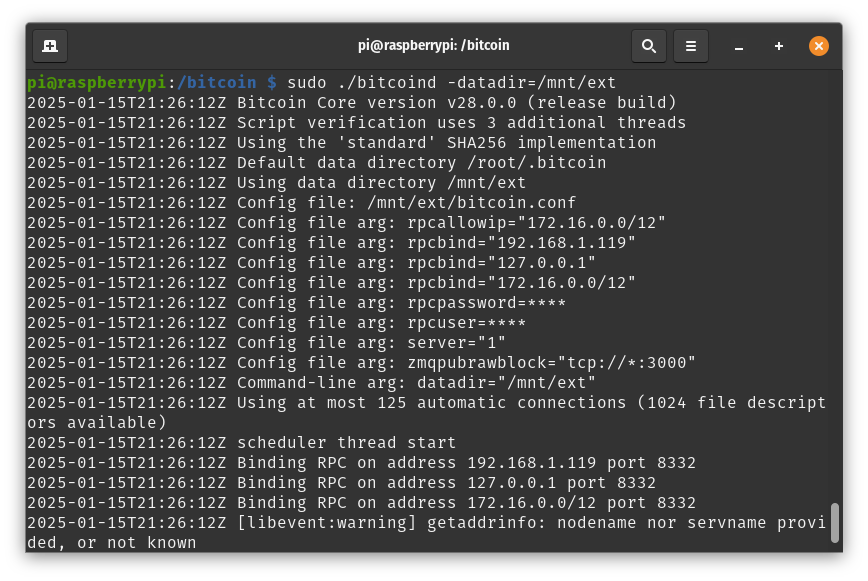
<font size=1>[IMG-008] bitcoind Start Up</font>
Then you want to just let bitcoind run and start downloading the entire blockchain. This Initial Block Download can take a few weeks on a Raspberry Pi with 4GB of RAM so give it time. You won't be able to start mining until the synchronization process is done.
In the mean-time, you can build the Public-Pool container.
<h3>Step 5 – Install the Public-Pool Container</h3>
While bitcoind is synchronizing, open a new terminal window and SSH into your Raspberry Pi like before.
Clone the Public Pool Git Repo:
`$ sudo git clone https://github.com/benjamin-wilson/public-pool.git`
Change Directory to the new public-pool folder:
`$ cd public-pool`
Create a new environment file in the root of the public-pool folder:
`$ sudo touch .env`
Open the new .env file:
`$ sudo nano .env`
Copy/Paste the contents from the ".env.example" file (from https://github.com/benjamin-wilson/public-pool/blob/master/.env.example) then modify the following lines to your specific setup:
Change the IP on this line to the local IP address of your Raspberry Pi:
<kbd>BITCOIN_RPC_URL=http://192.168.1.119</kbd>
Enter the RPC Username you entered into the bitcoin.conf file:
<kbd>BITCOIN_RPC_USER=INSERTYOURUSERNAME</kbd>
Enter the RPC Password you entered into the “bitcoin.conf” file:
<kbd>BITCOIN_RPC_PASSWORD=INSERTYOURPASSWORD</kbd>
Add a hashtag in front of this line:
<kbd># BITCOIN_RPC_COOKIEFILE=</kbd>
Delete the hash tag from this line:
<kbd>BITCOIN_ZMQ_HOST="tcp://192.168.1.100:3000"</kbd>
And change the <kbd>192.168.1.100</kbd> IP address to the local IP address of your Raspberry Pi.
Add a hashtag in front of this line:
<kbd># DEV_FEE_ADDRESS=</kbd>
Change the <kbd>POOL_IDENTIFIER</kbd> to whatever you want to show up in the blockchain when you win a block. For example:
<kbd>POOL_IDENTIFIER="/abolish the fed/"</kbd>
ctrl+o to write, enter to save, ctrl+x to exit.
Docker Compose binds to “127.0.0.1” by default. To expose the Stratum services on your server you need to update the ports in the “docker-compose.yml” file, so run:
`$ sudo nano docker-compose.yml`
Scroll down to the ports section where it says:
<kbd>ports:
-"127.0.0.1:${STRATUM_PORT}:${STRATUM_PORT}/tcp"
-"127.0.0.1:${API_PORT}:${API_PORT}/tcp"</kbd>
Delete everything between to quotation marks on both lines and add <kbd>0.0.0.0:3333:3333/tcp</kbd> and <kbd>0.0.0.0:3334:3334/tcp</kbd> respectively. For example, the end result should look like this:
<kbd>ports:
-"0.0.0.0:3333:3333/tcp"
-"0.0.0.0:3334:3334/tcp"</kbd>
Press ctrl+o to write, enter to save, ctrl+x to exit.
While still in the public-pool folder run:
`$ sudo docker compose build`
After several minutes you should get a confirmation like Service public-pool Built. Then run:
`$ sudo docker compose up -d`
This command will take some time to execute but you should see some lines of text flying by in the terminal window in the mean-time. Eventually, you should get a confirmation like `Container public-pool Started`.
This completes the steps needed for building your Bitcoin node and Stratum Server. Now you can bring your miner into the loop.
<h3>Step 6 – Connecting Bitaxe</h3>
A Bitaxe was used in this example but you should be able use any miner in theory.
Plug your Bitaxe into the power supply.
Use your mobile phone to connect via WiFi to the Bitaxe network, this should be something like "Bitaxe_4A89" or "Bitaxe_5B09" etc.
Once connected, open a web browser on your mobile phone and enter "192.168.4.1" in the address bar. This should bring you to the Bitaxe Dashboard.
From the menu, scroll down to “Settings”.
Update the WiFi SSID to your local WiFi network name.
Enter the password for your local WiFi network in the WiFi Password dialog box.
For the Stratum URL, enter the local IP address for your Raspberry Pi.
Leave the Stratum Port as 3333.
For your Stratum User, enter your bitcoin address that you want block rewards sent to. You can optionally append your bitcoin address with a worker name, for example: ".bitaxe1".
Save those changes and then restart the miner. Once back up, the Bitaxe should connect to your local WiFi network and point to your Raspberry Pi Stratum server. You can navigate back to the dashboard and you should start seeing some hashrate happening within less than a minute.
If you don't, go to the menu and scroll down to the Logs and click on the Show Logs button to see what the Bitaxe is doing.
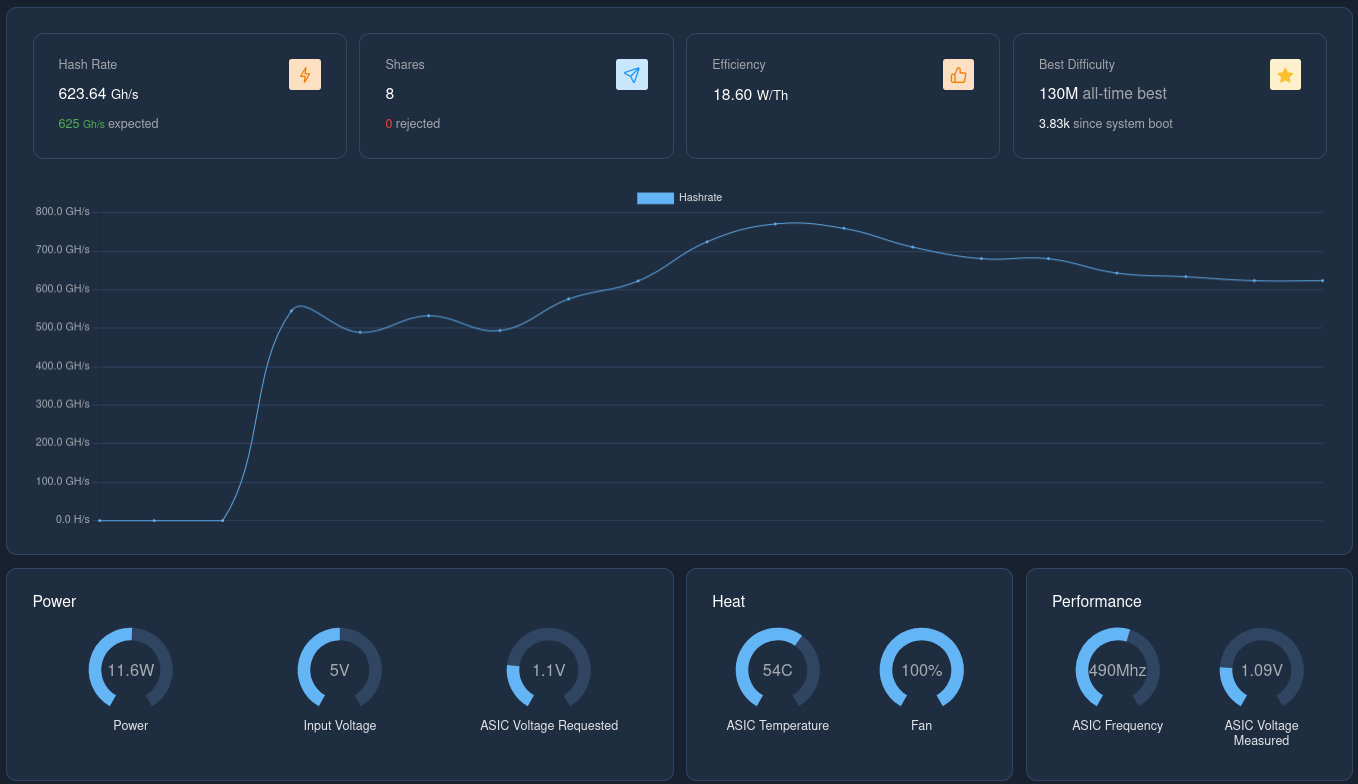
<font size=1>[IMG-009] Bitaxe Dashboard</font>
If you experience problems and do not see any hashrate in the Bitaxe dashboard after a minute or so, here are some things you can check to get a better idea of what the problem is:
Check the Bitaxe logs by navigating to the “Logs” option in the side menu of the dashboard, then click on “Show Logs”. Restart the Bitaxe if necessary. If you see errors about a refused socket connection then you might need to double check the IP addresses
configured in your bitcoin.conf file or Public-Pool .env file.
You can stop the Public-Pool service at anytime by running the following command from the public-pool directory:
`$ sudo docker compose stop`
Restart the service again with:
`$ sudo docker compose up -d`
You can check the logs of the Public-Pool service by running the following command from the public-pool directory:
`$ sudo docker compose logs`
You Might need to run this command a couple times to get the latest events. You want to see a response that shows you are using ZMQ and it is connected, Bitcoin RPC is connected, and that it is receiving some responses about the mining information like in [IMG-010].
If you are seeing an error with the RPC connection then try double checking the IP addresses configured in the bitcoin.conf file and the Public-Pool .env file. Or if you see errors about not being able to complete a “getmininginfo” request then try double checking the port
parameters you set in the Public-Pool docker-compose.yml file.
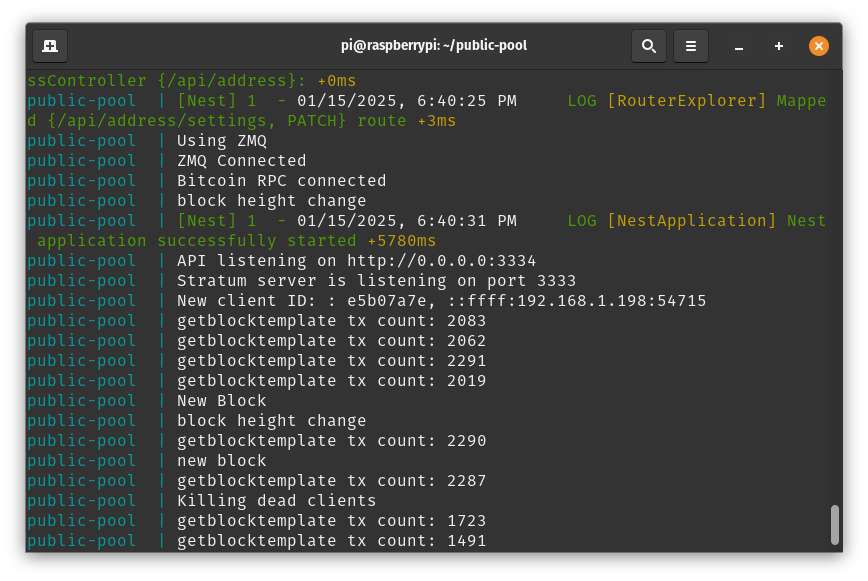
<font size=1> [IMG-010] Docker Compose Logs</font>
You can test the RPC connection with a command like this from the /bitcoin directory:
`$ sudo ./bitcoin-cli -rpcuser=YOURUSERNAME -rpcpassword=YOURPASSWORD getblockchaininfo`
You might need to wait for the blockchain data to finish synchronizing before you can run RPC commands. Or if your node is fully sync’d and you are still not able to make RPC requests then double check the IP addresses you have configured in the “rpcallowip”
and “rpcbind” fields in the bitcoin.conf file.
<h2>Conclusion:</h2>
Thank you for reading the first 256 Foundation newsletter. Keep an eye out for more newsletters on a monthly basis in your email inbox by subscribing at https://256foundation.org/. Or you can download .pdf versions of the newsletters from there as well.
You can also find these newsletters published in article form on Nostr.
If you are not currently mining to your own node, making your own templates with open source mining hardware then you now have zero excuses not to be.
Stay vigilant, frens.
-econoalchemist