-
 @ Heyyawn
2024-02-04 23:35:07
@ Heyyawn
2024-02-04 23:35:07Overview
- Introduction
- Model Types
- Training (Data Collection and Config Settings)
- Probability Viewing: AI Inspector
- Match
- Cheat Sheet
I. Introduction
AI Arena is the first game that combines human and artificial intelligence collaboration.
AI learns your skills through "imitation learning."
Official Resources
- Official Documentation (Must Read): Everything You Need to Know About AI Arena
Watch the 2-minute video in the documentation to quickly understand the basic flow of the game. 2. Official Play-2-Airdrop competition FAQ Site https://aiarena.notion.site/aiarena/Gateway-to-the-Arena-52145e990925499d95f2fadb18a24ab0 3. Official Discord (Must Join): https://discord.gg/aiarenaplaytest for the latest announcements or seeking help. The team will also have a exclusive channel there. 4. Official YouTube: https://www.youtube.com/@aiarena because the game has built-in tutorials, you can choose to watch videos.
What is this game about?
- Although categorized as a platform fighting game, the core is a probability-based strategy game.
- Warriors take actions based on probabilities on the AI Inspector dashboard, competing against opponents.
- The game does not allow direct manual input of probabilities for each area but inputs information through data collection and establishes models by adjusting parameters.
- Data collection emulates fighting games, but training can be completed using a Dummy As long as you can complete the in-game tutorial, you can master the game controls.
II. Model Types
Before training, there are three model types to choose from: Simple Model Type, Original Model Type, and Advanced Model Type.
It is recommended to try the Advanced Model Type after completing at least one complete training with the Simple Model Type and gaining some understanding of the game.

Simple Model Type
The Simple Model is akin to completing a form, and the training session is comparable to filling various sections of that form.
This model has 30 buckets. Each bucket can be seen as telling the warrior what action to take in a specific situation. There are 30 buckets, meaning 30 different scenarios. Within the same bucket, the probabilities for direction or action are the same.
For example: What should I do when I'm off-stage — refer to the "Recovery (you off-stage)" bucket.
For all buckets, refer to this official documentation:
https://docs.aiarena.io/arenadex/game-mechanics/tabular-model-v2
Video (no sound): The entire training process for all buckets
https://youtu.be/1rfRa3WjWEA
Game version 2024.1.10. The method of saving is outdated. Please refer to the game updates.
Advanced Model Type
The "Original Model Type" and "Advanced Model Type" are based on Machine Learning, which is commonly referred to as combining with AI.
The Original Model Type consists of only one bucket, representing the entire map. If you want the AI to learn different scenarios, you need to choose a "Focus Area" to let the warrior know where to focus. A single bucket means that a slight modification can have a widespread impact on the entire model. This is where the "Advanced Model Type" comes in.
The "Advanced Model Type" can be seen as a combination of the "Original Model Type" and the "Simple Model Type". The Advanced Model Type divides the map into 8 buckets. Each bucket can use many "Focus Area." For a detailed explanation of the 8 buckets and different Focus Areas, please refer to the tutorial page (accessible in the Advanced Model Type, after completing a training session, at the top left of the Advanced Config, click on "Tutorial").

III. Training (Data Collection and Config Settings)
Training Process:
- Collect Data
- Set Parameters, Train, and Save
- Repeat Step 1 until the Model is Complete
Training the Simple Model Type is the easiest to start with; refer to the video above for a detailed process.
Training the Advanced Model Type offers more possibilities through the combination of "Focus Area" parameters, providing a higher upper limit. While the Original Model Type has great potential, it's harder to control. Therefore, this section focuses on the "Advanced Model Type."
1. What Kind of Data to Collect
- High-Quality Data: Collect purposeful data. Garbage in, garbage out. Only collect the necessary data; don't collect randomly. It's recommended to use Dummy to collect data. However, don't pursue perfection; through parameter adjustments, AI has a certain level of fault tolerance.
- Balanced Data: Balance your dataset. In simple terms, if you complete actions on the left side a certain number of times, also complete a similar number on the right side. While data imbalance can be addressed through parameter adjustments (see below), it's advised not to have this issue during data collection.
- Moderate Amount: A single training will include many individual actions. Collect data for each action 1-10 times. Personally, it's recommended to collect data 2-3 times for a single action. If the effect of a single training is not clear, conduct a second (or even third) training with the same content, but with different parameter settings.
2. What to Collect (and Focus Area Selection)
Game actions mimic fighting games, consisting of 4 directions + 6 states (Idle, Jump, Attack, Grab, Special, Shield). Directions can be combined into ↗, ↘, etc. These directions and states can then be combined into different actions.
To make "Focus Area" effective, you need to collect data in training that matches these parameters. For example, for "Distance to Opponent", you need to collect data when close to the opponent and also when far away. * Note: While you can split into multiple training sessions, it's most effective to cover different situations within a single training.
Refer to the Simple Config, categorize the actions you want to collect, and based on the game scenario, classify them into two categories: "Movement" and "Combat."
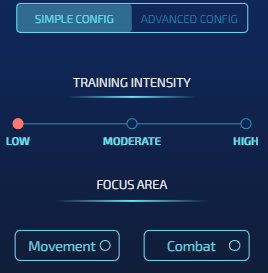
Movement-Based Actions
Action Collection
When the warrior is offstage, regardless of where the opponent is, we require the warrior to return to the stage to prevent self-destruction.
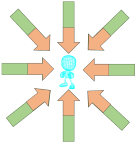
This involves 3 aerial buckets: 5 (Near Blast Zone), 7 (Under Stage), and 8 (Side Of Stage).

* Note: The background comes from the Tutorial mentioned earlier. The arrows in the image indicate the direction of the action and are for reference only. * Note: Action collection should be clean; do not collect actions that involve leaving the stage.
Config Settings
In the Simple Config, you can directly choose "Movement" in it. However, for better customization, it's recommended to use the Advanced Config directly. - Intensity: The method for setting Intensity will be introduced separately later. - Buckets: As shown in the image, choose the bucket you are training. - Focus Area: Position-based parameters: - Your position (must) - Raycast Platform Distance, Raycast Platform Type (optional, generally choose these in Bucket 7)
Combat-Based Actions
The goal is to direct attacks quickly and effectively towards the opponent, which is the core of game strategy.
This involves 5 buckets: - 2 regular situations - In the air: 6 (Safe Zone) - On the ground: 4 (Opponent Active) - 3 special situations on the ground: - 1 Projectile Active - 2 Opponent Knockback - 3 Opponent Stunned
2 Regular Situations
In the in-game tutorial, we learned how to perform horizontal attacks. However, in the actual game, directions expand to 8 dimensions. Imagine having 8 relative positions available for launching hits against the opponent. Our task is to design what action to use for attack or defense at each relative position.
Focus Area - Basic (generally select all) - Angle to opponent
- Distance to opponent - Discrete Distance: Choosing this option helps better differentiate between closer and farther distances from the opponent. As shown in the image, red indicates a relatively close distance, and green indicates a relatively distant distance.- Advanced: Other commonly used parameters
- Direction: different facings to opponent
- Your Elemental Gauge and Discrete Elementals: Considering the special's charge
- Opponent action: The warrior will react based on the opponent's different actions.
- Your action: Your previous action. Choose this if teaching combos.
3 Special Situations on the Ground
Projectile Active, Opponent Stunned, Opponent Knockback These three buckets can be referenced in the Simple Model Type video. The parameter settings approach is the same as Opponent Active/Safe Zone.
For Projectile Active, in addition to the parameters based on combat, to track the projectile, you also need to select "Raycast Projectile Distance" and "Raycast Projectile On Target."
3. Setting "Intensity"
Resources
- The "Tutorial" mentioned earlier explains these parameters.
- Official Config Document (2022.12.24): https://docs.google.com/document/d/1adXwvDHEnrVZ5bUClWQoBQ8ETrSSKgG5q48YrogaFJs/edit
TL;DR:
Epochs: - Adjust to fewer epochs if learning is insufficient, increase for more learning.
Batch Size: - Set to the minimum (16) if data is precise but unbalanced, or just want it to learn fast - Increase (e.g., 64) if data is slightly imprecise but balanced. - If both imprecise and unbalanced, consider retraining.
Learning Rate: - Maximize (0.01) for more learning but a risk of forgetting past knowledge. - Minimize for more accurate learning with less impact on previous knowledge.
Lambda: - Reduce for prioritizing learning new things.
Data Cleaning: - Enable "Remove Sparsity" unless you want AI to learn idleness. - For special cases, like teaching the warrior to use special moves when idle, refer to this tutorial video: https://discord.com/channels/1140682688651612291/1140683283626201098/1195467295913431111
Personal Experience: - Initial training with settings: 125 epochs, batch size 16, learning rate 0.01, lambda 0, data cleaning enabled. - Prioritize Multistream, sometimes use Oversampling. - Fine-tune subsequent training based on the mentioned theories.
IV. Probability Viewing: AI Inspector
The dashboard consists of "Direction + Action." Above the dashboard, you can see the "Next Action" – the action the warrior will take in its current state. The higher the probability, the more likely the warrior is to perform that action, indicating a quicker reaction. It's essential to note that when checking the Direction, the one with the highest visual representation may not have the highest numerical value. To determine the actual value, hover the mouse over the graphical representation, as shown below, where the highest direction is "Idle."

In the map, you can drag the warrior to view the probabilities of the warrior in different positions. Right-click on the warrior with the mouse to change the warrior's facing. The status bar below can change the warrior's state on the map.

When training the "Opponent Stunned, Opponent Knockback" bucket, you need to select the status below the opponent's status bar. If you are focusing on "Opponent action" in the Focus Zone, choose the action in the opponent's status bar. If you are focusing on "Your action" in the Focus Zone, choose the action in your own status bar. When training the "Projectile Active" Bucket, drag the projectile on the right side of the dashboard to check the status.
Next
The higher the probability, the faster the reaction. However, be cautious when the action probability reaches 100%. This may cause the warrior to be in a special case of "State Transition," resulting in unnecessary "Idle" states.
Explanation: In each state a fighter is in, there are different "possible transitions". For example, from falling state you cannot do low sweep because low sweep requires you to be on the ground. For the shield state, we do not allow you to directly transition to headbutt. So to do headbutt you have to first exit to another state and then do it from there (assuming that state allows you to do headbutt). This is the reason the fighter runs because "run" action is a valid state transition from shield. Source
V. Learn from Matches
After completing all the training, your model is preliminarily finished—congratulations! The warrior will step onto the arena alone and embark on its debut!
Next, we will learn about the strengths and weaknesses of the warrior from battles to continue refining the warrior's model.
In matches, besides appreciating the performance, pay attention to the following:
-
Movement, i.e., Off the Stage: Observe how the warrior gets eliminated. Is it due to issues in the action settings at a certain position, or is it a normal death caused by a high percentage? The former is what we need to avoid and optimize.
-
Combat: Analyze both sides' actions carefully. Observe which actions you and the opponent used in different states. Check which of your hits are less effective, and how does the opponent handle different actions, etc.
The approach to battle analysis is similar to the thought process in the "Training", helping to have a more comprehensive understanding of the warrior's performance and making targeted improvements.
VI. Cheat Sheet
Training 1. Click "Collect" to collect actions. 2. "Map - Data Limit" is more user-friendly. Most players perform initial training on the "Arena" map. 3. Switch between the warrior and the dummy: Tab key (keyboard) / Home key (controller). 4. Use "Collect" to make the opponent loop a set of actions. 5. Instantly move the warrior to a specific location: Click "Settings" - SPAWN - Choose the desired location on the map - On. Press the Enter key (keyboard) / Start key (controller) during training.
Inspector 1. Right-click on the fighter to change their direction. Drag the fighter and observe the changes in different positions and directions. 2. When satisfied with the training, click "Save." 3. In "Sparring" and "Simulation," use "Current Working Model." 4. If satisfied with a model, then click "compete." The model used in the rankings is the one marked as "competing."
Sparring / Ranked 1. Use the Throneroom map only for the top 2 or top 10 rankings. 2. There is a 30-second cooldown between matches. The replays are played for any match. Once the battle begins, you can see the winner on the leaderboard or by right-clicking the page - Inspect - Console. Also, if you encounter any errors or bugs, please send screenshots of the console to the Discord server.
Good luck! See you on the arena!