-

@ cadayton
2025-03-13 12:30:19
#btcpayserver #lightning #lnd #powershell
In this article I'm going to go through basics of what it takes to implement a BTCPAY server instance on a VM cloud hosted computer or on your own computer. I've been running BTCPAY server now for about 2 years and haven't done much with it other than host an LND lightning node. After watching a [BTC SESSIONS tutorial](https://www.youtube.com/watch?v=-GJr4XjRCPo), this motivated me to do a little more with my BTCPAY server instance. A BIG Thanks goes out to BTC SESSIONS for getting me motivated again. Of course, none this would be possible without the grand contribution the BTCPAY server team as made. I take a knee to these giants before me.
==**Step 1**== is if you don't know anything about BTCPAY server then watching the BTC SESSIONS tutorial is a requirement.
Be aware that your being directed to use a one-click process for doing BTCPAY server installation these days, but this leaves one without the knowledge and experience needed to trouble shoot your own installation.
My old saying is:
```
"You can't learn how to ride a horse by watching someone else do it. You have to experience it for yourself".
```
If you want to skip the experience, then this article is a waste of your time.
==**Step 2**== is to decide where to host your BTCPAY Server instance, self-hosting on your own hardware, hosting on cloud instance, or buy a node in the box solution that supports the installation of BTCPAY server. There isn't a wrong answer here so choose the option that works for you.
Initially, I started with the LunaNode hosting solution and later implemented a second instance on Oracle Cloud Infrastructure (OCI) because they offer an always free VM instance using the parameters below. I have yet another implementation of a full Bitcoin core and LND instance running on my home server.
```
Shape: VM.Standard.A1.Flex
OCPU count: 4
Network bandwidth (Gbps): 4
Memory (GB): 24
Local disk: Block storage only (200GB)
```
Currently, I'm still running the full Bitcoin core with LND but it has no active channels and it is only available via Tor. The OCI instance is still running strong and the LunaNode instance have been removed.
In the 2 years of hosting BTCPAY server with OCI, I've paid 0 hostings charges. Other hosting providers are charging close to $75 dollars per month for this type of configuration. You do have to use a credit card to reqister.
[Oracle Cloud](https://www.oracle.com/cloud/free/). The last I checked the always-free offer is still available.
If this is your first exposure to BTCPAY server, I recommend you create a new Linux VM just for the sake of gaining the experience of installing and configuring the software. Then implement your final solution on the hardware or hosting service of your choice.
Your are going to need a DNS name so here is one of many options available - noips.com offers a free Dynamic IP address or low cost for a non-nagging one.
Just to be different, I'm going to do things in reverse order just so you'll get a glimpse of a functional implementation before umbarking on the journey yourself. The link below links to my Point-of-Sales app running on BTCPAY Server hosted on OCI.
[Barnyard Market](https://btcpayserver.sytes.net)
The BTC SESSIONS tutorial referenced above does a great of demonstrating how to do implement a Point-of-Sales app.
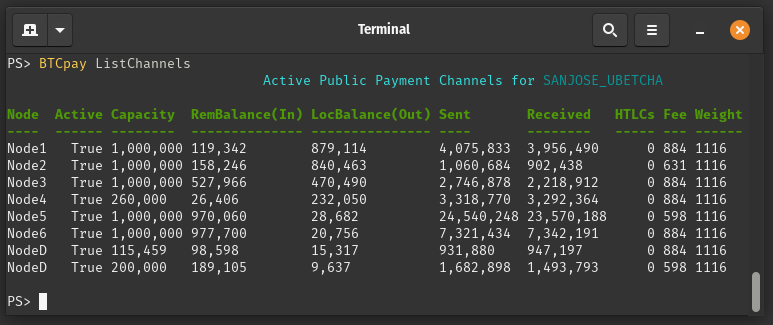
My LND Lightning node alias is ==SANJOSE_UBETCHA== and you can go to **mempool.space** to lookup information on it, if desired.
Us small time lightning node operators need to band together if we are going to stand a chance at surviving. We can't compete on a liquidity basis but we can compete on a connectivity basis, if we herd together.
A warning to those considering running your own lightning node: It's a big club and your not in it. -George Carlin
At the time of implementing my BTCPAY server instance running a lightning node was the only option for accepting lightning payments. But, now with NWC you can use your own lightning wallet to receive and make payments in sats. You'll need to pay some sats to one the big club members to open a payment channel though. This is likely the cheaper route to take when all things are considered.
I'm seriously considering dumping my LND instance and maybe even lightning too. If Lightning is just turning into a big player game, I'm out.
Here are the core things that I configured with my BTCPAY server instance.
```
1. A DNS name pointing to my Linux server.
a. securely configured Linux system
Davide-btc has done great job of outlining the steps
https://github.com/asyscom/Node-Security-Hardening-Guide-for-BTC-and-Lightning-Node-on-Ubuntu
b. git cloning of the BTCPAY software.
c. PowerShell installed because I want it. I'm not going to justify this.
```
When I originally started this article, I thought it would be easy to just reference existing documentation to get the job done, but this information is being dropped in favor one-click installation. So the information below is from my old notes which may be outdated, so please let me know if something is incorrect or missing.
At this point, 1(a) and 1(c) should be completed and tested so only 1(b) is left to do. 1(c) is optional BTW.
Prove it: If you CAN'T answer yes to the following questions, don't proceed with installing BTCPAY server.
```
You can you ping your DNS name from a remote network?
You can you ping your IP address from a remote network?
You can ssh to either IP or DNS address and get a console session?
Do you have root access on your linux system (sudo su -)?
```
Here are my old notes on the steps I took for installing BTCPAY Server on a Linux server.
```
# Login as root
sudo su -
# Create a folder for BTCPay
mkdir BTCPayServer
cd BTCPayServer
# Clone BTCPay docker repository & set environmental variables
git clone https://github.com/btcpayserver/btcpayserver-docker
cd btcpayserver-docker
# Run btcpay-setup.sh with the RIGHT AND DESIRED PARAMETERS
export BTCPAY_HOST="YOUR DNS NAME" < PUT YOUR DNS NAME HERE
export NBITCOIN_NETWORK="mainnet"
export BTCPAYGEN_CRYPTO1="btc"
export BTCPAYGEN_ADDITIONAL_FRAGMENTS="opt-save-storage-s"
export BTCPAYGEN_REVERSEPROXY="nginx"
export BTCPAYGEN_LIGHTNING="lnd" < SKIP THIS ONE IF YOU DON'T WANT LND LIGHTNING NODE
export BTCPAY_ENABLE_SSH=true
# Run the setup script
. ./btcpay-setup.sh -i
```
After setup process completes, it will take some time before the blockchain is fully in sync so don't PANIC.
Also, capture the console output generated from the setup script and save it to a text file for later recall about what it did.
Browsing to your DNS NAME should now greet you with the BTCPAY Web server interface. The excellent BTC SESSIONS tutorial can now guide you from here.
==Next steps.==
How is your opertional knowledge of Docker? If it is lacking you need to bone up on it. https://www.docker.com/
Here some useful things to know how to do with docker on your BTCPAY server instance.
List the BTCPAY server docker container services that are actually running and their version information.
```
#ssh to your server
sudo su -
cd <to your BTCPAY install path>
cd Generated
cp docker-compose.generated.yml docker-compose.yml
docker ps --format "table {{.ID}}\t{{.Image}}\t{{.Names}}"
rm docker-compose.yml
```
List the logs for a given docker container service
```
#ssh to your server
sudo su -
cd <to your BTCPAY install path>
docker logs --tail 100 btcpayserver_bitcoind
# the prior example lists all the container names that can be used with 'docker logs' command
```
To renew the SSL certificate restart the *letsencrypt* container
```
sudo su -
cd <to your BTCPAY install path>
docker restart letsencrypt-nginx-proxy-companion
```
Hopefully, this illustrates why you need to be famliar with the docker commands.
[BTCPAY Server Docs](https://docs.btcpayserver.org) This is the official documentation source and I've just touched on a few of them.
[BTCPAY Server Chat](https://chat.btcpayserver.org) This is the official chat channel. Go here when you are stuck and need to ask the experts on BTCPAY server.
Now, I'm going move onto some of the automation stuff I've recently done with the REST Api(s) related to BTCPAY server.
==BTCpay== and ==BTCpayApi== are two PowerShell scripts that I wrote to make use of the LND REST api and the Greenfield REST api.
Generally, speaking REST api(s) provide the ability automate many of the tasks assoicated with software packages like LND and BTCPAY server.
The BTCpay and BTCpayApi creation is a proof of concept work to determine if it can free me up from the daily grind of button clicking on the associated GUI applications to get the same work done. At this point, I'm finding great value in using these REST api(s).
You can refer to [BTCPayApi](https://cadayton.onrender.com/scripts/BTCpayApi.html) to get the full details about these 2 scripts.
BTCpayApi sole function is to invoke the REST Api(s) and return PowerShell objects to the caller. BTCpay (the caller) is responsible for submitting the correct input to BTCpayApi and processing the returned PowerShell objects as desired.
One of the useful commands is showing the status of the current active channels as shown below.
Another useful command is performing a Circular Rebalance between two active channels.
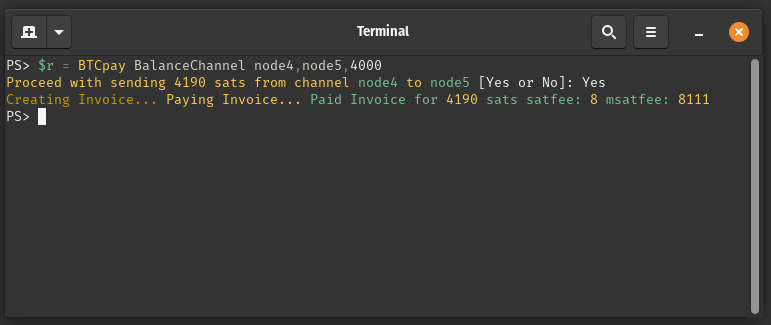
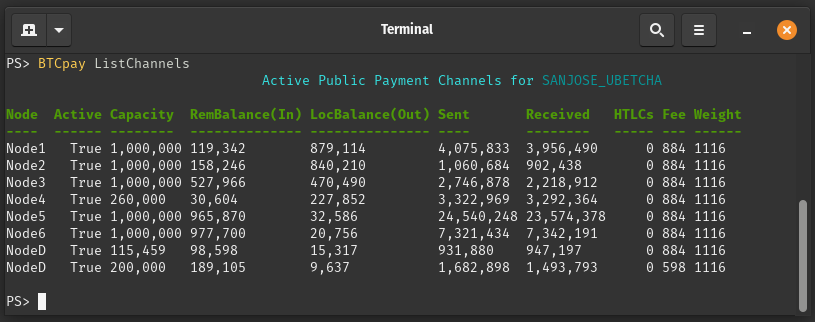
==Notice how the channel balances have changed between Node4 and Node5.==
The node names being displayed are aliases that I made up to replace their real alias names. There is an xml configuration file called, LNDnodes.xml that maps these alias names to their public key and chan_id.
One of the more difficult aspects of creating these scripts was ensuring that it did not leak sensitive data by embedding the values or keeping clear text data in a file. The current choices for protecting sensitive data are the key-value store implemented with ==Keybase==, the key-value store implemented with ==Hashicorp Vault==, and lastly the most laborious and error prone option is to input the data manually when prompted.
Each key-value store options comes with their own set of requirements. Since Zoom has purchased Keybase, the future of this application is unknown. In addition, Keybase is a centralized service so they could lock out your account on their whim. So, I'm going to focus on using the key-value store with Hashicorp Vault which has recently been purchased by IBM. The Hashicorp Vault solution that I'm using is totally self-hosted instance using the free download version. My corporate IT days provided me some exposure to this product and I never consider it for personal use until I discovered it had a REST api. Okay I said, "move over Web interface" here I come. The script, ==VaultApi== totally automates all aspect of using Hashicorp Vault. See [VaultApi](https://cadayton.onrender.com/scripts/VaultApi.html) for details.
Now with that history out of way, let's dive into configuring stuff in BTCpay/BTCpayApi.
==The task at hand is to update the configuration file, BTCpayApiCfg.xml.==
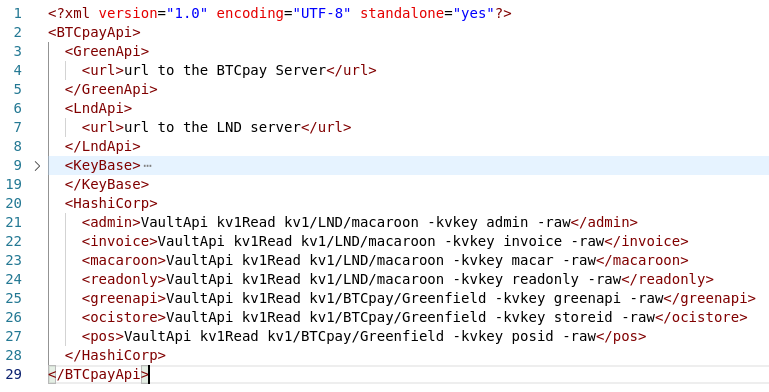
I've collaspe the Keybase section because I don't want it to be a distraction and no this is my real path information that I'm using.
Lines 4, 7, 21, 26, and 27 are the lines that need to be updated. The url format is, https://mydomain/quack/flap/
Looking a line 21, it is just executing the VaultApi script to go get the admin macaroon for LND.
It would be very trivial to implement support for any other password manager that supports either CLI and/or REST Api for retrieving data.
==Hope this information has been of help.== Thanks! for reading it.