-
 @ Girino Vey!
2025-04-23 01:57:57
@ Girino Vey!
2025-04-23 01:57:57🔧 Infrastructure Overview
- Hardware: Raspberry Pi 5 with PCIe NVMe HAT and 2TB NVMe SSD
- Filesystem: ZFS with separate datasets for each service
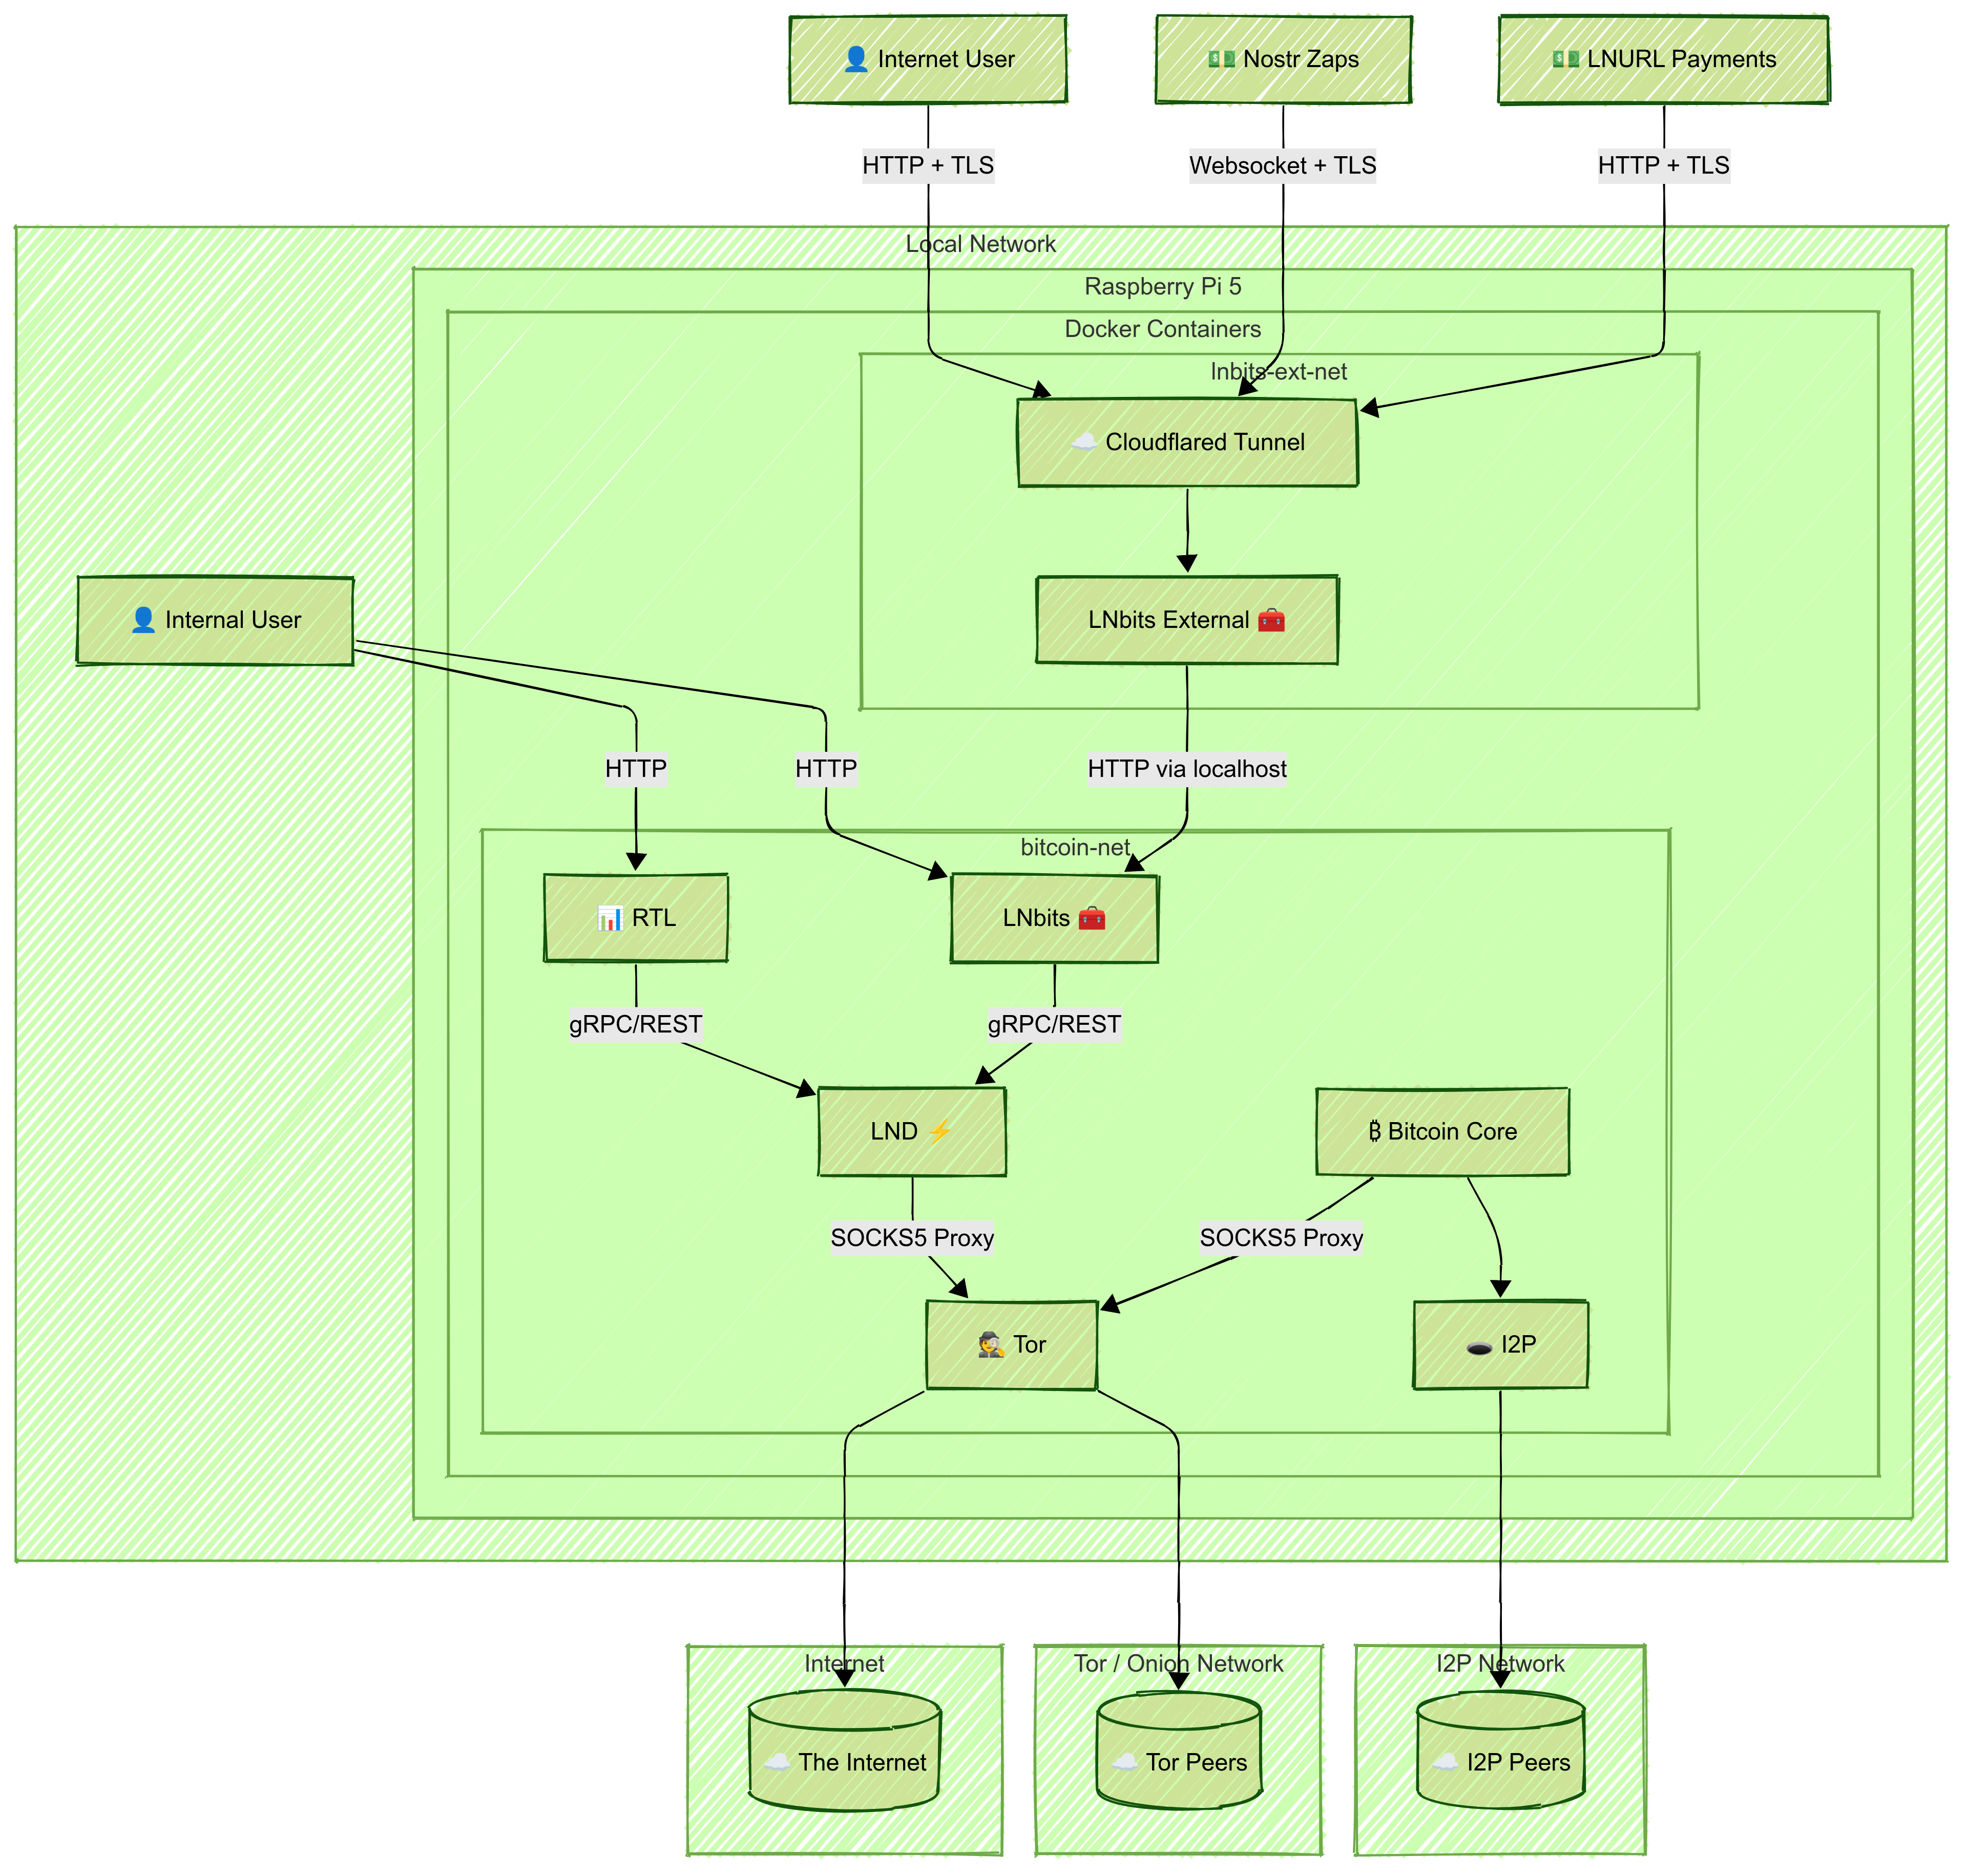
- Networking: Docker bridge networks for service segmentation
- Privacy: Tor and I2P routing for anonymous communication
- Public Access: Cloudflare Tunnel to securely expose LNbits
📊 Architecture Diagram
🛠️ Setup Steps
1. Prepare the System
- Install Raspberry Pi OS (64-bit)
- Set up ZFS on the NVMe disk
- Create a ZFS dataset for each service (e.g.,
bitcoin,lnd,rtl,lnbits,tor-data) - Install Docker and Docker Compose
2. Create Shared Docker Network and Privacy Layers
Create a shared Docker bridge network:
bash
docker network create \
  --driver=bridge \
  --subnet=192.168.100.0/24 \
  bitcoin-net
Note: Connect
bitcoind,lnd,rtl, internallnbits,tor, andi2pto thisbitcoin-netnetwork.Tor
- Run Tor in a container
- Configure it to expose LND's gRPC and REST ports via hidden services:
HiddenServicePort 10009 192.168.100.31:10009 HiddenServicePort 8080 192.168.100.31:8080 - Set correct permissions:
bash
  sudo chown -R 102:102 /zfs/datasets/tor-data
I2P
- Run I2P in a container with SAM and SOCKS proxies
- Update
bitcoin.conf:i2psam=192.168.100.20:7656 i2pacceptincoming=1
3. Set Up Bitcoin Core
- Create a
bitcoin.confwith Tor/I2P/proxy settings and ZMQ enabled - Sync the blockchain in a container using its ZFS dataset
4. Set Up LND
- Configure
lnd.confto connect tobitcoindand use Tor: ```ini [Bitcoind] bitcoind.rpchost=bitcoin:8332 bitcoind.rpcuser=bitcoin bitcoind.rpcpass=very-hard-password bitcoind.zmqpubrawblock=tcp://bitcoin:28332 bitcoind.zmqpubrawtx=tcp://bitcoin:28333
[Application Options] externalip=xxxxxxxx.onion
``
- Don’t expose gRPC or REST ports publicly
- Mount the ZFS dataset at
/root/.lnd` - Optionally enable Watchtower5. Set Up RTL
- Mount
RTL-Config.jsonand data volumes - Expose RTL's web interface locally:
```yaml
ports:
- "3000:3000" ```
6. Set Up Internal LNbits
- Connect the LNbits container to
bitcoin-net - Mount the data directory and LND cert/macaroons (read-only)
- Expose the LNbits UI on the local network:
```yaml
ports:
- "5000:5000" ```
- In the web UI, configure the funding source to point to the LND REST
.onionaddress and paste the hex macaroon - Create and fund a wallet, and copy its Admin Key for external use
7. Set Up External LNbits + Cloudflare Tunnel
- Run another LNbits container on a separate Docker network
- Access the internal LNbits via the host IP and port 5000
- Use the Admin Key from the internal wallet to configure funding
- In the Cloudflare Zero Trust dashboard:
- Create a tunnel
- Select Docker, copy the
--tokencommand - Add to Docker Compose:
yaml
    command: tunnel --no-autoupdate run --token eyJ...your_token...
💾 Backup Strategy
- Bitcoin Core: hourly ZFS snapshots, retained for 6 hours
- Other Services: hourly snapshots with remote
.tar.gzbackups - Retention: 7d hourly, 30d daily, 12mo weekly, monthly forever
- Back up ZFS snapshots to avoid inconsistencies
🔐 Security Isolation Benefits
This architecture isolates services by scope and function:
- Internal traffic stays on
bitcoin-net - Sensitive APIs (gRPC, REST) are reachable only via Tor
- Public access is controlled by Cloudflare Tunnel
Extra Security: Host the public LNbits on a separate machine (e.g., hardened VPS) with strict firewall rules:
- Allow only Cloudflare egress
- Allow ingress from your local IP
- Allow outbound access to internal LNbits (port 5000)
Use WireGuard VPN to secure the connection between external and internal LNbits:
- Ensures encrypted communication
- Restricts access to authenticated VPN peers
- Keeps the internal interface isolated from the public internet
✅ Final Notes
- Internal services communicate over
bitcoin-net - LND interfaces are accessed via Tor only
- LNbits and RTL UIs are locally accessible
- Cloudflare Tunnel secures external access to LNbits
Monitor system health using
monit,watchtower, or Prometheus.Create all configuration files manually (
bitcoin.conf,lnd.conf,RTL-Config.json), and keep credentials secure. Test every component locally before exposing it externally.⚡