-

@ 8d5bed4d:f974dea5
2024-04-14 14:32:05
## Chef's notes
Bramboraky pancakes are pan-fried in pork lard or vegetable oil.
## Details
- ⏲️ Prep time: 20 minutes
- 🍳 Cook time: 2-3 minutes
- 🍽️ Servings: 4
## Ingredients
- Peel raw potatoes and shred them.
- Strain the excess liquid.
- Pour the hot milk over potatoes
- Add flour, egg, salt, pressed garlic and majroram. Stir well.
## Directions
1. Peel the raw potatoes and shred them finely with a box grater.
2. Transfer the grated potatoes to a colander and squeeze out the excess liquid they released.
3. Put the squeezed potatoes in a bowl, pour hot milk over them. Add an egg, flour, pressed garlic, dried marjoram, and salt. Stir. The potato batter should have a semi-fluid consistency.
4. Take a non-stick frying pan, put the lard or vegetable oil in it (1-2 Tablespoons pro pancake), and heat it up to medium heat. Always mix the potato batter evenly before frying, scoop one ladleful and carefully dump it into the middle of the preheated pan. Using a flat spoon, spread the dough into a 1/4 inch (5-6 mm) thick pancake about 8 inches (20 cm) in diameter.
5. Fry each bramborak for about 2-3 minutes on both sides. Flip with a flat spatula once the edges start to turn golden.
6. Stack up the finished bramboraky on a plate. If you want to save calories and make the pancakes healthier, line them with paper towels to soak up excess fat.
7. Serve the bramboraky pancakes immediately while still warm, when they are beautifully crispy around the edges. The colder the pancake, the chewier it will be
-
@ 246052c3:1e4b3d16
2024-04-08 23:52:47
## Details
- 🍳 Cook time: 8 hours
- 🍽️ Servings: 20
## Ingredients
- Raw milk
- Yogurt (organic if possible)
## Directions
1. Pour 1/2 gallon of raw milk into instant pot
2. Add at least 2 tablespoons yogurt for active cultures (organic preferably)
3. Close instant pot lid and set setting to yogurt
4. Cook for 8 hours
-
@ ee6ea13a:959b6e74
2024-04-08 02:50:07
## Chef's notes
You'll need a decent-sized wok or large skillet to cook this. All of the ingredients are cooked in one pan and served on top of Jasmine rice (but just about any type of white rice or blend will work).
## Details
- ⏲️ Prep time: 15 minutes
- 🍳 Cook time: 20 minutes
- 🍽️ Servings: 2
## Ingredients
- 2 tbsp of toasted sesame oil
- 6 thin slices of peeled fresh ginger (don't use powdered)
- 3-4 cloves of garlic, smashed
- 4 scallions, sliced into 1/2 inch pieces (use both white and green parts)
- 2 sliced dried red chili peppers or 1/2 teaspoon of dried chili flakes
- 2 boneless and skinless chicken breasts or thighs, cut into bite-size chunks
- 1/3 cup of toasted cashews (these can be prepared in a toaster oven or on the stovetop in advance)
- 3 tablespoons of rice wine or dry sherry
- 2-3 teaspoons of soy sauce
- 4 dates, pitted and sliced thinly
- 1-2 cups of fresh basil leaves
- Juice of one lime
## Directions
1. Slice and season the chicken with salt and pepper
2. Add 1 tablespoon of oil to the skillet
3. When hot, add the ginger, garlic, scallions and chili and stir-fry for 2-3 minutes
4. Add 1 more tablespoon of oil along with the chicken and cashews
5. Cook for 5 minutes, turning the chicken over to cook throughout
6. Add rice wine, soy sauce, and dates
7. Turn down the heat and allow to simmer for another 5-6 minutes until the sauce is reduced
8. Stir in the basil so it begins to wilt
9. Add equal amounts of lime juice to both the chicken stir-fry and the rice
10. Plate the stir-fry over the rice
-
@ ee2f41fa:23552fbb
2024-04-06 15:58:51
## Chef's notes
1. Preheat oven to 350 degrees, ( glass pyrex pan works great for this recipe) brush melted butter all over bottom amd sides of baking pan.
2. Mix salt, cheese and milk and eggsin a bowl , combine and stir ingredients well.
3. Put down 5 sheets of phyllo dough down in buttered pan and brush over with melted butter. You can also put down one sheet at a time and butter seperatelly.
4. Pour enough of the mixture to cover phyllo sheets and top with 3 more sheets.
5. Continue to repeat the process: put down 3 sheets and make sure to brush them well with butter then layer with mixture until all of the mixture is done, then cover with atleast 2 sheets. I preffer not to butter the top sheets as they tend to get very hard after the banitsa is done baking.
6. Bake for 25-35 minutes or until golden, make sure mixture is cooked in the middle by cutting into banitsa. When the mixture is cooked it will not be runny.
7. Once banitsa is done cover it with either a towell or the lid to the pan and let it sit and cool before cutting it or serving. Covering it lets the steam soften the phyllo dough sheets.
## Details
- ⏲️ Prep time: 30 min
- 🍳 Cook time: 45 min
- 🍽️ Servings: 6
## Ingredients
- 16 sheets phyllo dough, thawed
- 2 cups feta cheese
- 3 large eggs
- 1 teaspoon salt
- 3⁄4 cup butter (melted)
- 1 cup milk
## Directions
1. 1. Preheat oven to 350 degrees, ( glass pyrex pan works great for this recipe) brush melted butter all over bottom amd sides of baking pan. 2. Mix salt, cheese and milk and eggsin a bowl , combine and stir ingredients well. 3. Put down 5 sheets of phyllo dough down in buttered pan and brush over with melted butter. You can also put down one sheet at a time and butter seperatelly. 4. Pour enough of the mixture to cover phyllo sheets and top with 3 more sheets. 5. Continue to repeat the process: put down 3 sheets and make sure to brush them well with butter then layer with mixture until all of the mixture is done, then cover with atleast 2 sheets. I preffer not to butter the top sheets as they tend to get very hard after the banitsa is done baking. 6. Bake for 25-35 minutes or until golden, make sure mixture is cooked in the middle by cutting into banitsa. When the mixture is cooked it will not be runny. 7. Once banitsa is done cover it with either a towell or the lid to the pan and let it sit and cool before cutting it or serving. Covering it lets the steam soften the phyllo dough sheets.
-
@ ccc8ee23:9f3d9783
2024-04-01 01:24:50
## Chef's notes
Get ready to taste the ultimate flavor fusion with our Coffee Pineapple Nastar cookies!
These bad boys mix the bold kick of coffee with the tropical vibes of pineapple jam for a taste that's off the charts.
It's like a party in your mouth, with each bite bringing you a wicked combo of rich coffee goodness and zesty pineapple tang.
## Details
- ⏲️ Prep time: 10 min
- 🍳 Cook time: 40 min
## Ingredients
- 200g unsalted butter
- 100g powdered sugar
- 1 tablespoon coffee powder
- 1 egg yolk
- 250g all-purpose flour
- 50g cornstarch
- 1/4 teaspoon salt
- 1 tablespoon milk
- 1/4 teaspoon vanilla
## Directions
1. 1 bowl/150gr pineapple jam (store-bought or homemade) 1 teaspoon instant coffee powder, dissolved in 1 tablespoon hot water (optional, for extra coffee flavor)
2. mix together butter and sugar until light and fluffy. Add the dissolved instant coffee mixture and egg yolk to the butter-sugar mixture. Mix until well combined. Sift in the all-purpose flour, cornstarch, and salt into the mixture. Mix until a smooth dough forms. If the dough is too soft, you can chill it in the refrigerator for 15 minutes to firm up. Preheat the oven to 180°C and line a baking sheet with parchment paper.
3. Take a small portion of cookie dough (about 1 tablespoon/8gr) and flatten it into a small disc with your hands. Place a small amount of pineapple jam filling (about 1/2 teaspoon) in the center of the dough disc.
4. Carefully fold the edges of the dough over the filling to encase it completely, shaping it into a ball. Ensure the filling is completely covered by the dough.
5. Lightly brush the tops of the cookies with beaten egg yolk for a shiny finish.
6. You can shape the Nastar cookies to resemble coffee beans by flattening the dough into small circles and shaping them in the middle. Yeah, it'll look just like coffee beans!
7. Bake in the preheated oven for about 15-20 minutes, or until the cookies are lightly golden brown. Remove from the oven and let the cookies cool on the baking sheet for a few minutes. Once cooled, transfer the cookies to a wire rack to cool completely.
-
@ ccc8ee23:9f3d9783
2024-04-01 01:05:16
## Chef's notes
Seblak, Indonesia's fiery street food sensation!
Packed with pasta/noodles, kerupuk/crackers, veggies, and a punchy broth, topping as your taste preference, it's a flavor explosion that'll leave you craving more.
Get ready to spice up your life and take your taste buds on a wild ride!
## Details
- ⏲️ Prep time: 10 min
- 🍳 Cook time: 30 min
- 🍽️ Servings: 2
## Ingredients
- 100g pastas/noodles (any variety)
- 50g tapioca crackers or kerupuk
- 50g cabbage/pakchoy, shredded
- 1pc egg
- Topping: some seafood
- 2 cloves garlic
- 1pc kencur / aromatic ginger
- 5pcs shallot
- 12pcs red chilli
- 1pc green onion
- Salt
- Vegetable oil
- 4cups water/chicken broth
- Topping as your references
## Directions
1. Cook the pasta/noodles
2. Shred the veggies and rinse
3. Soak the crackers until they become soft
4. In a mortar and pestle, grind kencur, shallot, garlic, and red chilies into a coarse paste.
5. Heat vegetable oil, add the spice paste and sauté until fragrant. Pour in water and bring it to a simmer. Add cooked instant noodles, crackers, all toppings to the pan. Add veggies. Stir well to combine.
6. Season with salt
7. Garnish with fried shallots, chopped green onions.
-
@ c5fb6ecc:e58c38bb
2024-03-31 14:56:06
## Chef's notes
### Prerequisites
Ensure you have a popovers pan like the one here:

### Extra Information
**Double all ingredients to make 12.**
Typically made for Christmas Morning Breakfast and Easter Sunday Breakfast.
From a BLT Recipe card that's falling apart in our kitchen. Digitized for convenience.
## Details
- ⏲️ Prep time: 15 minutes
- 🍳 Cook time: 50 minutes
- 🍽️ Servings: 6
## Ingredients
- 2 cups milk, warmed
- 4 eggs
- 2 cups flower
- ¾ heaping tbsp salt
- 1 ⅛ cups grated gruyere cheese
- Popover pan
## Directions
1. Place the popover pan in the oven. Heat the oven and pan to 350°.
2. Gently warm the milk over low heat and set aside.
3. Whisk the eggs until frothy and slowly whisk in the milk (so as not to cook the eggs).
4. Set the mixture aside.
5. Sift the flower with the salt.
6. Slowly add this dry mixture and gently combine until mostly smooth.
7. Once combined, remove the popover pan from the oven and spray with non-stick vegetable spray.
8. While the batter is still slightly warm or room temperature (definitely not cool), fill each popover cup ¾ full.
9. Top each popover with approximately 2 ½ tbsp of the grated gruyere.
10. Base at 350° for 50 minutes, rotating pan half a turn after 15 minutes of baking.
11. Remove from the oven, remove from the pan and serve immediately.
-
@ a723805c:0342dc9c
2024-03-31 13:23:47
## Chef's notes
Deviled eggs are a great dish that can make a chef out of anybody! Mix it up by adding a garnish on top such as jalapenos, pickles (relish), bacon, or the classic smoked paprika
## Details
- ⏲️ Prep time: 20 min
- 🍳 Cook time: 15 min
- 🍽️ Servings: 6
## Ingredients
- 6 hard boiled eggs, peeled
- 3 tablespoons of mayonnaise
- 1/2 teaspoon of soy sauce
- 1 teaspoon of Dijon mustard
- 1/2 stalk of celery, finely diced
- Salt and pepper
## Directions
1. Cut eggs in half lengthwise and pop yolks out into bowl, mash with fork
2. Mix in mayonnaise, mustard, celery, soy sauce, salt and pepper. Whip until a creamy texture
3. Scoop out fill and add to egg whites, heaping it slightly
4. Add garnish of choice
5. Serve immediately or refrigerate before serving
-
@ 246052c3:1e4b3d16
2024-03-31 05:22:30
## Details
- ⏲️ Prep time: 15 min
- 🍳 Cook time: 30 min
- 🍽️ Servings: 10
## Ingredients
- 1 cup pumpkin puree
- 1 cup peanut butter
- 2/3 cup honey or maple syrup
- 4 eggs
- Cinnamon
- 1 teaspoon baking soda
- 1/2 teaspoon salt
- 2 teaspoon apple cider vinegar
- 1 teaspoon vanilla extract
## Directions
1. Preheat the oven to 350°F. Line an 8×8 baking dish with parchment paper then lightly grease and set aside.
2. Combine all ingredients and mix well.
3. Pour mixture into the prepared pan and place in the oven for 30-35 minutes, until center is set. Bars will be slightly moist. Allow to cool in pan for 15 minutes then place the bars in the pan in the refrigerator for at least 30 minutes, or up to a few days.
-
@ c69b71dc:426ba763
2024-03-30 17:52:14
## Chef's notes
Prepare the day before to steep/ marinate. Depending on your taste, you can vary the ingredients. With capers, olives, pickled cucumbers, finely chopped onions etc... Completely according to your taste. Don't don't leave out Kala Namak or Black salt! As this gives the salad the typical flavour!
In case you don't have almond butter, you can also buy vegan mayonnaise instead and leave out mustard and plant milk.
## Details
- ⏲️ Prep time: 15 minutes / steep over night
- 🍳 Cook time: 0
- 🍽️ Servings: 3
## Ingredients
- 200g Tofu nature
- 3 tbsp Almon butter (almond nut butter)
- Juice of 1/2 lemon
- 3 tbsp Apple vinegar (maybe more)
- 1 tsp Mustard
- 1 tsp Kala Namak / Black salt
- 1/2 tsp Turmeric
- 2 tbsp Unsweetened plant milk (oat, soy, almond)
- 1/4 tsp Garlic powder (optional)
- 3-4 pcs. Diced pickles
- 2 tbsp capers (optional)
- 1-2 tbsp Finely chopped fresh onion, chives or onion sprouts
## Directions
1. For the dressing, mix all of the above ingredients except tofu. Drain the tofu and cut it into small cubes. When you add the tofu to the dressing, rub it a little between your fingers to break up some cubes. It will look more “egg-like”. Cover and store in the refrigerator overnight.
-
@ b22fef18:1bba6e1f
2024-03-30 02:16:38
## Details
- ⏲️ Prep time: 3 hours
- 🍳 Cook time: 40 minutes
- 🍽️ Servings: 1 loaf
## Ingredients
- 1 packet Active Dry Yeast (7g)
- 16oz warm water (473g)
- 1tsp salt (6g)
- 500g flour
## Directions
1. Combine yeast, warm water, and salt into large bowl.
2. Add flour and mix until no dry flour remains. The dough should be wet and shaggy.
3. Cover and let sit on kitchen counter or warm area for 2 hours or until dough has at least doubled in size.
4. Knock down and scrape dough from sides of bowl until dough is roughly original size before your first rise.
5. Oil or butter loaf baking pan and add dough. Cover and let rise while oven preheats (30-60min)
6. Preheat oven to 390F (200C)
7. Uncover loaf and rub with oil or softened butter.
8. Add uncovered loaf into oven and bake for 40min.
-
@ 2d0e6c2b:87d592ae
2024-03-29 22:37:20
## Chef's notes
Any type of pasta can be used, though I recommend Rotini, Cavatappi, or a Macaroni.
There are some optional ingredients but I never use them.
Can add a little more carrots or celery to increase the texture/crunch, which is my preference.
## Details
- ⏲️ Prep time: 10 mins
- 🍳 Cook time: 10 mins
- 🍽️ Servings: 6
## Ingredients
- 8 oz small uncooked pasta
- 0.5 cups Frank's hot sauce
- 0.5 cups olive oil
- 1 tablespoon lemon juice
- 0.25 teaspoon garlic powder
- 0.25 teaspoon onion powder
- 0.25 teaspoon celery salt
- 2 cups precooked shredded rotisserie chicken
- 1 cup chopped carrots
- 1 cup chopped celery
- 1.5 cups crumbled blue cheese (optional)
- 0.5 cups chopped red onion (optional)
## Directions
1. Boil water and cook pasta according to directions on package, roughly 9-11 minutes
2. Whisk together Frank's hot sauce, olive oil, lemon juice, garlic powder, onion powder, and celery salt. Mix very well.
3. Place pasta in large mixing bowl, stir in chicken, carrots, celery. If including the optional ingredients (blue cheese and onion) do so now.
4. Slowly mix in dressing. Mix very well.
5. Serve cold.
-
@ c69b71dc:426ba763
2024-03-29 15:16:53
## Chef's notes
You will need a good blender, a cake tin (18cm Ø) and parchment paper.
## Details
- 🍳 Cook time: 0
- 🍽️ Servings: 8
## Ingredients
- 175 g mixed nuts, e.g. hazelnuts
- 150 g dried figs (alternatively dates), preferably cut into small pieces
- 20 g coconut oil (if below 26 degrees it is solid)
- 675 g apples (approx. 5 pieces)
- 1 organic lemon - ½ teaspoon of the zest + all the juice
- 80 g dried figs, preferably cut into small pieces
- 90g coconut oil
- approx. 2 teaspoons of psyllium husk powder
- ¾ tsp vanilla powder or vanilla extract (season with cinnamon and cardamom as desired)
## Directions
1. For the base: mix in the blender 175 g nuts, 150 g dried figs, 20 g coconut oil to form a dough and press it into a baking tin lined with baking paper.
2. 2. For the filling: Cut apples in peaces and mix all the ingredients in a blender (add psyllium husk towards the end), pour into the baking tin and chill overnight.
-
@ 8394902e:3e8f9e14
2024-03-28 15:07:43
## Chef's notes
# Healthy ravioli gluten free!
## Eat a lot and still loose fat :)
## Details
- ⏲️ Prep time: 10 min
- 🍳 Cook time: 1 hour
- 🍽️ Servings: 4
## Ingredients
- rice flour 100 grams
- Chickpea Flour: 50 grams
- Tapioca Flour: 100 grams
- Guar Gum: 1.5 grams (approximately 1/2 teaspoon)
- Eggs: 2 large (about 100 grams without shells)
- Water: 15 to 30 grams (1-2 tablespoons), as needed for dough consistency
- Ground turkey / chicken breast / minced meat: 150 grams
- Fresh spinach / celery / leek: 100 grams, finely chopped
- Onion: 1 small (approximately 70 grams), finely chopped
- Garlic: 2 cloves (approximately 6 grams), minced
## Directions
1. Dough Preparation: In a large bowl, whisk together the rice flour, chickpea flour, tapioca flour, guar gum, and salt. Add the eggs and start mixing. Gradually add water, 1 tablespoon at a time, just enough to form a smooth and pliable dough. Knead briefly until consistent.
2. Filling Mix: Combine ground turkey or chicken, spinach, onion, garlic, salt, pepper, and optional herbs in a separate bowl. Mix thoroughly.
3. Assemble the Ravioli: Roll out half of the dough between two sheets of parchment paper to about 2mm thickness. Place teaspoons of filling onto the dough, spaced apart. Cover with another sheet of dough. Press around the filling to seal, then cut into individual pieces.
4. Cooking: Boil in salted water for 3-5 minutes, or until they float to the surface and are thoroughly cooked.
-
@ eeadea6c:64ae47a4
2024-03-26 12:53:33
## Chef's notes
I will give some combinations but i highly encourage experimenting.
Basic: red onion, bacon bits
Fruity: pear, walnuts, goat cheese
Fish: salmon, spinach, caper, red onion
Sweet: apple, cinnamon, sugar, almonds
## Details
- ⏲️ Prep time: 2h
- 🍳 Cook time: 20 min
- 🍽️ Servings: 4
## Ingredients
- 500gr flour
- 300ml lukewarm water
- 7gr yeast (1 package)
- 10gr salt
- 3tbps olive oil
- 200gr creme fraiche
## Directions
1. Mix the yeast and water and let it bloom this takes about 10 min
2. In a mixing bowl sift in the flour and add everything except the creme fraiche
3. Mix till it comes togheter than transfer to a floured workbench and knead for 10min
4. Lightly oil the mixing bowl and place the dough in it cover and let it rise in a warm spot for 60-90min(it should double in size)
5. Preheat the oven to 250c(500f) and place either a pizza stone or metal tray in there to heat up
6. In the mean time take out your dough cut in to 4 and on a floured workbench roll out as thin as possible into a oval shape
7. Take the back of a spoon and smear a layer of creme fraiche on one side and add your toppings
8. Take the stone or tray out of the oven and place parchment on it place your flammkuchen on top and cook for 12-20 till golden brown
-
@ 005bc4de:ef11e1a2
2024-03-26 10:02:08
## Chef's notes
The classic corn dogs that we ate as kids. Easy to make, fun and yummy to eat.
## Details
- ⏲️ Prep time: 15 minutes
- 🍳 Cook time: 25 minutes
## Ingredients
- 1 c yellow cornmeal
- 1 c all purpose flour
- 1/4 t salt
- 1/8 t black pepper
- 1/4 c white sugar
- 4 t baking powder
- 1 egg
- 1 c milk
- 1 qt vegetable oil (depends of size of your pot)
- 1 lb hot dogs
## Directions
1. In medium bowl combine cornmeal, flour, salt, pepper, sugar, and baking powder. Stir in eggs and milk.
2. Preheat oil in deep saucepan over medium-high heat. Allow the oil to get FULLY HOT before frying the dogs
3. Skewer the hot dogs. THE HOT DOGS MUST BE DRY. If they're wet or have condensation, the batter will fall off while frying. Roll the hot dogs in batter until well covered.
4. Fry 2 or 3 at a time until lightly browned, about 3 minutes. Drain on paper towels.
5. Allow to cool, serve with mustard, ketchup, or whatever. (They're great for breakfast the next morning too!)
-
@ 1cb14ab3:95d52462
2024-03-26 01:53:24
## Chef's notes
The original Di Shui Dong ribs (and this recipe) use pork spare ribs- but I have made it using beef short ribs and lamb shanks as well. You can substitute for whatever ribs you prefer; the taste will remain the same.
Recipe is originally credit of 'Da Dinner Roll' -- Go show them some love below ⬇️
https://dadinnerblog.wordpress.com/2010/07/11/shanghai-food-hunan-cumin-ribs-di-shui-dongg-style/
## Details
- ⏲️ Prep time: 30 mins
- 🍳 Cook time: 2.5 hours
- 🍽️ Servings: 6
## Ingredients
- NEIL PERRY'S MASTER STOCK
- water
- 3 cloves garlic, sliced
- 1 knob ginger, sliced
- 1 handful shallot ends
- 1 stick cassia bark (Chinese cinnamon)
- 2 star anise
- 375 ml light soy sauce
- 375 ml. Shaoxing wine (绍兴酒)
- 75 g Chinese rock sugar
- SPICE COATING
- 1 tbsp. Shaoxing wine (绍兴酒)
- 1/2 tsp. salt
- 1 tsp. light soy sauce
- 1 tsp. dark soy sauce
- 1 tbsp. potato starch or cornflour
- 1 3/4 cups peanut oil
- 2 tsp. minced ginger
- 1 tbsp. finely chopped garlic
- 2 fresh red chilies, seeded and finely chopped
- 2 tbsp. cumin seeds
- 2 to 4 tsp. dried chili flakes
- 2 spring onions, green parts only, finely sliced
- 1 tsp. sesame oil
## Directions
1. Fill a large stockpot ¾ full with cold water. Add the sliced garlic, ginger and shallots, followed by the aromatics. Add light soy, shaoxing wine and Chinese rock sugar and bring to a boil.
2. Strain the mix through a fine sieve and add the ribs. Simmer for 1 – 2 hours turning the ribs occasionally. Switch off the heat and let sit for 30 minutes. Transfer ribs to a dish and cool in the fridge.
3. To prepare the spice coating, mix cooking wine, salt, soy sauces, flour and one tablespoon water in. large bowl. Add cooled ribs and mix to marinade.
4. In a wok, heat peanut oil to about 275 degrees. Add ribs and stir gently for two to three minutes, then remove from oil with a slotted spoon and drain well. Pour off all but 3 tablespoons of oil in wok. Over a high flame, add the ginger, garlic, fresh chilies, chili flakes and cumin seeds and stir-fry briefly, until they are fragrant. Return ribs to the wok and stir well, seasoning with salt to taste.
5. When ribs are sizzling and fragrant, add spring onions and toss briefly. Remove from heat and stir in sesame oil.
-
@ 341db5a7:4c4fc2ef
2024-03-26 00:58:09
## Chef's notes
Cook in a well seasoned, antique cast iron skillet. Preferably one passed down from your grandmother.
## Details
- ⏲️ Prep time: 10 mins
- 🍳 Cook time: 30 mins
- 🍽️ Servings: 8
## Ingredients
- 1 cup yellow cornmeal
- 1 cup white flour
- 1/4 cup white sugar
- 1 heaping tablespoon baking powder
- 1 teaspoon salt
- 1 cup whole milk
- 1 large egg
- 1/4 cup lard or shortening
## Directions
1. Preheat oven to 375°F (190° C)
2. Heat lard or shortening in cast iron skillet over medium-high heat on the stovetop
3. Combine all dry ingredients in large mixing bowl (cornmeal, flour, sugar, salt, baking powder)
4. Whisk dry ingredients to combine
5. Add wet ingredients, milk and egg, and whisk until a loose batter is formed. If it's too stiff to pour, add a small amount of milk and keep whisking.
6. When the oil in the cast iron skillet is smoking hot, pour the batter into the skillet, scraping the sides with a spatula to get it all out.
7. Give the cast iron skillet a little tap to let the batter settle into the oil, remove from the stovetop and transfer into the preheated oven for 30 minutes.
8. The cornbread should have risen and turned golden brown on top. Remove from oven, and transfer to a plate or serving disk. Cut it down the middle and add salted butter.
-
@ 44dc1c2d:31c74f0b
2024-03-25 21:41:15
## Chef's notes
When adding things like extra veggies, if you don't want them to be mush, consider roasting veggies in the oven and only adding them near then end of the cook time. The same is generally true for meats.
While Parmesan is traditional, almost any cheese will work.
Choose your broth based on your needs (IE a veggie stock to make it more vegetarian friendly), water or more stock can be used in place of wine if need be.
## Details
- ⏲️ Prep time: 20 min
- 🍳 Cook time: 25 min
- 🍽️ Servings: 4 mains or ~6 appetizers
## Ingredients
- 1 onion, DIced
- ¼ cup butter
- 2 cups arborio rice
- 1 cup white wine
- 6 to 8 cups warm chicken broth
- 1 cup grated Parmigiano-Reggiano cheese
## Directions
1. In a large saucepan over medium heat, soften the onion in half the butter. Add the rice and cook for 1 minute, stirring to coat well. Add the white wine and reduce until almost dry.
2. Add the broth, about 1 cup at a time, stirring frequently until the liquid is completely absorbed before adding more broth. Season with salt and pepper. Cook for 18 to 22 minutes or until the rice is al dente. Add broth, as needed.
3. Take off the heat and add the cheese, the remaining butter and the toppings of your choice. Stir until the texture is very creamy. Adjust the seasoning.
4. Dish up, sprinkle with a little Parmesan cheese, if desired. Enjoy.
-
@ eeadea6c:64ae47a4
2024-03-25 13:32:47
## Details
- ⏲️ Prep time: 15 min
- 🍳 Cook time: 45 min
## Ingredients
- 1L white wine
- 0.5L white wine vinegar
- 0.5L Vinegar
- 1KG sugar
- 2 kefir like leaves
- 2 limes
- 2 lemons
- 2 sjalots
- 2 garlic
- 15 peppercorns
- 1 thumbsized piece of ginger
- 2 red pepper
## Directions
1. In a big pot add all liquids and bring to a boil
2. Turn to a simmer add sugar stir till dissolved
3. Add all other ingredients and simmer for 30 min
4. Pour over whatever veggies you are trying to pickle and enjoy
-
@ 45057918:92db0561
2024-03-25 08:52:02
## Chef's notes
**Panang Curry Recipe
Ingredients:
- 8 dried red chilies
- 1 tablespoon of coriander root
- 1 teaspoon of galangal
- 2 tablespoons of lemongrass
- 1 teaspoon of kaffir lime leaves
- 1 teaspoon of lime zest
- 1 teaspoon of cumin
- 1 teaspoon of coriander seeds
- 3 shallots
- 5 garlic cloves
- 1/2 teaspoon of salt
- 1/2 teaspoon of roasted shrimp paste
- 1 tablespoon of roasted peanuts
- 2 tablespoons of vegetable oil
Instructions:
1. Pound the dried chilies, coriander root, galangal, lemongrass, kaffir lime leaves, lime zest, cumin, coriander seeds, shallots, garlic, salt, and roasted shrimp paste until fine.
2. Heat 2 tablespoons of vegetable oil in a pan.
3. Add the pounded curry paste and stir-fry until fragrant.
4. Add the roasted peanuts and stir-fry until fragrant.
5. Turn off the heat and let it cool.
6. Store in an airtight container.
*Tips for Panang Curry Recipe
- Adjust the amount of chili peppers to your taste.
- You can toast the curry paste before pounding it for a more fragrant flavor.
- You can add other spices, such as star anise and cinnamon.
*Tips for Panang Curry with Beef Recipe
- For a richer flavor, choose beef with marbling.
- You can add other vegetables, such as eggplant or green beans.
- Adjust the amount of chili peppers to your taste.
## Details
- ⏲️ Prep time: 20 min
- 🍳 Cook time: 30 min
- 🍽️ Servings: 2
## Ingredients
- 500 grams of beef (chuck or sirloin)
- 1 carton (400 ml) of coconut milk
- 2 tablespoons of Panang curry paste
- 2 tablespoons of fish sauce
- 1 tablespoon of palm sugar
- 5 kaffir lime leaves
- 5 betel leaves
- 1 cup of basil leaves
- 2 red chili peppers
- 2 tablespoons of vegetable oil
- 1/2 teaspoon of salt
## Directions
1. Cut the beef into bite-sized pieces and rinse with water. Drain and set aside.
2. Coarsely chop the red chili peppers.
3. Wash the kaffir lime leaves, betel leaves, and basil leaves. Set aside.
4. Heat 2 tablespoons of vegetable oil in a pan.
5. Add the Panang curry paste and stir-fry until fragrant.
6. Add the beef and stir-fry until cooked.
7. Pour in the coconut milk and bring to a boil.
8. Season with fish sauce, palm sugar, and salt.
9. Add the kaffir lime leaves, betel leaves, and red chili peppers.
10. Simmer until the curry thickens.
11. Add the basil leaves and stir briefly.
12. Turn off the heat and serve with jasmine rice.
-
@ 45057918:92db0561
2024-03-25 08:28:06
## Chef's notes
**Panang Curry Recipe
Ingredients:
- 8 dried red chilies
- 1 tablespoon of coriander root
- 1 teaspoon of galangal
- 2 tablespoons of lemongrass
- 1 teaspoon of kaffir lime leaves
- 1 teaspoon of lime zest
- 1 teaspoon of cumin
- 1 teaspoon of coriander seeds
- 3 shallots
- 5 garlic cloves
- 1/2 teaspoon of salt
- 1/2 teaspoon of roasted shrimp paste
- 1 tablespoon of roasted peanuts
- 2 tablespoons of vegetable oil
Instructions:
1. Pound the dried chilies, coriander root, galangal, lemongrass, kaffir lime leaves, lime zest, cumin, coriander seeds, shallots, garlic, salt, and roasted shrimp paste until fine.
2. Heat 2 tablespoons of vegetable oil in a pan.
3. Add the pounded curry paste and stir-fry until fragrant.
4. Add the roasted peanuts and stir-fry until fragrant.
5. Turn off the heat and let it cool.
6. Store in an airtight container.
*Tips for Panang Curry Recipe
- Adjust the amount of chili peppers to your taste.
- You can toast the curry paste before pounding it for a more fragrant flavor.
- You can add other spices, such as star anise and cinnamon.
*Tips for Panang Curry with Beef Recipe
- For a richer flavor, choose beef with marbling.
- You can add other vegetables, such as eggplant or green beans.
- Adjust the amount of chili peppers to your taste.
## Details
- ⏲️ Prep time: 20 min
- 🍳 Cook time: 30 min
- 🍽️ Servings: 2
## Ingredients
- 500 grams of beef (chuck or sirloin)
- 1 carton (400 ml) of coconut milk
- 2 tablespoons of Panang curry paste
- 2 tablespoons of fish sauce
- 1 tablespoon of palm sugar
- 5 kaffir lime leaves
- 5 betel leaves
- 1 cup of basil leaves
- 2 red chili peppers
- 2 tablespoons of vegetable oil
- 1/2 teaspoon of salt
## Directions
1. Cut the beef into bite-sized pieces and rinse with water. Drain and set aside.
2. Coarsely chop the red chili peppers.
3. Wash the kaffir lime leaves, betel leaves, and basil leaves. Set aside.
4. Heat 2 tablespoons of vegetable oil in a pan.
5. Add the Panang curry paste and stir-fry until fragrant.
6. Add the beef and stir-fry until cooked.
7. Pour in the coconut milk and bring to a boil.
8. Season with fish sauce, palm sugar, and salt.
9. Add the kaffir lime leaves, betel leaves, and red chili peppers.
10. Simmer until the curry thickens.
11. Add the basil leaves and stir briefly.
12. Turn off the heat and serve with jasmine rice.
-
@ ccc8ee23:9f3d9783
2024-03-25 02:15:29
## Chef's notes
Easy to make and consists of basic ingredients like ripe bananas, flour, sugar, eggs, butter, and baking powder.
The cake has a tender crumb and a subtle banana aroma. It's often enjoyed as a simple and comforting dessert or snack, perfect for any occasion.
## Details
- ⏲️ Prep time: 10 min
- 🍳 Cook time: 40 min
## Ingredients
- 100gr Unsalted Butter
- 60gr Caster Sugar
- 2-3 Ripe Bananas
- 2 eggs
- Chocolate chips
- A pinch of salt
- 250gr Flours
- 1 teaspoon vanilla
- 1 teaspoon cinnamon
- 1/2 teaspoon baking powder
## Directions
1. Preheat your oven to 180°C (350°F) and grease a cake tin or line it with parchment paper.
2. Mix softened butter and caster sugar until light and fluffy using a hand mixer or a wooden spoon.
3. Add the eggs one at a time, beating well after each addition.
4. Add and stir Vanilla, Cinnamon and Mashed Bananas until well combined
5. Gradually fold in the sifted flour mixture into the wet ingredients until you have a smooth batter.
6. Pour the batter into the prepared cake tin and spread it evenly. Add chocolate chip and banana cuts on top.
7. Place the cake tin in the preheated oven and bake for approximately 30-35 minutes, or until a toothpick inserted into the center of the cake comes out clean.
8. Remove the cake from the oven and let it cool in the tin for about 10 minutes. Then, transfer the cake onto a wire rack to cool completely.
-
@ 3cea4806:10fe3f40
2024-03-25 00:42:07
## Chef's notes
The directions are for the Posh version.
For the Poor version, just drizzle honey mustard on the rice and enjoy.
Here's the video I made for this "dish":
https://www.youtube.com/watch?v=lKWIHYO_WSI
## Details
- ⏲️ Prep time: 5 min
- 🍳 Cook time: 5 min
- 🍽️ Servings: 1
## Ingredients
- rice
- honey mustard
## Directions
1. Get a tiny cup
2. Get a plate
3. Get rice
4. Get honey mustard
5. Top-up the the tiny cup with with rice
6. Cover that tiny cup with the plate then flip it
7. Wait 2 to 4 minutes until it stabilizes then remove the tiny cup
8. Drizzle a line of honey mustard near the rip of the plate (to make a quarter circle)
-
@ eeca201e:7246dbd5
2024-03-24 05:50:22
## Details
- ⏲️ Prep time: 10min
- 🍳 Cook time: 15min
- 🍽️ Servings: 12
## Ingredients
- 1/2 c. white Karo corn syrup
- 1/4 tsp. salt
- 10 large marshmallows exactly 10 or the consistency is off
- 2 cups coconut
- 1/2 tsp. vanilla
- roasted almonds
- 1 bag Ghiradelli milk chocolate chips
- 1g of distillate
## Directions
1. 1) In a heavy sauce pan (over medium-low on the stove) heat syrup, marshmallows, and salt until marshmallows are melted.
2. 2) Continue to stir over heat for an additional minute. Remove from stove.
3. 3) Add distillate, coconut, and vanilla.
4. 4) Stir well and transfer to a bowl to cool in the fridge. The mixture needs to get cool enough that it can be shaped into bars later on.
5. 5) In the meantime, melt the chocolate chips. I like to do this by putting them in a metal bowl and placing the bowl over a pot of boiling water. Stir until chocolate is melted and smooth.
6. 6) Once cool, shape the coconut mixture into small bars and press an almond into the top.
7. 7) Dip each one in chocolate then let cool on a chilled marble slap or on wax paper over a chilled cookie sheet.
-
@ 04222fa1:634e9de5
2024-03-23 23:48:44
## Chef's notes
Premade burgers are full of shite
Try plain mince with a pinch of salt pepper chilli powder. I guarantee they'll taste so much meatier
## Details
- ⏲️ Prep time: 5min
- 🍳 Cook time: 15min
- 🍽️ Servings: 2
## Ingredients
- 500g beef, salt, pepper, chilli powder
## Directions
1. Split into 4, smash, fry, enjoy
-
@ a80fc4a7:dc80ebd1
2024-03-23 22:48:19
## Chef's notes
You can replace the pepperoni with any meat or vegetables you like. Also I recommend Mexican blend shredded cheese.
## Details
- ⏲️ Prep time: 5
- 🍳 Cook time: 10
- 🍽️ Servings: 3
## Ingredients
- 10 uncooked tortillas
## Directions
1. To make these simply grab a pack of fresh tortillas (I recommend the cook yourself ones) heat them up in a pan till almost cooked. Add cheese and pepperoni (beat with the pepperoni minis) and fold in half and keep cooking till the cheese is melted and the tortillas are golden brown. Did in your favorite pepper sauce and enjoy!
-
@ 44dc1c2d:31c74f0b
2024-03-23 22:14:17
## Chef's notes
Recommend kosher salt for this recipe as it has a better flavor with the cream.
If you have foam, either skim the top or you can use a torch to get a glass smooth finish on the top.
## Details
- ⏲️ Prep time: 30 min
- 🍳 Cook time: 40 min
- 🍽️ Servings: 6
## Ingredients
- 2 cups heavy cream
- 10 tablespoons sugar, divided
- 1 vanilla bean (or 1 teaspoon vanilla extract)
- 4 large egg yolks
- 1/2 teaspoon vanilla extract
- 1/4 teaspoon kosher salt
- For the Brûlée topping:
- 4 tablespoons sugar (2 teaspoons per ramekin)
## Directions
1. Preheat oven to 325°F with a rack in the middle position: Arrange six 4-ounce ramekins in a 9x13 baking dish and set aside.
2. Prepare the vanilla bean: Split the vanilla bean in half and scrape out the seeds with the dull (non-cutting) side of a paring knife.
3. Warm the cream: In a medium saucepan, combine heavy cream, 4 tablespoons of the sugar, vanilla bean pod, vanilla bean seeds, and salt. Cook over medium heat, until it begins to simmer.
4. Infuse the cream: Once the cream begins to simmer, remove the pan from heat, cover, and let stand for 15 minutes to allow the vanilla bean to infuse into the cream. (If you’re replacing the vanilla bean with vanilla extract, skip this step.)
5. Separate the eggs and whisk with sugar: When your cream is almost done infusing, separate your eggs. Place the yolks in a medium-sized mixing bowl; save the whites for another purpose. Whisk the remaining 6 tablespoons of sugar into the yolks. (Don't combine the eggs and sugar too soon before you mix it with the warm cream because the sugar binds with the water in egg yolks, which constricts the proteins in yolks and creates eggy lumps. And you don't want eggy lumps in your custard!)
6. Temper the yolks and mix with the cream: While whisking the yolks continuously, slowly add one ladle (about 1/4 or 1/3 cup) of hot cream in a thin stream. Do this two or three more times. While whisking, slowly add the remaining cream to the egg mixture, followed by the vanilla extract. Strain the mixture through a fine mesh sieve into a second mixing bowl and discard the vanilla bean pod (this also helps strain out any small bits of egg that may have curdled).
7. At this point, the custard can be cooled and stored for up to 5 days. If you choose to bake them right from the fridge, you will probably need to add a couple of extra minutes.
8. Fill the ramekins: Divide the custard between the ramekins, filling each one just up to the inner rim, or about three-quarters of the way full.
9. Fill the hot water bath: Bring a kettle or pot of water to a boil. Fill the pan with the hot water until the water comes about two-thirds of the way up the side of the ramekins. Avoid splashing water into the custards.
10. Bake the custards: Transfer the pan with the custards to the oven and bake for 38 to 40 minutes. When ready, the crème brûlée should have a uniform jiggle in the middle; when you touch the center, it should spring back just a bit. If the sides hold firm but the center sloshes, they aren’t quite done yet. If they are set like Jell-O, they’ve overbaked, although they will still be delicious! Chill them, brûlée them, eat them, love them and celebrate your efforts. If they have overbaked to the point that they look risen in the center, toss them, start again
11. Cool and chill the custards: Remove the baking dish with the finished custards from the oven and set on a wire cooling rack. Let the custards cool in the water until you can safely pick up the ramekins by the rim with your fingers. This should take about 15 minutes, depending on how tender your fingers are. (Mine are like asbestos, so I tend to go in rather quickly.) Once removed from the water bath, let each custard rest on the cooling rack for about 15 more minutes. Use a spoon to skim any bubbles off the top, then cover each ramekin with plastic wrap and store in the fridge. Chill for at least 4 hours, or up to 4 days, before serving.
12. Brûlée the custards: When ready to serve, remove the custards from fridge. Sprinkle the surface of each custard evenly with about 1 teaspoon of granulated sugar. Rotate the custard as you sprinkle to make sure the sugar evenly coats the surface. Ignite your torch. Hold the flame about 4 inches from the surface of the sugar. Using a circular motion, move the flame across the surface. The sugar will at first begin to bead up, and then will eventually solidify into a hard sugar crust. You want to make sure all the sugar granules have melted, and the sugar has at least a tint of caramel color. The longer you torch the surface, the darker it will become and the more bitter the sugar crust will be. Sprinkle each of the custards with an additional teaspoon of sugar and brûlée the surface again.
-
@ 56549c3c:1083acaf
2024-03-23 21:19:11
## Chef's notes
- Adapted from Silvana Nardone's *Cooking for Isaiah*
- Baking may be "science" but spices are a matter of flavor. I often add cloves or allspice, and may add more ginger or pumpkin pie spice as the mood strikes.
- If the two baking sheets cannot fit side-by-side and are on racks above one another, the cookies may take a bit longer to cook.
## Details
- ⏲️ Prep time: 10 min
- 🍳 Cook time: 10 min
- 🍽️ Servings: 10-15 cookies
## Ingredients
- 1.5 cups Gluten-free all-purpose flour (I used King Arthur's)
- 2tbs Unsweetened cocoa powder
- 1tbs Ground ginger
- 1tsp Pumpkin Pie Spice
- 1.5tsp Baking powder
- .5tsp Baking Soda
- .5tsp Salt
- .5 cup Vegetable Oil
- .5 cup Packed light brown sugar
- 3tbs Unsulfured Molasses
## Directions
1. Preheat Oven to 350° F
2. Line two baking sheets with parchment paper
3. Whisk together flour, cocoa powder, ginger, pumpkin pie spice, baking powder, baking soda, and salt.
4. In a large bowl, whisk together oil and sugar until thoroughly mixed, then whisk in egg and molasses.
5. Fold in the flour mixture with a rubber spatula until just combined (so you can't see any flour streaks).
6. Using a rounded tablespoon, drop mounds of batter on the baking sheets, spaced evenly apart.
-
@ 3bf0c63f:aefa459d
2024-03-19 13:07:02
# Censorship-resistant relay discovery in Nostr
In [Nostr is not decentralized nor censorship-resistant](nostr:naddr1qqyrsdmpxgcrsepeqyghwumn8ghj7enfv96x5ctx9e3k7mgzyqalp33lewf5vdq847t6te0wvnags0gs0mu72kz8938tn24wlfze6qcyqqq823c4n8rw6) I said Nostr is centralized. Peter Todd thinks it is centralized by design, but I disagree.
Nostr wasn't designed to be centralized. The idea was always that clients would follow people in the relays they decided to publish to, even if it was a single-user relay hosted in an island in the middle of the Pacific ocean.
But the Nostr explanations never had any guidance about how to do this, and the protocol itself never had any enforcement mechanisms for any of this (because it would be impossible).
My original idea was that clients would use some undefined combination of relay hints in reply tags and the (now defunct) `kind:2` relay-recommendation events plus some form of manual action ("it looks like Bob is publishing on relay X, do you want to follow him there?") to accomplish this. With the expectation that we would have a better idea of how to properly implement all this with more experience, Branle, my first working client didn't have any of that implemented, instead it used a stupid static list of relays with read/write toggle -- although it did publish relay hints and kept track of those internally and supported `kind:2` events, these things were not really useful.
[Gossip](https://github.com/mikedilger/gossip) was the first client to implement a [truly censorship-resistant relay discovery mechanism](https://mikedilger.com/gossip-relay-model.mp4) that used NIP-05 hints (originally proposed by [Mike Dilger](nprofile1qqswuyd9ml6qcxd92h6pleptfrcqucvvjy39vg4wx7mv9wm8kakyujgua442w)) relay hints and `kind:3` relay lists, and then with the simple insight of [NIP-65](https://nips.nostr.com/65) that got much better. After seeing it in more concrete terms, it became simpler to reason about it and the approach got popularized as the "gossip model", then implemented in clients like [Coracle](https://coracle.social) and [Snort](https://snort.social).
Today when people mention the "gossip model" (or "outbox model") they simply think about NIP-65 though. Which I think is ok, but too restrictive. I still think there is a place for the NIP-05 hints, `nprofile` and `nevent` relay hints and specially relay hints in event tags. All these mechanisms are used together in [ZBD Social](nostr:naddr1qqyxgvek8qmryc3eqyghwumn8ghj7enfv96x5ctx9e3k7mgzyqalp33lewf5vdq847t6te0wvnags0gs0mu72kz8938tn24wlfze6qcyqqq823chekfst), for example, but I believe also in the clients listed above.
I don't think we should stop here, though. I think there are other ways, perhaps drastically different ways, to approach content propagation and relay discovery. I think manual action by users is underrated and could go a long way if presented in a nice UX (not conceived by people that think users are dumb animals), and who knows what. Reliance on third-parties, hardcoded values, social graph, and specially a mix of multiple approaches, is what Nostr needs to be censorship-resistant and what I hope to see in the future.
-
@ 1cb14ab3:95d52462
2024-03-13 13:13:28
## Chef's notes
Chicken can be substituted by assorted mushrooms and tofu.
Sichuan chilli bean pastes can be substituted by tomato paste or fresh tomatoes.
Pixian chilli bean paste 郫县豆瓣酱 Pí xiàn dòubàn jiàng
Light soy sauce 生抽 Shēng chōu
Cooking wine 料酒 Liàojiǔ
Vegetable oil 植物油 zhíwùyóu
Salt 盐 Yán
Sugar 糖 Táng
Recipe is originally credit of: https://thehutong.com/xinjiang-big-plate-chicken-xinjiang-dapan-ji/
## Details
- ⏲️ Prep time: 30 minutes
- 🍳 Cook time: 1 hour
- 🍽️ Servings: 4
## Ingredients
- 2 big chicken thighs or 1 whole chicken
- 3 medium-size potatoes
- 1 medium-size green chilli pepper
- 1 medium-size red chilli pepper
- 1 small yellow onion
- 10g ginger
- 5-8 cloves of garlic
- 2 tbsp of Sichuan chilli bean paste
- 1tsp of salt or salt for taste
- 1tsp of sugar or sugar for taste
- 1 tbsp of cooking wine
- 2 tbsp of light soy sauce
- 1tbsp of dark soy sauce
- 2-3 tbsp of vegetable oil
- 250g wide noodle
- 1L Chicken/vegetable stock/water (or enough to cover ingredients)
- 10 pieces of dried chilli pepper
- 1 tbsp of Sichuan peppercorn
- 1 cinnamon bark
- 2 pieces of star anise
- 2 pieces of bay leaves
- a small pinch of white pepper powder
## Directions
1. Wash the chicken and cut into bite-size pieces. Cut the potatoes and chilli pepper into small pieces about bite-size. Slice the ginger, onion & crush the garlic.
2. Heat 2-3tbsp of oil in a wok with low heat and add sugar in. When sugar is getting melted, add the chicken to stir fry quickly till the chicken meat tight and dried. Add the Sichuan peppercorn, dried chilli. star aniseed, cinnamon, bay leaves, garlic, ginger, onion to fry till fragrance.
3. Put Sichuan chilli bean paste, light soy, dark soy, cooking wine and mix well. Add water/ stock to boil and cover it and simmer it for about 3 min. and then mix the potatoes well in, (make sure all the potato and chicken will be merged in the water/stock) check-in between and stir a bit in while the liquid is reducing.
4. Get a fork to check the potato, if it could get through easily. They are cooked and add the bell pepper to fry about another 3 minutes till the liquid thicken up. Give a taste and adjust the flavour for saltiness. Serve with noodles, rice or bread.
-
@ d7607464:421e573a
2024-03-12 21:40:20
## Chef's notes
## Details
- ⏲️ Prep time: 0 min
- 🍳 Cook time: 5 min
- 🍽️ Servings: 1
## Ingredients
- 3/4 cup Raw Milk
- 1 tbsp Dutch-Processed Cocoa
- 1 tbsp Cane Sugar, to taste
- 1 tbsp Raw Unfiltered Honey, to taste
## Directions
1. Heat milk in a pot until steaming.
2. Whisk in cocoa, sugar, and honey.
3. Serve hot.
-
@ d4338b7c:f1d23a5b
2024-03-07 16:42:42
## Chef's notes
Absinthe rinse
10 Dashes Peychauds bitters
1/2 tsp Demarara or simple syrup
2oz Rye (usually Sazerac 6 year)
Stirred. Served up in a rocks glass. Luxardo cherry 🍒 and a lemon expression as garnish.
## Details
- ⏲️ Prep time: 5
- 🍳 Cook time: 5
- 🍽️ Servings: 1
## Ingredients
- Peychauds bitters
- Demarara
- Luxardo cherry
- Lemon
- Rye whiskey
- Absinthe
## Directions
1. 10 Dashes peychauds into mixing glass
2. 1/2 tsp demarara
3. 2oz Rye
4. Add ice cubes to fill mixing glass
5. Stirring for 15-30 seconds
6. Rinse the desired glass with absinthe. A barspoon amount will do.
7. Strain into said absinthe rinsed glass.
8. Droo a Luxardo cherry in it
9. Express a lemon peele into the glass
10. Cheers 🍻
-
@ 06a5736d:9993b167
2024-03-07 09:44:42
## Chef's notes
I found the recipe on BBC recipes, should be the first one to pop up if you google easy banana bread recipe.
## Details
- ⏲️ Prep time: 15-20min
- 🍳 Cook time: 40-50min
- 🍽️ Servings: 4-8 (depending on portion size). I also didn’t bake this in the usual bread tin, I used a semi deep oven dish as that’s all I had.
## Ingredients
- 140g unsalted butter
- 140g caster sugar (I only put 90g as it was for the kids but you can tweak it to your liking)
- 2large eggs
- 1tsp baking soda
- 140g self raising flour
- 1tbs cinnamon powder
- 1tsp vanilla extract
- 1 cup fresh blueberries
- 3 ripe bananas
## Directions
1. Beat the butter and sugar until a paste is formed
2. Add in 2 beaten eggs and mix together
3. Gently add the flour and baking soda bit by bit whilst mixing it all well
4. Once combined, add in your cinnamon and vanilla
5. Add in your washed blueberries
6. Mash the bananas well and add to mixture.
7. Fold the mixture until well mixed together and set aside
8. Preheat oven to 180c
9. Butter your dish and line with parchment paper ( I didn’t have this available so I covered it with butter and then added flour all around to prevent it from sticking. Works just the same)
10. Once oven is heated up, carefully place the dish into the middle and bake for 40-50min. Make sure to check after 30min as every oven is different.
11. Once cooked, remove from oven and let it cool for 10mins before removing from dish (this is to prevent it from falling apart)
12. Last step. Cut a slice and enjoy on it’s own or how I did, with some yummy custard
-
@ 50809a53:e091f164
2024-03-05 12:33:57
## Chef's notes
Note 1. Aquafaba is just the liquid from a can of chickpeas. If you don’t have canned chickpeas or are allergic, use 2 flax eggs: mix 2 TBSP ground flaxseed meal with 5 TBSP water. Stir and let sit for 15 minutes to thicken. The banana bread won’t be as fluffy though.
Note 2: If using brown sugar, lightly pack it. If choosing between light and dark brown sugar, I like the dark variety for a deeper molasses flavor; the bread will be darker in color too. If you are limiting your sugar intake, you can use less sugar, as little as 1/4 cup (about 38g) with still pretty good results.
Note 3: Since this is a simple ingredient list, try to use real vanilla extract, not the imitation stuff, as you will taste the difference.
Note 4. If not using a measuring scale to weigh ingredients, please spoon and level your flour so you don’t overmeasure. More info in the Tips section of the blog post.
Note 5: Don’t just insert a toothpick vertically down into the bread. Instead, insert it at an angle, which is a much better test for doneness in a tall cake.
## Details
- 🍳 Cook time: 50 min
- 🍽️ Servings: 10
## Ingredients
- 6 tablespoons (90 mL) aquafaba (see Note 1)
- 3 medium-sized very ripe bananas, (optional, 1 ripe banana for decoration)
- 1/4 cup + 2 tablespoons (90 mL) oat milk, or plain-flavored plant-based milk of choice
- 1 tablespoon lemon juice
- 1/3 cup (75g) sunflower oil, olive oil, or any neutral-tasting oil
- 3/4 cup (115g) organic brown sugar or coconut sugar (see Note 2)
- 1 teaspoon pure vanilla extract (see Note 3)
- 2 cups (240 to 250g) all-purpose flour, spooned and leveled (see Note 4)
- 1/4 teaspoon sea salt
- 1 teaspoon baking soda
- 3/4 teaspoon ground cinnamon
## Directions
1. Preheat the oven to 350°F/176°C. Arrange a rack in the bottom third of the oven. Line a 9×5-inch (23×13 cm) loaf pan with parchment paper, letting the excess hang over the long sides to form a sling.
2. Pour the aquafaba into a medium bowl. Using a handheld electric mixer, whip the aquafaba on medium speed for 45-60 seconds until uniformly foamy.
3. Wipe out the bowl used for the aquafaba. Add the three bananas to the bowl and mash with a fork until smooth and no lumps remain (or, for a more rustic banana bread, leave a few chunks in). FYI: the 3 mashed bananas should weigh around 300g.
4. Stir the lemon juice into the oat milk and set aside. This is the vegan "buttermilk."
5. In a large mixing bowl, add the sugar and oil. Mix using the electric mixer or a whisk until well combined.
6. Add the whipped aquafaba and mix until well incorporated. Add in the vegan "buttermilk" and vanilla and mix until smooth. Add the mashed bananas and mix until well incorporated.
7. Add the flour, salt, baking soda, and cinnamon to the wet ingredients. Switch to using a silicone spatula (if you don’t have one, use a large wooden spoon). Gently stir until the ingredients are just barely combined. It’s okay if you can see a few traces of flour.
8. Pour the batter into the prepared loaf pan and smooth out the top of the batter using a spatula or spoon.
9. For the optional decoration, keep the peel on the reserved banana and slice it in half, lengthwise; then peel the banana. Sprinkle a little coconut sugar or brown sugar on the cut/interior sides of the banana. Gently arrange the bananas on top the batter, sugared side side up. NOTE: This might create a dome in the middle of the bananas, where the batter bunches up in the middle. Use a spoon to move some of the batter around the pan so that the bread doesn’t bake unevenly.
10. Bake in the preheated oven for 45 to 55 minutes. Since every home oven differs, I like to start checking at 45 minutes. The banana bread is done when a toothpick inserted into the center top at a slight angle comes out a few moist crumbs (see Note 5). If there's runny batter, it needs more time.
11. Transfer the pan to a wire rack and cool for 10 minutes. Then remove the bread from the pan and cool on the rack for at least 20 to 30 minutes before slicing (the bread is still cooking and setting up, so don't slice too early).
12. To store, place completely cooled banana bread in an airtight container or wrap tightly in plastic and leave on the counter for 2-4 days (if using decorative banana topping, the topping a will start to brown after day 1). You can also freeze the banana bread. If you freeze the whole loaf, allow it to defrost on the countertop for 2-3 hours. If you freeze individual slices, defrost on the countertop for 20-30 minutes.
-
@ 52387c6b:49dbdfb2
2024-02-28 01:38:42
## Chef's notes
Not a healthy snack by any means but sometimes you just have too.
## Details
- ⏲️ Prep time: 1
- 🍳 Cook time: 0
- 🍽️ Servings: 1
## Ingredients
- 1 Bag of Chips
- 1 Bottle of Wooster
- 1 Bowl
- Many Beers
## Directions
1. Open Chips
2. Pour chips into bowl
3. Add Wooster to taste
4. Now savour the flavour
-
@ e9905f7e:e31bfdf9
2024-02-27 02:33:31
## Chef's notes
The recipe is very flexible, so you can treat the ingredients as guidelines. It is easy to scale as well, depending on your needs.
To save time, you can just buy a rotisserie chicken and shred it yourself. Although preparing your own chicken is hard to beat in my experience. The prep time will vary depending on which chicken you choose: rotisserie vs cooked-at-home. Furthermore, the cooked-at-home chicken doesn't need to be complicated. Just some butterflied chicken breast, salt and pepper on all sides, baked for 25 minutes at 425F.
This dip pairs well with pita chips or bagel chips.
## Details
- ⏲️ Prep time: 10 min - 35 min
- 🍳 Cook time: 1 hour
- 🍽️ Servings: 6
## Ingredients
- 16 oz of shredded cheddar
- 8oz of cream cheese
- 1/2 cup of ranch dressing
- 1/2 bottle for Frank's RedHot Buffalo Sauce
- 3/4 lbs of shredded chicken
## Directions
1. Combine ingredients in crock pot.
2. Turn heat on high.
3. Stir occasionally.
4. Once it just begins to bubble turn heat to low.
-
@ 341db5a7:4c4fc2ef
2024-02-18 20:44:00
## Chef's notes
This recipe focuses on the chicken and sauce, not the buns. So make sure to get quality buns, or make your own. I like a brioche bun from my local bakery but choose whatever buns you like. Toppings are optional but I like to use blue cheese crumbles and fresh kosher dill pickle slices. You may prefer ranch dressing and lettuce, you're the Earl of this sandwich!
## Details
- ⏲️ Prep time: 1 hour 30 minutes
- 🍳 Cook time: 30 mins
## Ingredients
- SAUCE:
- 1 cup Franks Red Hot or Louisiana style hot sauce
- 1 cup butter
- CHICKEN BREADING:
- 2 eggs
- 1/4 cup milk
- 2 cups flour
- 2 heaping tablespoons Tony's or other Cajun style seasoning
- CHICKEN BRINE:
- 4 cups pickle juice
- THE MAIN EVENT:
- 4 large chicken breasts
- Pan of frying oil of choice
- Sliced Kosher dills
- Blue cheese crumbles
## Directions
1. The day before you make your chicken sandwiches, brine the 4 chicken breasts in the 4 cups of pickle juice. It'll be perfectly seasoned after an overnight soak.
2. Make your sauce by combining the butter and hot sauce over medium low heat until it just starts to simmer, then remove from heat and cover. Traditionally, Frank's Red Hot is used, but you can use literally any sauce you like to combine with the butter.
3. Start heating your pan of oil on medium high heat until it is a good frying temperature.
4. While the oil is heating up, prep your breading station. We will be doing wet-dry-wet-dry battering. Remove the chicken breasts from the brine, and allow to briefly drip dry before tossing them in the flour and cajun seasoning mix. Then dip them in the beaten egg and milk solution. Toss in flour again, and set them on a rack until the breading is mostly dry.
5. When the oil comes to temp, lower the chicken breasts into it and cook roughly 7 minutes, or until the outside is a golden brown. Use a food thermometer to make sure the internal temp is 165°F (74°C) if you're a sissy.
6. Allow the chicken breasts briefly while you toast the buns on a pan.
7. After the breasts have rested for a couple minutes, toss them in the still hot Buffalo sauce mixture.
8. Now you are ready to plate, serve the chicken breasts with crumbled blue cheese and pickle slices on an open faced bun. You may prefer other dressings, but blue cheese and pickles is the way.
-
@ 341db5a7:4c4fc2ef
2024-02-16 18:50:51
## Chef's notes
The first section of ingredients is for the crust, then the toppings, then the sauce. Best to prep the sauce the day before and let it cool completely before topping the pizza.
Experiment with different toppings like diced pepperoni or black olives. Feel free to substitute different sauces, but remember not to go too expensive with your ingredients or you risk ruining the authenticity of the school cafeteria lunch experience!
## Details
- ⏲️ Prep time: 1 hr 30 min
- 🍳 Cook time: 25 min
- 🍽️ Servings: 8
## Ingredients
- 2-2/3 cup flour
- 3/4 cup powdered milk
- 2 T sugar
- 1 package quick rise yeast
- 1 tsp salt
- 1-2/3 cup warm water (110-115)
- 2 T vegetable oil
- TOPPINGS
- 1/2 lb Italian sausage
- 1/2 lb ground chuck
- 1/2 tsp pepper
- 1/2 tsp salt
- 1 (8oz) block mozzarella cheese (use imitiation cheese shreds for more authentic school cafeteria experience)
- SAUCE
- 1 (6oz) can tomato paste
- 1 1/2 cups water
- 1/3 cup olive oil
- 2 cloves garlic minced (use garlic powder for authenticity)
- 1 t salt
- 1 tsp pepper
- 1/2 T dried oregano
- 1/2 T dried basil
- 1/2 t dried rosemary
## Directions
1. Make Sauce the night before by combining ingredients in sauce pan, bringing to a low simmer, and removing from heat until cool.
2. Crust: Preheat oven to 475. Spray 18 x 13 sheet pan with Pam and lay parchment paper down. Add flour, powered milk, sugar, yeast, and salt to a large bowl. Whisk to blend. Add oil to warm water. Pour into flour mixture. Stir with a wooden spoon until batter forms. Don’t worry about lumps - you just want no dry spots. Spread dough onto sheet pan with fingertips until even. If the dough doesn’t want to cooperate then let it rest for 5 min and try again. Bake just the crust for 8 to 10 min. Remove from oven and set aside.
3. filling: Brown meats (add salt and pepper) until it resembles crumbles. Drain, set aside. Get out sauce.
4. To partially baked crust assemble: Spread sauce all over crust. Sprinkle meats. Sprinkle cheese. Bake at 475 for 8 to 10 min. Until cheese starts to brown. Let stand 5 min, cut into slices and serve.
-
@ 3f7d1a20:bb856f90
2024-02-08 13:20:26
## Details
- ⏲️ Prep time: 1
- 🍳 Cook time: 2
## Ingredients
- lemon
- salt
- mineral water
## Directions
1. juice the lemon
2. add salt and mix ( according to your taste )
3. add the mineral water
4. done, enjoy!
-
@ 3f7d1a20:bb856f90
2024-02-07 13:40:51
## Details
- ⏲️ Prep time: 5 mins
- 🍳 Cook time: 20 mins
## Ingredients
- rice
- olive oil
- butter
- arpa şehriye
- water ( hot water )
- chicken broth
- salt
## Directions
1. rinse the rice
2. add the olive oil and butter to the pot
3. add the şehriye and stir until light brown
4. add the rice, chicken broth, water and salt, stir
5. put on the lid and turn to low heat
6. turn off the heat and put a paper towel on top to absorb excess moisture
7. wait for about 10 mins and done
-
@ 1d6a020c:6e9cf203
2024-02-02 21:40:35
## Chef's notes
This is a mashup of research done online combined with a couple years of personal experience. The pictutes are in chronological order and correspond to the steps in the recipe.
## Details
- ⏲️ Prep time: 4 days
- 🍳 Cook time: 0 minutes
- 🍽️ Servings: 1
## Ingredients
- Turmeric plant
## Directions
1. When the leaves turn bown, or new shoots start coming up, it's time to harvest (usually Jan-Feb)
2. Dig up the big stuff and replant any sprouts that are coming up
3. Trim off any small roots and get most of the dirt out. Don't worry if they're not totally clean, we'll get to that later
4. Break apart the rhyzomes and cut off any little bits. They're immature and won't make good turmeric powder
5. Peel off the outer laer to reveal that beautiful orange color
6. Once peeled, give them a final wash. This is where getting the dirt off actually matters
7. Finely grate the turmeric
8. Spread out on a cutting board, cookie sheet, plate or some other flat surface and set aside to dry
9. After a day or two, move the partially dried turmeric around so it dies more quickly and easily, repeat until it feels dry
10. Put the dried turmeric into a spice grinder (aka, coffee grinder). A blender can work if that's all you have. This will make a nice fine powder. The powder will likely not feel entirely dry. Lay it out on your horizontal surface again for a few days to dry. Repeat drying/grinding until it's dry.
11. Bottle it up and enjoy
-
@ 2448a66f:838296c9
2024-01-19 11:23:42
## Chef's notes
สูตรขนมกุยช่ายสำหรับทานแบบนึ่ง สูตรนี้ปั้นลูกขนาดพอดีคำได้ 25 ลูก
## Details
- ⏲️ Prep time: 30 นาที
- 🍳 Cook time: 30 นาที
- 🍽️ Servings: 4
## Ingredients
- แป้งมัน 50 กรัม
- แป้งข้าวเจ้า 25 กรัม
- แป้งท้าวยายม่อม 10 กรัม
- กุยช่าย 200 กรัม
- น้ำเปล่า 200 กรัม
- น้ำมันพืช 50 กรัม
- เกลือ 1 หยิบมือ
- เบกกิ้งโซดา 1 หยิบมือ
## Directions
1. เทน้ำเปล่าลงไปผสมกับแป้งมัน แป้งข้าวเจ้า แป้งท้าวยายม่อม เกลือ คนจนส่วนผสมเข้ากัน ระวังอย่าให้แป้งเป็นก้อน
2. ใส่กุยช่าย น้ำมันพืชและ เบกกิ้งโซดา ลงไปผสมกับแป้ง และขย้ำจนกว่าน้ำแป้งจะเปลี่ยนเป็นสีเขียวเล็กน้อย เพื่อให้กลิ่นของกุยช่ายระเหยออกมา และทำให้กุยช่ายนิ่มลง
3. ตั้งกระทะบนเตา ใช้ไฟอ่อน เทส่วนผสมที่เราผสมไว้ลงไป กวนจนแป้งใส จับตัวเป็นก้อน ไม่ติดกระทะ
4. ปั้นแป้งขนาดพอดีคำ หรือจะกดให้เป็นแผ่นก็ได้ ตามใจชอบ
5. ระหว่างปั้นแป้งเป็นก้อน ให้ต้มน้ำเตรียมนึ่ง ใส่ใบเตยลงไปในน้ำ เพื่อเพิ่มความหอม
6. เมื่อน้ำเดือดได้ที่ นำแป้งที่ปั้นไว้ลงไปนึ่งประมาณ 10 นาที จนแป้งใส จากนั้นตั้งขึ้นพักให้อุ่น พร้อมเสิร์ฟ
-
@ 9810d9af:b3f2bf82
2024-01-18 06:33:53
## Chef's notes
## Details
- ⏲️ Prep time: 60
- 🍳 Cook time: 30
- 🍽️ Servings: 4
## Ingredients
- 1 pound lean ground pork
- 1¹/² cups finely chopped onions
- 1½ cups finely chopped chayote squash or sweet potato
- 1½ cups finely chopped jicama (or other root veg)
- 2 tablespoons minced garlic
- 1 tablespoon soy sauce
- 1 tablespoon ground black pepper
- 50 lumpia or spring roll wrap (about 7"x7")
- Hot chilli in oil is optional
- Plum sauce is favourite dip
- 1 large egg
- Generous pinch of sea salt
- 2 tablespoons oyster sauce
- ¹/² cup bread crumbs
## Directions
1. In a large bowl or pot, blend all ingredients together mixing in with the ground meat throughly. Add bread crumbs as needed to thicken into a good paste.
2. Have a small dish on the side for dipping finger tips in water. Set up a work station with large cutting board or smooth surface. Set up the wraps by having them thawed from frozen and transferring them from packaging to a plate with a damp paper towel over pile of sheets. This will keep them fresh and prevent hardening too early.
3. Pour some warm water onto a plate and add a dash of flour or cornstarch to mix in, creating a kind of glue for your lumpia wraps!
4. Now the fun part! - Splash some water ("glue" mix) onto your clean, flat surface.
5. Carefully separate 2 sheets of wraps and place flat on the watered surface (in a diamond shape ideally)
6. Using a fork or spoon, scoop up about 1.5 table spoons of your meat/veg/spice mix into the center of the wrap. Try to create a 3" x 1" shape that is long left to right and form it solid and uniform as possible
7. Lift the bottom corner (nearest to you) of the wraps and fold over the meat, tucking under meat as tightly as possible.
8. Roll wrap and meat together about half way, fold in the sides. (you might need to splash more water on the corners or in folds if you find it is not sticking, be careful though bc it can over saturate and then your are F'd.
9. Complete the rolling and follow through while trying to keep sides near and secure. Some times I toss some flour in and around the final corner to add more stickiness.
10. Lay the completed rolled piece in a tupperware container and continue until you have amount desired.
11. *IT GETS EASIER AS YOU DEVELOP YOUR OWN TECHNIQUES, be patient and take your time.
12. Preheat your over/oil/airfryer Whip up an egg in a bowl and add a dash of milk or cream. Add pinch of salt and stir.
13. Spread some parchment paper on a strong baking sheet, spray with cooking spray.
14. brush all sides and around both end folds of each roll with generous coating of egg wash
15. Place on greased pan if oven baking (this is easiest and yields about 18-20 pieces quickly)
16. Bake uncovered, in oven, and on middle rack @400°F for about 15 min. Then turn all pieces over and bake for about another 15min.
17. Once all pieces are golden brown and crispy, remove from oven and transfer to a wire cooling rack.
18. Dipping sauce is whatever you like, but plum sauce is most appealing along with a hot chilli paste. Also can simply serve chopped on sticky rice.
19. If freezing pieces raw then do so quickly after rolling them. For best freezer storing results, lay them out separately when you put in freezer to grab a few at a time in order to keep them from blocking together.
-
@ ee0be83f:c260a740
2024-01-16 21:07:47
## Ingredients
- test
## Directions
1. test
-
@ cb084639:2f16502a
2024-01-15 12:55:53
## Chef's notes
Bone broth 🦴 นั้นจะพูดให้ง่ายมันก็คือน้ำซุปต้มกระดูกสัตว์นั่นเอง สามารถใช้ได้ทั้งกระดูกไก่ หมู วัว ส่วนที่นอกจากนี้ยังไม่รู้จะหาได้จากตลาดหรือไม่ 555 ในที่นี้ที่จะมาทำกันเป็นกระดูกที่หาได้ง่ายตามตลาดทั่วไป หรือจะตามห้างสรรพสินค้า คือกระดูกหมูนั้นเอง 🐖 เอาแบบที่เป็นกระดูกจริงๆ ราราประมาณ 40 บาทต่อ 1กิโลกรัมเท่านั้นเอง การทำ bonebroth นั้นต้องเป็นการต้มด้วยไฟอ่อนเป็นระยะเวลานาน 12ขึ้นไป -24 ชั่วโมง เพื่อให้สารอาหารที่อยู่ในกระดูกละลายออกมาอยู่ในน้ำซุปของเรา ซึ่งเราคงสงสัยกันแล้วใช้มั้ยว่าเราจะทำเจ้า bonebroth กันทำไม bonebroth นั้นกินได้ทุกวัยและกินได้ทุกวัน มีสารอาหารหลายชนิดช่วยบำรุงร่ายกาย และยังเหมาะกับผู้สูงวัยที่อาจจะรับสารอาหารไม่เพียงพอด้วย การกินก็ง่ายๆคือนำมาซดเป็นน้ำซุปเลย หรือจะนำมาเป็นส่วนประกอบในเวลาปรุงอาหารก็ได้ครับ มันจะมีเรื่องหม้อแรงดันอีกถ้าใครมีมันจะช่วยทุ่นเวลาให้เราลงมาอีกครึ่งเลยครับ
## Details
- ⏲️ Prep time: 10 min
- 🍳 Cook time: 12-24 hour
- 🍽️ Servings: 4
## Ingredients
- กระดูกหมู 1.5 kgs.
- น้ำสะอาด 1 หม้อ เบอร์ 28
- เกลือชมพู 1ช้อนชา
## Directions
1. นำกระดูกหมูล้างให้สะอาดมาต้มให้เดือดแล้วทิ้งน้ำไปก่อน 1 รอบ
2. ล้างกระดูกแล้วนำมาต้มในน้ำใหม่ไฟกลางถึงอ่อนยาว 12-24 ชม.
3. เติมเกลือชมพู
4. ถ้ายังไม่ถึงเวลาแล้วน้ำแห้ง เติมได้ตามความเหมาะสม
5. รอจนครบเวลาก็จะได้ bonebroth ไว้กินแล้วครับ
-
@ 341db5a7:4c4fc2ef
2024-01-15 05:05:23
## Chef's notes
I like to fry catfish for friends and family, and sometimes I fry too much. Reheated fried food isn't great, but this is an amazing way to reinvent leftover fried catfish filets as a hearty curry dish. Feel free to substitute for whatever fried fish you have, and of course try different combination of veggies and curries. You can also fry your fish just before cooking, but it actually works better with cold filets, as they break down less in the sauce. Serves well over long grain rice, but Jasmine rice works great too!
## Details
- ⏲️ Prep time: 30mins
- 🍳 Cook time: 30mins
- 🍽️ Servings: 6-8
## Ingredients
- 1 yellow onion
- 1 bell pepper
- 2 carrots
- 1/2 cup shredded cabbage
- 6oz sliced mushrooms
- 1 stalk celery
- 2tbs garlic ginger paste
- 1/4 cup coconut oil
- 1 can coconut milk
- 5 tlbs curry powder
- 1 lbs leftover fried catfish filets
- salt and pepper to taste
## Directions
1. chop all veggies to desired thickness for stir frying
2. heat coconut oil in wok or large skillet
3. add garlic ginger paste and cook til light brown and aromatic
4. add veggies sliced carrots, cook 1 min
5. add bell pepper, cook 1 min
6. add onion, cook 1 min
7. add celery, cook 1 min
8. add mushrooms, cook 1 min
9. add cabbage, cook until all veggies are almost soft
10. add coconut milk and curry powder and cook until boiling
11. add salt and pepper to taste
12. add your leftover catfish. bring back to a boil
13. cook 10 mins. stir cautiously at this point, as your fish filets may break down.
14. serve over rice
-
@ 8d9d2b77:86dd65fa
2024-01-14 20:49:18
## Chef's notes
When I make this creamy taco soup, I don't really measure anything, so this will be approximate measurements. The recipe is very forgiving, and you can add or delete to your taste. The cream cheese is the key ingredient to make this soup creamy, and in my opinion the cilantro is a must.
## Details
- 🍳 Cook time: 30 minutes
- 🍽️ Servings: 8
## Ingredients
- 2-3 lbs ground beef
- 1 whole onion
- 1 head of fresh garlic
- 2-3 8oz packages cream cheese, depending on your taste
- Beef bouillon, 2-3 cubes
- Chili powder to taste
- Salt and pepper to taste
- Cumin to taste
- Cayenne pepper, optional
- Fresh cilantro to taste
- I can fire roasted, diced tomatoes
## Directions
1. In a large cookpot, brown meat.
2. Add onions and garlic, simmer for 5 mins
3. Add diced tomatoes and cream cheese.
4. Add all seasonings
5. Add cream cheese, allow to melt and stir.
6. At this point you might want to add a bit of water or milk, depending on how thick you want the soup.
7. Let simmer for 10 min.
8. Add cilantro and let it wither, about 3 mins
9. Thats it! If you wish, you can top with shredded cheese or avocado.
-
@ 3bf0c63f:aefa459d
2024-01-14 13:55:28
# There's a problem with using Git concepts for everything
We've been seeing a surge in applications that use Git to store other things than code, or that are based on Git concepts and so enable "forking, merging and distributed collaboration" for things like blogs, recipes, literature, music composition, normal files in a filesystem, databases.
The problem with all this is they will either:
1. assume the user will commit manually and expect that commit to be composed by a set of meaningful changes, and the commiter will also add a message to the commit, describing that set of meaningful, related changes; or
2. try to make the committing process automatic and hide it from the user, so will producing meaningless commits, based on random changes in many different files (it's not "files" if we are talking about a recipe or rows in a table, but let's say "files" for the sake of clarity) that will probably not be related and not reduceable to a meaningful commit message, or maybe the commit will contain only the changes to a single file, and its commit message would be equivalent to "updated `<name of the file>`".
Programmers, when using Git, _think in Git_, i.e., they work with version control in their minds. They try hard to commit together only sets of meaningful and related changes, even when they happen to make unrelated changes in the meantime, and that's why there are commands like `git add -p` and many others.
Normal people, to whom many of these git-based tools are intended to (and even programmers when out of their code-world), are much less prone to _think in Git_, and that's why another kind of abstraction for fork-merge-collaborate in non-code environments must be used.
-
@ 3bf0c63f:aefa459d
2024-01-14 13:55:28
# A prediction market as a distributed set of oracle federations
See also: [Truthcoin as a spacechain](nostr:naddr1qqyrqcfsxumrsvmpqyghwumn8ghj7enfv96x5ctx9e3k7mgzyqalp33lewf5vdq847t6te0wvnags0gs0mu72kz8938tn24wlfze6qcyqqq823chvhy2j).
This is not Truthcoin, but hopefully the essence of what makes it good is present here: permissionless, uncensorable prediction markets for fun, profit, making cheap talk expensive and revolutionizing the emergence and diffusion of knowledge in society.
## The idea
The idea is just to reuse Fedimint's codebase to implement federated _oracle corporations_ that will host individual prediction markets inside them.
Pegging in and out of a federation can be done through Lightning gateways, and once inside the federation users can buy and sell shares of individual markets using a native LMSR market-maker.
Then we make a decentralized directory of these bets using something simple like [Nostr](https://github.com/nostr-protocol/nostr) so everybody can just join any market very easily.
## Why?
The premise of this idea is that we can't have a centralized prediction market platform because governments will shut it down, but we can instead have a pseudonymous _oracle corporation_ that also holds the funds being gambled at each time in a multisig Bitcoin wallet and hope for the best.
Each corporation may exist to host a single market and then vanish afterwards -- its members returning later to form a new corporation and host a new market before leaving again.
There is custodial risk, but the fact that the members may accrue reputation as the time passes and that this is not one big giant multisig holding all the funds of everybody but one multisig for each market makes it so this is slightly better.
In any case, no massive amounts are expected to be used in this scheme, which defeats some of the use cases of prediction markets (funding public goods, for example), but since these are so advanced and society is not yet ready for them, we can leave them for later and first just try to get some sports betting working.
This proto-truthcoin implementation should work just well enough to increase the appetite of bitcoiners and society in general for more powerful prediction markets.
## Why is this better than DLCs?
Because DLCs have no liquidity. In their current implementations _and in all future plans from DLC enthusiasts_ they don't even have **order books**. They're not seen very much as general-purpose prediction markets, but mostly as a way to create monetary instruments and derivatives.
They could work as prediction markets, but then they would need order books and order books are terrible for liquidity. LMSR market makers are much better.
## But it is custodial!
If you make a public order book tied to known oracles using a DLC the oracle may also be considered custodial since it becomes really easy for him to join multiple trades as a counterpart then lie and steal the money. The bets only really "discreet" if they're illiquid meaningless bets between two guys. If they're happening in a well-known public place they're not discreet anymore.
DLC proponents may say this can be improved by users using multiple oracles and forming effectively a federation between them, but that is hardly different from choosing a reputable _oracle corporation_ in this scheme and trusting that for the life of the bet.
## But [Hivemind](https://bitcoinhivemind.com) is better!
Yes.
-
@ d4338b7c:f1d23a5b
2024-01-12 21:00:23
## Chef's notes
Similar to a traditional Manhattan. The specs remain the same 2:1 Rye Whiskey to Sweet Vermouth. Except we are supplementing the vermouth out for Averna.
## Details
- ⏲️ Prep time: 5
- 🍳 Cook time: 5
- 🍽️ Servings: 1
## Ingredients
- Rye
- averna
- angostura bitters
- orange bitters
## Directions
1. add ingredients to a mixing glass
2. add large cubes
3. stir for 45 seconds
4. serve up in a coupe
5. skewered luxardo cherry garnish
6. cheeers
-
@ af9c48b7:a3f7aaf4
2024-01-10 20:07:25
## Chef's notes
This recipe has been passed around our family from different generations. It can be modified to your liking.
## Details
- ⏲️ Prep time: 15
- 🍳 Cook time: 30 minutes active cook time followed by 4-6 hours crockpot simmering
- 🍽️ Servings: 10-12
## Ingredients
- 1lb ground beef
- 2 packages of dry taco seasoning
- 2 (15.5 ounce) cans of Pinto Beans
- 2 (10 ounce) cans of Diced Tomatoes with Green Chiles
- 2 (15 ounce) cans of Yellow Corn
- 1 package of dry ranch dressing seasoning
- Bag of Shredded Cheese (we use mexican mix, but whatever you prefer)
- Sour Cream
- Large Bag of Corn Chips or Tortillia Chips
## Directions
1. Brown ground beef in skillet and drain off excess liquid, then add 1 package of taco seasoning mix into ground beef following the instructions on the package.
2. In a crockpot (preferred) or large pot, add the 2 cans of pinto beans, 2 cans of diced tomatoes with greeen chilies, 2 cans of yellow corn, 1 package of dry taco seasoning, and 1 package of dry ranch dressing seasoning stirring gently mixing all ingredients thoroughly.
3. Add in the browned, seasoned, ground beef prepared in step 1. Then add two or three can (30 to 45 ounces) of water and stir gently.
4. Allow to cook on high in the crockpot for 4 to 6 hours.
5. Serve over corn chips/tortilla chip and garnish with shredded cheese and sour cream.
6. Garnish with jalepenos, avacado, lime, or whatever you like.
-
@ 44dc1c2d:31c74f0b
2024-01-07 21:19:28
## Chef's notes
This bread is super simple to make and takes a bit to dial in.
The only real notes I have here is you can use whatever round pan you want to bake it in. Or use a square one, just make sure the walls of the pan are high.
Less is more with this bread. You really don't want to over knead the bread here. If you're used to making bread that need a lot of kneading, this will feel odd.
## Details
- ⏲️ Prep time: 27 hours
- 🍳 Cook time: 50 to 60 min
- 🍽️ Servings: 1 loaf
## Ingredients
- 1-1/2 teaspoons active dry yeast
- 1-3/4 cups warm water (110° to 115°)
- 3-1/2 cups plus 1 tablespoon all-purpose flour, divided
- 2 teaspoons salt
- 1 tablespoon cornmeal or additional flour
## Directions
1. In a large bowl, dissolve yeast in warm water. Using a rubber spatula, stir in 3-1/2 cups flour and salt to form a soft, sticky dough. Do not knead. Cover and let rise at room temperature 1 hour.
2. Stir down dough (dough will be sticky). Turn onto a floured surface; with floured hands pat into a 9-in. square. Fold square into thirds, forming a 9x3-in. rectangle. Fold rectangle into thirds, forming a 3-in. square. Place in a large greased bowl, turning once to grease the top. Cover and let rise at room temperature until almost doubled, about 1 hour.
3. Punch down dough and repeat folding process. Return dough to bowl; refrigerate, covered, overnight.
4. Grease the bottom of a roasting pan with sides at least 4 in. high; dust pan with cornmeal. Turn dough onto a floured surface. Knead gently 6-8 times; shape into a 6-in. round loaf. Place into prepared pan; dust top with remaining 1 tablespoon flour. Cover pan and let rise at room temperature until dough expands to a 7-1/2-in. loaf, about 1-1/4 hours.
5. Preheat oven to 500°. Using a sharp knife, make a slash (1/4 in. deep) across top of loaf. Cover pan tightly with foil. Bake on lowest oven rack 25 minutes.
6. Reduce oven setting to 450°. Remove foil; bake bread until deep golden brown, 25-30 minutes. Remove loaf to a wire rack to cool.
-
@ af9c48b7:a3f7aaf4
2024-01-05 13:58:55
## Chef's notes
This recipe was published by a local chef who prepares it on a weekly basis at a small boutique restaurant located above a bookstore.
## Details
- ⏲️ Prep time: 15 minutes
- 🍳 Cook time: 30 minutes
- 🍽️ Servings: 8-10
## Ingredients
- 3 tablespoons olive oil
- 2 medium onions, chopped
- 1 tablespoon minced garlic
- 3/4 pound smoked, baked or country ham cubed
- 2 (14.5-ounce) cans of turnip greens, undrained (recommend Glory Brand turnip greens if available)
- 2 (15.5- ounce) cans great northern beans
- 2 red potatoes, diced
- 4 (14.5-ounce) cans chicken broth
- Salt and ground pepper to taste
- Cajun seasoning to taste
- 2 tablespoons of granulated sugar
## Directions
1. In a soup pot, sweat olive oil, onions, garlic, and ham on low heat.
2. Add turnip greens, beans, potatoes, chicken broth, and bring to a boil on high heat.
3. Once boiling, turn down to medium heat. Add salt, pepper, cajun seasoning, and sugar.
4. Simmer for appoximately 30 minutes.
5. This recipe makes a large quantity and can be cut in half. Serve with cornbread.
-
@ 44dc1c2d:31c74f0b
2024-01-04 05:18:29
## Chef's notes
This is a base recipe. You can and should modify it to your tastes.
For a honey mustard, add a couple tablespoons of honey.
You can affect the taste by changing the vinegar around, like a white or sherry vinegar. You can use beer instead of vinegar. Also chop up some fresh herbs like tarragon and chuck it in. You can also play with the water and vinegar ratio for less of a bite (or more).
If you want a more yellow mustard, chuck in some turmeric and sugar.
Play with the heat of the mustard by changing the seeds and the heat of the liquid you start with. Black mustard being the hottest. Starting with a cold liquid will make for a hotter mustard instead of a warm liquid. (IE white mustard seeds in a warm liquid will make for a mellow mustard vs black seeds in a cold liquid)
## Details
- ⏲️ Prep time: 10ish min.
- 🍳 Cook time: 48 hours
- 🍽️ Servings: About a 3/4 full 8oz jar
## Ingredients
- 2 tablespoons of brown or black whole mustard seeds
- 1/4 cup ground mustard powder
- 3/4 teaspoon salt
- 1/4 cup water
- 4 teaspoons apple cider vinegar
## Directions
1. Grind seeds in a spice grinder or in a mortar and pestle tell the seeds are at the desired consistency.
2. Mix the dry stuff together. (seeds, salt and powder)
3. Mix the wets in.
4. Cover and let sit for 2 days. (I use a jar) Wait time is important here. It will look soupy at first and thicken up as the seeds absorb the liquid. The time also allows the mustard to mellow. Fresh made mustard is harsh and bitter tasting so give it time.
-
@ b0d05d2e:c7e7408d
2024-01-03 03:20:11
## Chef's notes
This recipe was derived from the following, https://w3.do/Z5TLZZTR
The main differences: we use sugar + honey, specifically unsalted butter & we don’ t make the yeast mixture the same way she does, so the steps about getting the dry yeast and water going could vary, (if you have your method that works with the mixer or system you have then it should still all work out in the end).
This roll can be used as a side or a meal/soup roll or for any & many kinds of plates & you can roll stuff into the them before you bake them.
Photos using this recipe https://w3.do/4u72vYNL
## Details
- ⏲️ Prep time: @ (20-30 prep, total 3.75-4 hours)
- 🍳 Cook time: @25-30 minutes (can vary based on the size)
- 🍽️ Servings: 12
## Ingredients
- 2 ¼ teaspoons of dry yeast (10.54g)
- ¼ cup of warm water (59-60g)
- 1 stick of unsalted butter (4oz, 113g)
- 1 cup of WHOLE milk (240g)
- ¼ cup of granulated white sugar (75-150g)
- 1-2 tablespoons of honey (2.31-3.5g)
- 3 eggs (recommended: farm fresh and large)
- 4-5 cups of bread flower (480-600g,12+ high gluten protein if possible)
- 1 ½ teaspoons of salt (8.88g)
- 1 tablespoon of butter for the rising bowl insides, baking surfaces, and rollout board. (13-20g)
## Directions
1. Gather the ingredients for the mixer.
2. get warm water ready, @ 80-90F or @26.7-32.2C
3. in the mixer, get the yeast going with the warm water. We give ours a little mixing on medium then let it settle and watch for some activity. (we live in the south so our mixing bowl is rather warm, you may have to adjust the water temp or warm your mixer bowl up to get the yeast going), then give it your blessings, allow it to work its magic by walking away and perform the next items.
4. Get the cracked eggs ready (we break the yolks without beating them)
5. Melt the butter on the stove, but do not cook or fry it
6. add the sugar and honey into the heated melted butter off of the stove *don’t cook the butter*
7. The mixture does not have to be fully dissolved into the melted butter, then add the whole milk and stir it up like Bob Marley.
8. Now , Back to the mixer, add the cracked eggs at a medium setting and let that mix up for a few minutes.
9. Add the milk, butter, sugar, and honey mixture, still at half speed.
10. After its all in, turn the mixer up a half more notch (a yellowy beautiful color and yeasty smell should be present)
11. Then start adding flour, half a cup at a time, shaking it in as it mixes, up to about 3 cups.
12. Next, Add the salt and scrape the sides if necessary then get the mixer running again.
13. Continue adding the rest of the flour, after each cup you may have to stop and scrape the sides down.
14. Once the dough comes together, it will be a little tacky but not stick to the sides as much.
15. Once this happens, it will knead for 5-8 minutes, depending on how tacky it feels it may need some more kneading. (We make this at 200ft above sea level and at 40-60% humidity in our home) We think it is done when you poke it and it starts to fill back in and isn’t all stuck to your fingers
16. When the dough is ready, Stop the mixer and take the mixer parts out (these items should come freely of the dough), (this recipe requires its own patience level training, do not be afraid to let it work and come together.. if you start to take it out but it sticks too much, throw a little flour (very little) in and knead it some more before you decide to let it rise)
17. Roll the dough from the mixer bowl into your unsalted & buttered large bowl for the initial rise. (cover with a clean cloth and let it rise for 60-90 minutes at least doubling in size)
18. Roll the doubled dough out onto your buttered surface (try not to deflate it entirely). Fold the dough into itself and put it back into the same buttered rising bowl for a second rise. (It should smell so yeasty and buttery, and this is the point where we both start using the adjective Heaven except for the Hil in Hil-aceious says it feels like heaven before we turn it out for the first rise, thus she is more sensitive than I, the Ace in the cious-ness of this tasty roll recipe).
19. To get ready for baking, have your baking pan or pans buttered (unsalted). This recipe makes 24 rolls (3 rows of 8) in a 12.5 x 8-inch baking dish)) (8–9-inch cake rounds work also; you will need two to fit the rolls half/half).
20. After the dough doubles again, about 55-75 minutes, get the weight of the dough and divide the grams by 24, then cut off each roll using a small scale if possible and form it into a small oval. You will want to use you buttered surface to shape the rolls, don’t worry if the dough deflates a little while shaping them.
21. Fit 3 rows of 8 into a 12.5 x 8 baking dish next to each other. After you get them all into the baking pan, preheat the oven to 350F. (if you have a heated oven, give the rolls time to start growing into each other a little (we take pictures a lot to compare later throughout the whole process sometimes), 15-35 minutes works for us)
22. Bake them for about 25-30 minutes until they are golden brown on top but still white in the seams, (you should be able to lift the baking pan up quickly and the rolls should freely release from the pan and vacuum suck back to the pan a bit if they are done enough IMO).
23. After about 3-5 minutes turn them onto the drying rack and serve or consume. - they peel right apart.
-
@ be9bb3c6:8f7b599a
2024-01-03 01:42:49
## Chef's notes
Please use grass-fed, red veal. These animals, unlike their white veal brothers, live happy, free-roaming lives.
You can hack it, but you'll likely want an enamelled cast-iron terrine mould.
## Details
- ⏲️ Prep time: 20 mins
- 🍳 Cook time: 5 hours + 24 hours in the fridge
- 🍽️ Servings: 12
## Ingredients
- 1kg veal bones, rinsed
- 2L cold water
- Mirepoix - 1 carrot, 2 celery stalks, 1 large onion
- 12 black peppercorns, crushed with the back of a pan
- 2 whole cloves
- 2 bay leaves
- 1kg veal shank meat, large pieces
- 3 packages of gelatin
- 45ml cold water
- 30ml Cognac
- 60ml dry white wine
- salt and pepper to taste
- 1 bunch flat-leaf parsley, finely chopped
- 1 sprig of thyme, finely chopped
- 10 black peppercorns, crushed with the back of a pan
## Directions
1. Place veal bones in a large pot. Cover with the 2L water and bring to a boil
2. Reduce heat to a simmer and skim the top of the scum that will develop
3. Add mirepoix, 12 crushed peppercorns, cloves and bay leaves, and simmer for 2 hours
4. Add the veal shank meat and simmer for 1.5 hours more
5. Remove veal and set aside to cool
6. Strain stock, discarding bones and mirepoix, and transfer 500ml of the stock to a sauce pan, reserving the rest for another use
7. Soften the gelatin with cold water and stir it into the 500ml of stock. Check your seasoning
8. Add Cognac, wine and keep warm, but don't boil
9. Cut veal into 2.5cm pieces and place in a bowl. Fold in the parsley, thyme and 10 crushed black peppercorns
10. Pack veal mixture tightly into terrine mould. It should come almost to the brim. Add stock slowly to moisten everything. You do not the meat swimming in a soup.
11. Pack veal mixture tightly into terrine mould. It should come almost to the brim. Add stock slowly to moisten everything. You do not the meat swimming in a soup
12. Place in the fridge for at least 4 hours and up to 24 hours before unmolding. Will keep in the fridge for up to 10 days
-
@ 00000000:f729d700
2024-01-02 23:53:03
## Chef's notes
Choose a good-quality feta cheese made from sheep’s milk.
This combo is also delicious served over pasta, which is great if you have leftovers.
Feta cheese that comes in a dry package may not melt as expected.
## Details
- ⏲️ Prep time: 15
- 🍳 Cook time: 20
- 🍽️ Servings: 6
## Ingredients
- 1 (7 oz) block Greek feta cheese
- 2 cups halved cherry or grape tomatoes
- 1/3 cup Kalamata olives (halved)
- 1/3 cup red onion (thinly sliced)
- 2 tablespoons olive oil
- 1 clove garlic (minced)
- 1 teaspoon oregano (dried)
- 1 tablespoon honey
- fresh basil (chopped)
- black pepper
- salt
## Directions
1. preheat oven to 400 ºF (200 ºC)
2. place the feta cheese in the center of a baking dish
3. spread with honey and drizzle with olive oil
4. combine tomatoes, olives, red onion, olive oil, and garlic in a small bowl
5. sprinkle bowl with oregano, season with salt and pepper, and mix
6. arrange the mix around the feta cheese
7. bake in oven until cheese is soft and tomato mixture is bubbly for 20 to 30 minutes
8. garnish with fresh basil, if desired
-
@ cb084639:2f16502a
2024-01-02 18:43:51
## Chef's notes
น้ำจิ้มซีฟู๊ดเป็นน้ำจิ้มที่เหมาะสำหรับกันกับอาหารทะเลแทบจะทุกชนิดก็ว่าได้ เริ่มจากการเลือกพริกที่จะนำมาทำในที่นี้จะใช้พริกจินดาเขียวและแดง หรือใครจะใช้พริกขี้หนูสวนร่วมก็ได้ก็จะได้ความหอมขึ้นไปอีก อย่างไรก็ตามความอร่อยไม่ได้ขึ้นอยู่กับน้ำจิ้มอย่างเดียว แต่ก็ขึ้นอยู่กับความสดของอาหารทะเลเหล่านั้นอีกด้วย ผมเคยลองเอาสเต็กมาจิ้มดูนะได้ความอร่อยไปอีกแบบแต่รสและกลิ่นของเนื้อจะโดนกลบหมดเลยเอาเป้นว่าใครอย่าจะเอาไปกินกับอะไรก็แล้วแต่ความชอบครับ มาไปลงมือทำกันดีกว่า!!!
## Details
- ⏲️ Prep time: 10 min
- 🍳 Cook time: 10 min
- 🍽️ Servings: 1-4
## Ingredients
- พริกจินดาแดง 5 เม็ด
- กระเทียมจีน 7 กลีบ
- รากผักชี 1 ต้น
- น้ำปลา 3 ช้อน
- น้ำมะนาว 3 ช้อน
- น้ำกระเทียมดอง 1 ช้อนโต๊ะ
## Directions
1. เริ่มจากการนำพริกจินดาแดงกระเทียมจีนรากผักชีที่เตรียมไว้นำมาปั่นให้เข้ากันหรือไม่มีเครื่องปั่นจะใช้ครกตำก็ได้แล้วนำมาพักไว้
2. หลังจากนั้นเติมน้ำปลาน้ำมะนาวน้ำกระเทียมดองแล้วคลุกให้เข้ากันเพียงเท่านี้ก็จะได้น้ำจิ้มซีฟู้ดไว้กินกับของทะเลที่ชื่นชอบแล้ว
-
@ cb084639:2f16502a
2023-12-25 17:27:51
## Chef's notes
เรื่องน้ำมันที่ใช้ประกอบอาหารใครว่าไม่สำคัญ เพราะร่างกายเราต้องการสารอาหารที่เป็นไขมันไปเป็นพลังงาน จะกินทั้งทีมันต้องเลือกของดีๆกันหน่อย จริงอยู่ที่สมัยก่อนเรากินน้ำมันพืช(seed oil)
มันถูกทำให้เราเชื่อว่ามันดี ไม่มีไข และโยนความผิดมาให้น้ำมันที่ได้จากสัตว์ ซึ่งจะยังไม่ลงรายละเอียดเดี๋ยวจะยาวไป เอาเป็นว่าเราไปหาซื้อไขมันเนื้อมาให้ได้ก่อนจะแหล่งไหนก็แล้วแต่ ถ้าได้แบบที่เป็นก้อนใหญ่ๆมายิ่งดี หั่นเป็นชิ้นได้เสมอกัน สุกพร้อมกันและได้น้ำมันเยอะแต่ถ้าหาไม่ได้แนะนำว่าให้ไปมองหาที่ขายเศษเนื้อซื้อเศษมาทำแดดเดียวแล้วสะสมในส่วนของไขมันแช่ช่องแข็งไว้รวบรวมไว้ก่อนค่อยมาทำ
การทำน้ำมันจำเป็นต้องใส่น้ำไปด้วยเพื่อรวนมันให้สุกก่อนแล้วจะทำให้ได้น้ำมันได้ง่ายขึ้น แค่นี้เราก็มีน้ำมันวัวที่หอมและมีประโยชน์ไว้ใช้ปรุงอาหารแล้วยังได้กากวัวไว้ทำกับข้าวหรือกินเล่นอีกด้วย!!!
## Details
- ⏲️ Prep time: 20 min
- 🍳 Cook time: 30-60 min
- 🍽️ Servings: 1-4
## Ingredients
- ไขมันวัว 1 กิโลกรัม
- เกลือชมพู 2 ช้อนชา
- น้ำเปล่า 1 ถ้วย
## Directions
1. นำมันวัวที่ล้างสะอาดแล้วมาหั่นเป็นชิ้นลูกเต๋าเท่าๆกัน
2. นำมันวัว น้ำเปล่า และเกลือชมพูใส่กระทะ
3. ตั้งไฟกลางไปทางอ่อน รวนไขมันให้สุกทั่วกัน
4. สังเกตว่าน้ำเริ่มแห้ง น้ำมันจะเริ่มออกมาแล้ว
5. จะเห็นได้ว่าพอน้ำมันออกมาทอดตัวไขมันเองเราก็ทอดไปเรื่อยๆจนไขมันก้อนเล็กลงและได้น้ำมันเพิ่มมากขึ้นไขมันมีสีเข้มขึ้นเป็นสีทองสวยงาม
6. ปิดไฟที่เตา ตักกากวัวออกมาผึ่งน้ำมัน เอาไว้กินเล่นได้เค็มนิดๆ
7. รอน้ำมันหายร้อนก็ทำการบรรจุใส่ภาชนะที่เตรียมไว้แล้วเก็บใส่ตู้เย็นน้ำมันจะกลายเป็นไขสีขาวเก็บไว้ใช้ได้นาน
-
@ 9f51b59f:75e7c3a2
2023-12-25 14:34:57
## Chef's notes
Use chuck, boneless short rib, or another cut that gets tender the longer you cook it. You cut even use pork butt, shoulder, or belly.
Select a few different dried chilies 🌶️ for greater complexity and heat. For extra spice use jalapeños or Serrano with the trinity. (Onion, pepper, celery)
## Details
- ⏲️ Prep time: 1 hour
- 🍳 Cook time: 2.5 hours
- 🍽️ Servings: 6
## Ingredients
- ½ pound Red, Pinto, or Kidney Beans- soaked over night
- 6 dried chilies of your choice- toasted, seeded, and soaked
- 2 tablespoon oil (lard or tallow)
- 2 pounds Chuck beef cubes or short rib
- 1 small Spanish Onion- small dice
- 1 Green Bell or Poblano Pepper- small dice
- 2 stalks Celery- small dice
- 4 cloves Garlic- minced
- 2 Bay Leaf
- 1 can Fire Roasted Tomatoes
- 2 teaspoon ancho or regular chili powder
- 2 teaspoons Smoked Paprika
- 2 teaspoon Dried Oregano
- 2 teaspoon ground Coriander
- 1 tablespoon cocoa powder
- 4 cups Beef or Chicken stock, water also works
- 2 tablespoons Butter
- 2 tablespoons Masa (ground corn flour)
- Toppings like cheese, onions, scallions, tortillas. Whatever you’d like.
## Directions
1. 1. Start by soaking your beans the night before. Fully submerged in water and kept in the fridge.
2. Place the pot you’ll be cooking the chili in over medium high heat, with NO oil heat the pan and add the dried chilies to toast for 3-5 minutes turning them occasionally. You will smell them toasting and becoming aromatic. Set them aside to cool, once cool remove and discard the seeds and stems. Submerge the chilies in stock to rehydrate and soften them for blending.
3. Season the beef with salt, then wipe out the pan and return it to the heat. Add the grapeseed oil to the pan and allow to heat. Sear the beef on multiple sides to achieve lots of browning and color. Remove the beef and set aside.
4. Add the diced onions, bell peppers, and celery to the pan (holy trinity) and cook until the edges begin to caramelize. When you see the browning of the veg add the garlic, bay leaves, oregano and spices. Cook for about a minute.
5. Add the fire roasted tomatoes to the trinity, scraping up the fond in the pan and cook until some of the liquid from the tomatoes has evaporated. Note the pot should be simmering or at a light boil for evaporation to occur.
6. Once the vegetable mixture looks thickened add the rehydrated chilies along with the stock they were soaking in. Remove the pot form the heat and using a stick blender or standing blender puree the trinity and chilies together until smooth.
7. Add the remaining stock and chocolate cocoa mix to the pot along with the puree, return the beef to the pot and bring everything to a boil then reduce to a simmer. Cover the pot and cook for about an hour.
8. After you’ve allowed the beef to cook on its own drain and add the soaking beans. Prepare the masa roux by melting the butter and stirring in the masa flour, cook for 3 minutes and then add into the chili.
9. Return the beans and chili to a boil, reduce to a simmer and cover. Cook for an addition hour to hour and a half until the beans and beef are tender and the sauce has thickened to your liking. Season with salt and pepper. To finish garnish with favorite toppings.
-
@ d4338b7c:f1d23a5b
2023-12-23 22:26:10
## Chef's notes
Tajin Syrup is going to be a mixture of tajin seasoning 1 table spoon to 1. cup of simple syrup.
Simple syrup is equal. parts water to refined sugar.
## Details
- ⏲️ Prep time: 5
- 🍳 Cook time: 5
- 🍽️ Servings: 1
## Ingredients
- reposado tequila
- nixta liqueur
- vida mezcal
- ancho verde
- lime juice
- tajin
- simple syrup
- mole bitters
## Directions
1. add the ingredients to a shaker
2. add large cubes to the shaker tin
3. shake vigorously
4. dump into rocks glass
5. garnish with dry chilli pepper or lime wheel
-
@ d4338b7c:f1d23a5b
2023-12-23 22:11:29
## Chef's notes
You don't want to use too many ice cubes in this shake because you want a foamy head to place the espresso beans on after it been served.
## Details
- ⏲️ Prep time: 5
- 🍳 Cook time: 5
- 🍽️ Servings: 1
## Ingredients
- vodka
- cold brew concentrate
- demerara
- kahlua
## Directions
1. place ingredients in to shaker tin
2. add five regular sized ice cubes
3. shake vigorously for ten to fifteen seconds
4. pour into a frozen coupe/ martini glass
5. place three espresso beans on top as a garnish
-
@ cb084639:2f16502a
2023-12-22 18:25:18
## Chef's notes
อาจจะดูเป็นอาหารที่ดูง่ายๆแต่มันก็ไม่ง่ายนะที่จำทำมันออกมาให้สวยดูดีและอร่อย!!! มันเริ่มจากการเลือกซื้อไข่ ไข่ไก่ที่เราเห็นที่ขายกันอยู่ทุกวันนี้มันมีที่มาที่แตกต่างกัน บางที่ก็มาจากเล้าไก่ทั่วไป ฟาร์มไก่ไข่ หรือจะมาจากการเลี้ยงแบบ ออแกนิก ปัจจัยเหล่านี้ทำให้สารอาหารที่มีอยู่ในไข่นั้นมันมีไม่เท่ากัน ขึ้นอยู่กับสารอาหารที่ไก่ได้รับ ความสะอาดของระบบการเลี้ยง ความเครียดของไก่ มีผลกับไข่ทั้งหมด พอเราเลือกไข่ได้แล้วเรา ก็มาดูเรื่องของกระทะการทำงานกับไข่จะให้ง่ายและไม่เสียอารมณ์ ควรจะใช้กระทะเทฟล่อน เพื่อไม่ให้ไข่ติดกระทะได้และเมื่อเราได้กระทะแล้วเราก็ไปทำกันเลยดีกว่า 55+
## Details
- ⏲️ Prep time: 2 min
- 🍳 Cook time: 5 min
- 🍽️ Servings: 1
## Ingredients
- ไข่ไก่ 4 ฟอง
- น้ำมันหมูหรือน้ำมันวัว 1 ช้อนโต๊ะ
- พริกไทยดำบด ตามชอบ
## Directions
1. เริ่มจากตั้งไฟเบาใส่น้ำมันลงไป
2. ไม่ต้องรอกระทะร้อนมากตอกไข่ไส่ไปเลย 4 ฟอง
3. โรยพริกไทย
4. ปิดฝาครอบเพื่ออบไข่
5. รอประมาณ1-2นาที คอยเปิดผาดูว่าส่วนไข่ขาวที่ใสเริ่มขุ่นหรือยัง
6. เอาไข่ออกจากกระทะโดยใช้ช้อนช่วยแซะด้านใต้ของไข่ ลงบนจารที่เตรียมไว้
7. เสิร์ฟคู่กับน้ำปลาพริก หรือซอสแม๊กกี้ตามชอบ
-
@ cb084639:2f16502a
2023-12-19 18:52:10
## Chef's notes
การทำเนื้อแดดเดียวที่จะเหมาะสำหรับเป็นกับแกล้มกับเครื่องดื่มแสนอร่อยและการที่จะทำให้รสชาติดีนั้นอยู่ที่ปัญจัยเพียงไม่กี่อย่างเช่น คุณภาพของเนื้อที่นำมาทำซึ่งเรื่องเนื้อให้เล่าคงจะยาวเอาเป็นที่ทำวันนี้ได้เสษเนื้อมาจากตลาดนัดแต่เป็นวันที่เราไปตลาดเร็วว่างั้นเถอะเศษที่ได้มาชิ้นค่อนข้างสวยเลยแหละ แล้วตอนหั่นเนื้อสำหรับคนที่ชอบบ่นว่าเนื้อมันเหนียวลองสังเกตุลายของเนื้อให้ดีเราควรจะหั่นแบบตัดขวางลายเนื้อก็จะช่วยได้ เครื่องปรุงสำหรับหมักอันนี้แล้วแต่ความชอบจะตัดหรือเพิ่มตัวไหนตามสะดวกไม่ว่าจะเป็นดอกเกลือ เกลือชมพู เกลือดำ ก็จะให้รสชาติต่างกันตามความชอบของแต่ละคน และระยะเวลาในการตากแดดถ้าช่วงที่เหมาะก็น่าจะเป็นช่วง ฤดูตอนนี้ กับฤดูร้อนน่าจะได้ผลที่สุด ส่วนฤดูฝนเนื้อมันจะไม่ได้รับแดดตามที่ต้องการเพราะฉะนั้นบางที่ถึงต้องใช้เครื่องไล่ความชื่นซึ่งมันจะให้ผลลัพธ์เหมือนนำเนื้อไปตากด้วยแดดนี่แหละ หรือเราจะใช้ความร้อนจากเครื่องขุด bitcoin ของเราก็ได้นะจะได้ใช้ลมร้อนให้เกิดประโยชน์
## Details
- ⏲️ Prep time: 4 hour
- 🍳 Cook time: 10
- 🍽️ Servings: 1-4
## Ingredients
- เนื้อวัว 1 kgs.
- เกลือ 1 ช้อนชา
- ผงปรุงรส 1 ช้อนโต๊ะ
- ซอสปรุงรส 3 ช้อนโต๊ะ
## Directions
1. หั่นเนื้อวัวเป็นเส้นๆอย่าลืมหั่นขวางตัดลายเนื้อ
2. นำเครื่องปรุงทั้งหมดคลุกเคล้ากับเนื้อ
3. พักเนื้อไว้ในอุณหภูมิห้อง 1/2 ชม.
4. นำเนื้อไปตากแดดจัด ด้านละ 1 ชั่วโมงครึ่ง
5. นำเนื้อที่ได้จะไปทอดด้วยน้ำมันวัว น้ำมันหมู หรือหม้อทอดไร้น้ำมันก็แล้วแต่ความชอบ
6. เพียงเท่านี้ก็ได้เนื้อแดดเดียวแสนอร่อยไว้กินคู่กับเครื่องดื่มสุดโปรดแล้วครับ
-
@ 341db5a7:4c4fc2ef
2023-12-19 05:50:38
## Chef's notes
Just mix it all together in a bowl, feel free to remix and adjust however you feel! You are the boss of this chicken sauce!
## Details
- ⏲️ Prep time: 5 mins
- 🍳 Cook time: 0 mins
- 🍽️ Servings: 8
## Ingredients
- 3/4 cup mayonnaise
- 1/4 cup ketchup
- 1/2 tbls. garlic powder
- 1/4 tbls. Worcestershire
- 1/8 tbls. black pepper
## Directions
1. Mix it all together real good. Let it rest in the fridge for 30 mins before serving. Dip whatever you want in it. Best on chicken tenders.
-
@ cb084639:2f16502a
2023-12-18 17:54:54
## Chef's notes
เนื้อที่ใช้นั้นสำหรับมือใหม่ยันมือเก๋า ง่ายที่สุดคือเนื้อตามร้านขายวัตถุดิบทั่วไป ที่เป็นเนื้อที่แพ็คไว้ชิ้นละ 250-300 กรัม นั้นแหละกำลังดี ดูดีๆมีทั้งแบบเนื้อโคขุน เนื้อออสเตรีย เนื้อวัวบรามันที่ค่อนข้างเหนียวไม่ค่อยเหมาะกับการมาทำสเต็กเท่าไร ในที่นี้ถ้ากลัวเนื้อจะเหนียวไปก่อนที่จะทาเกลือพรืกไทย ใช้ส้อมแทงเนื้อให้ทั่วทั้งสองด้านก่อนก็ได้ เอาเป็นว่าเรามาเริ่มกันเลยดีกว่า ลุย!!!
## Details
- ⏲️ Prep time: 10
- 🍳 Cook time: 15-20 min
- 🍽️ Servings: 1
## Ingredients
- เนื้อสันสะโพกสเต็ก 1 ชิ้น 300 กรัม
- เกลือชมพู 1 ช้อนชา
- พริกไทยดำ 2 ช้อนชา
- เนยแท้ไม่เติมเกลือ 1 ช้อนโต๊ะ
- น้ำมันหมูหรือน้ำมันวัว 1ช้อนโต๊ะ
- กระเทียมบุบพอแตก 5-7กลีบ
## Directions
1. แกะเนื้อออกจากแพ็คซับน้ำให้แห้งพักไว้
2. บดเกลือชมพูและพริกไทยดำเข้าด้วยกันแล้วโรยให้ทั้วชิ้นเนื้อที่เตรียมไว้
3. ตั้งกระทะไฟกลางไปทางเบา ใส่น้ำมันลงไป
4. กระทะเริ่มร้อน นำเนื้อด้านสันไปนาบให้ทั่วทั้ง 4 ด้าน ทอดเฉพาะขอบก่อน
5. พอขอบสีสวยแล้วก็ลงทอดด้านปกติทั้ง 2 ด้านใช้เวลาด้านละประมาณ 40 วินาที แล้วแต่ความหนาของเนื้อ
6. พอเสร็จเบาไปให้น้อยที่สุด ใส่เนย และกระเทียมที่เตรียมไว้
7. เนยละลายตักน้ำเนยสาดไปบนเนื้อทั้งสองด้านจนพอใจแล้วนำเนื้อออกมาพักไว้ 10-15 นาที
8. จัดจานให้สวยงามตามสะดวกพร้อมเสิร์ฟ
-
@ cb084639:2f16502a
2023-12-17 18:13:32
## Details
- ⏲️ Prep time: 5 min
- 🍳 Cook time: 5 min
- 🍽️ Servings: 1
## Ingredients
- Lamon
- Hdk
- Qww
## Directions
1. นำ1และ2
-
@ 7f21affa:57e19174
2023-12-15 03:45:49
## Chef's notes
All you need is a small pot to simmer the sauce for 7-10 mins.
## Details
- ⏲️ Prep time: 15mins
- 🍳 Cook time: 10 mins
- 🍽️ Servings: ~8oz (?)
## Ingredients
- 1/4 cup Mirin/Sake
- 1/4 cup Rice Wine Vinegar
- 2 tbsp Soy Sauce
- 2 tbsp Brown Sugar
- 1/2 cup Honey
- 2-5 tbsp Gochujang (Korean Spice Paste); Please add based on your spice preference
- 4 cloves Garlic (minced/paste)
- 1-2 tsp/slices of Ginger (slice/paste); Not everyone like ginger bits in their sauce
## Directions
1. Throw all ingredients into a small sauce pot and simmer for 7-10 mins
2. Take out ginger slices (if any)
3. Toss Fried Chicken and Sauce together
4. Enjoy!
-
@ d4338b7c:f1d23a5b
2023-12-14 22:07:29
## Chef's notes
Unlike a traditional negroni recipe, the boulevardier requires 2 part liquor, one part sweet vermouth, and one part campari.
Traditional negroni recipes call for equal parts gin, sweet vermouth, and campari.
2oz Whiskey
1oz Sweet vermouth
1oz Campari
## Details
- ⏲️ Prep time: 5
- 🍳 Cook time: 5
- 🍽️ Servings: 1
## Ingredients
- Whiskey or Rye
- Sweet vermouth
- Campari
- Orange peele
## Directions
1. Pour ingredients into a glass or mixing glass
2. Add large ice cubes
3. Stir for 30-45 seconds
4. Pour into coupe if stirred in mixing glass
5. Orange peele expression and garnish
6. Cheers
-
@ 75bf2353:e1bfa895
2023-12-13 20:19:11
## Chef's notes
Berf Jerky, the OG pocket steak made in the oven.
## Details
- ⏲️ Prep time: 15 minutes
- 🍳 Cook time: 4 hours
- 🍽️ Servings: 10
## Ingredients
- 2 LB. London Broil.
- salt
- pepper
## Directions
1. Trim as much fat as possible from London Broil.
2. Slice meat into thin strips.
3. Add salt & pepper.
4. Line large cookie sheet with foil(for easier clean-up.)
5. Add rack on top of the cookie sheet, the kind you might use for bacon.
6. Bake at 175° F for 4 hours
7. Remove from oven.
8. Enjoy.
-
@ 75bf2353:e1bfa895
2023-12-13 19:22:04
## Chef's notes
# Stay Humble, Brew Your Own Coffee
**Note: The Satoshi Coffee Company, Amazon, WalMart and coffee cups are not affiliate links**.
## Equipment
You'll need an [AeroPress](https://www.amazon.com/AeroPress-Portable-Travel-Coffee-Press/dp/B07YVL8SF3/ref=sr_1_6?keywords=aeropress&qid=1702486875&sr=8-6)
I use [sats.coffee](https://sats.coffee/) to support the bitcoin circular economy.
Coffee Cup. I can't vouch for anyone on this list, but [check out the mug market on nostr](https://letsnostr.com/t/mug).
Cold water because hot water tastes like water heater.
[Cheapest tea kettle I could find](https://www.walmart.com/ip/Mainstays-Teal-1-8-Liter-Stainless-Steel-Whistling-Tea-Kettle-Turquoise/2160878570).
[The cheapest digital meat thermometer I could find](https://www.walmart.com/ip/ThermoPro-TP-16-Large-LCD-Digital-Cooking-Food-Meat-Smoker-Oven-Kitchen-BBQ-Grill-Thermometer-Clock-Timer-with-Stainless-Steel-Probe/2125599883).
### Proof of Work


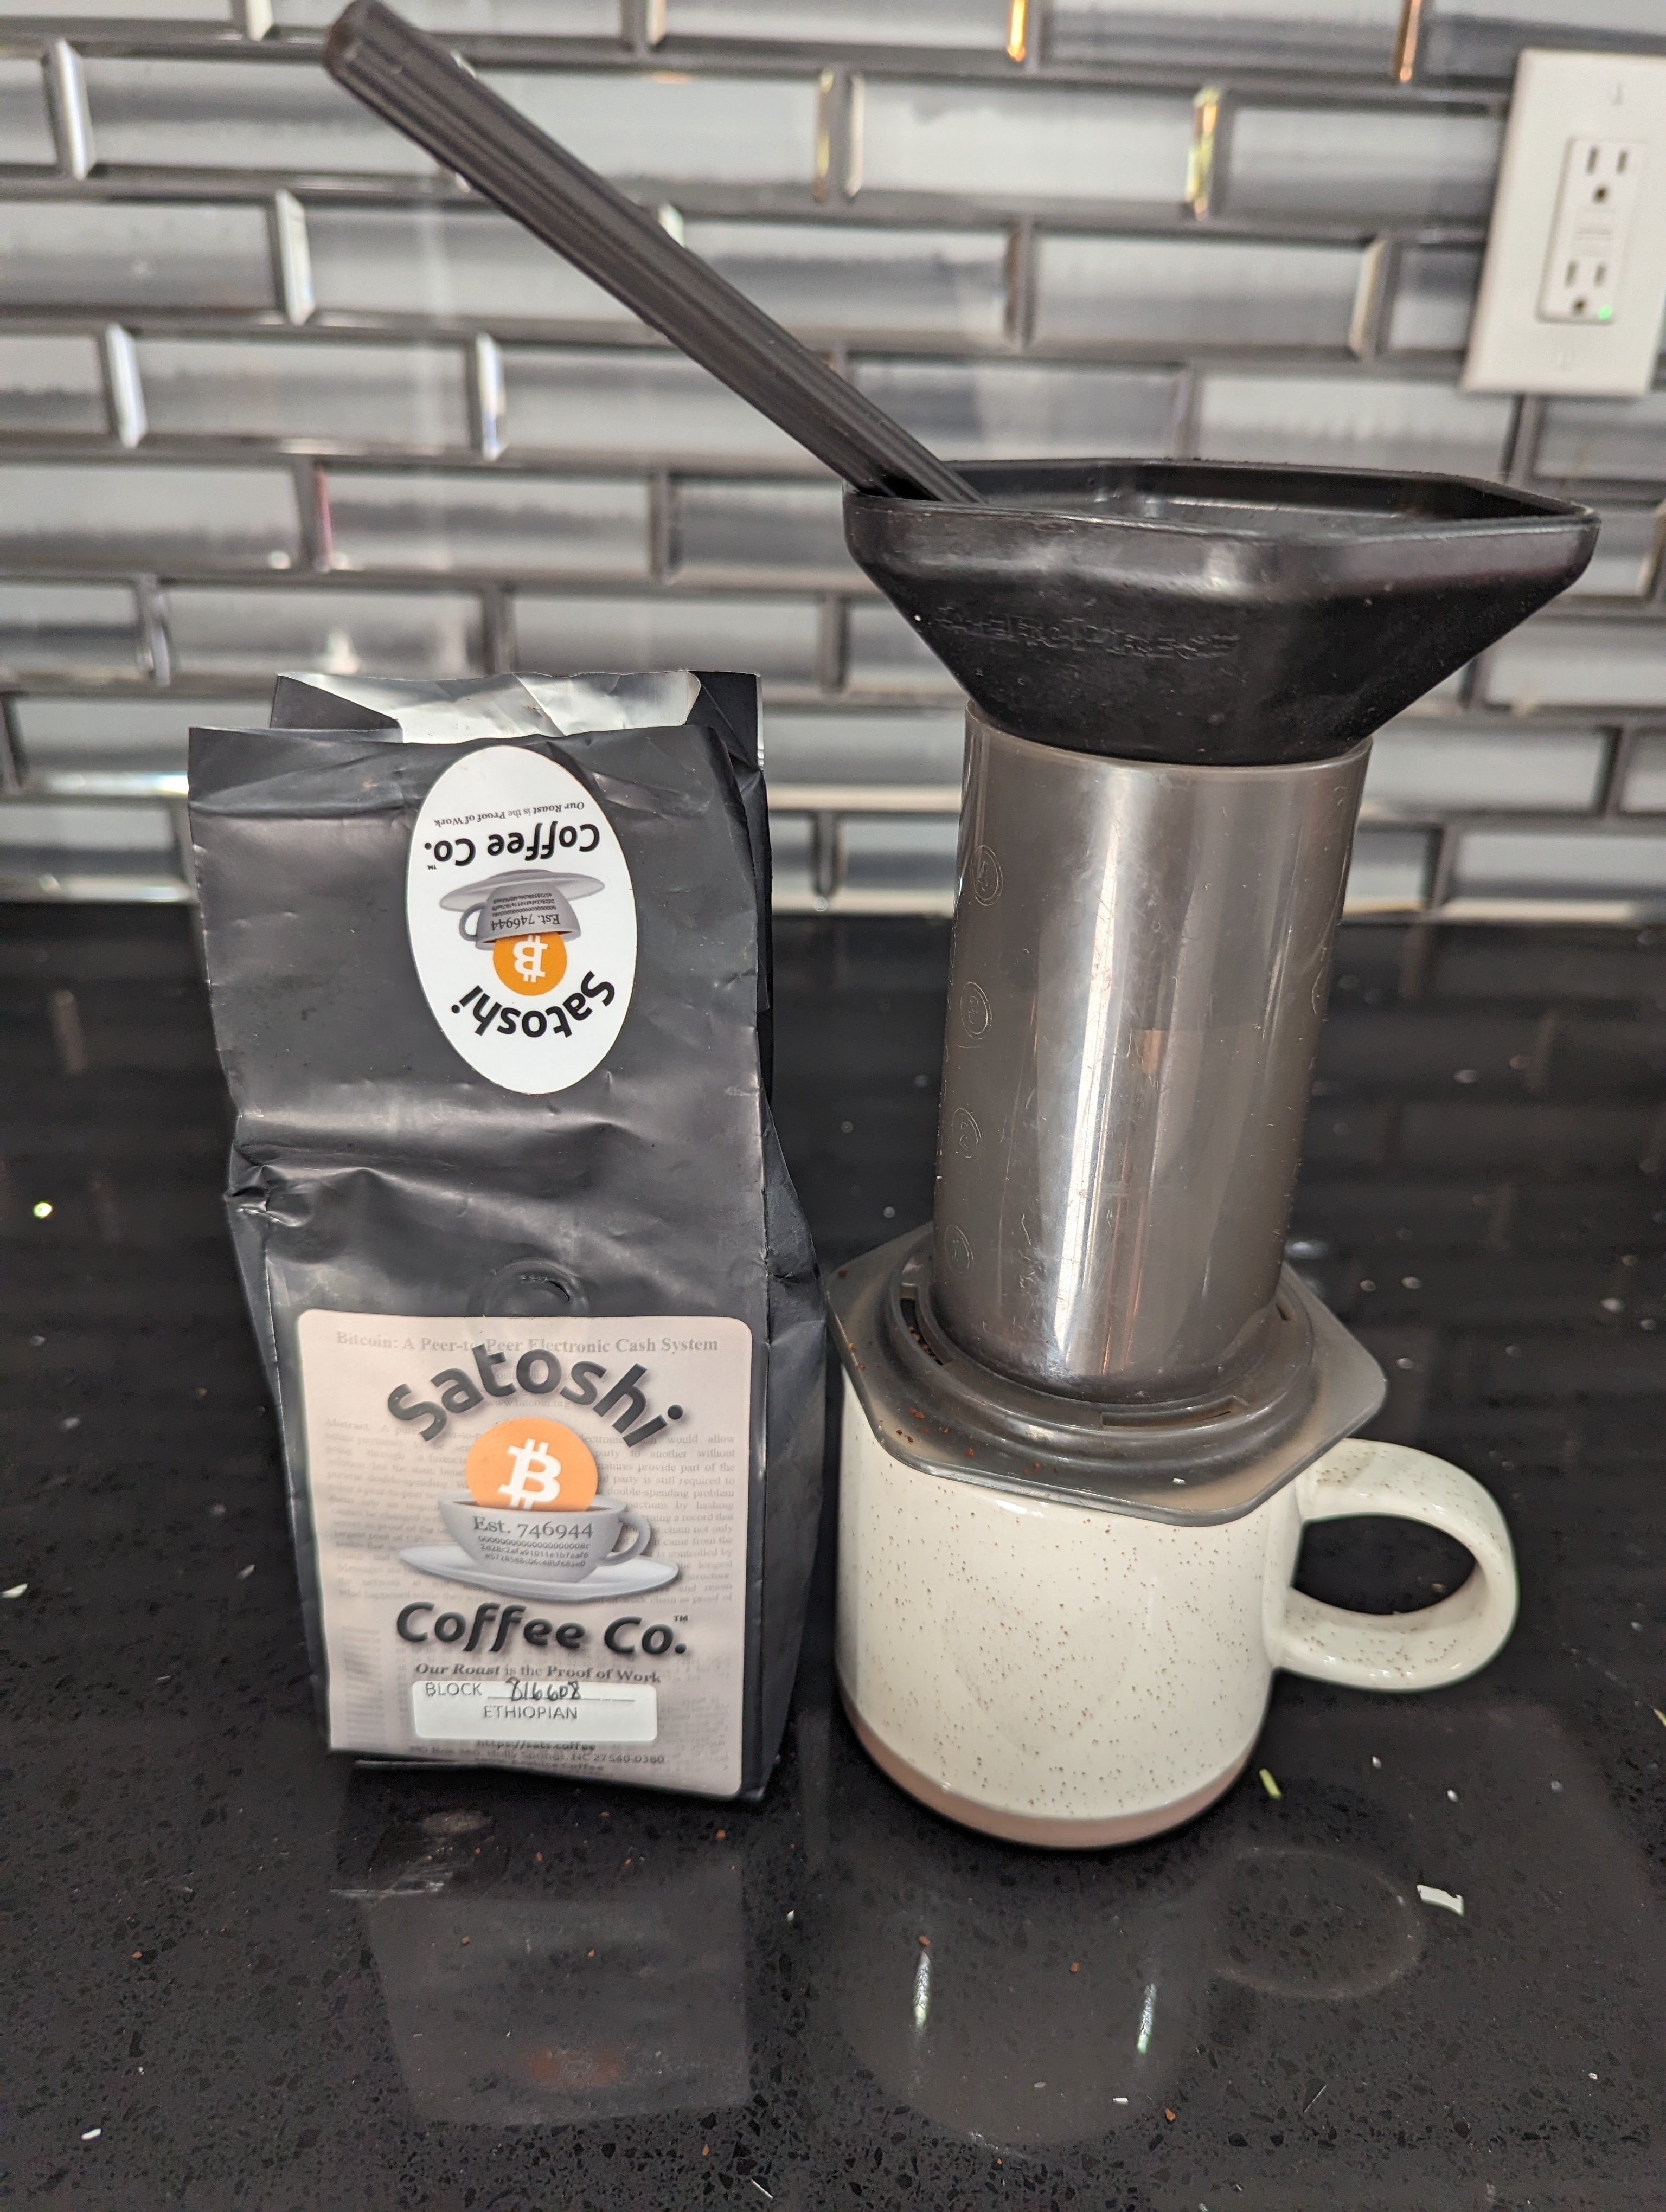


### Interested In Getting Sats Back?
**Note: These are referral links**
#### Oshi App
I swear, I was going to share this company anyway because I found out about the Oshi sats back reward on sats.coffee after I bought my first order. I could have saved myself thousands of sats. I also met Michael Atwood at a meetup in Newport Beach a couple years ago. He's a ride or die freak and told me about this new business he created, basically Groupon for Bitcoiners. We had a great conversation and I really like that dude, but totally forgot about Oshi app. So I plan on using it more. I also started this blog to teach people how to use bitcoin and promote the bitcoin circular economy. The [Oshi App](https://oshi.team/bloggingbitcoin) aligns with this mission.
**Save 10% off two bags of coffee from Satoshi Coffee Co.** When you use the [Oshi App](https://oshi.team/bloggingbitcoin)

Even if you don't like coffee, sign up for the [Oshi App anyway](https://oshi.team/bloggingbitcoin). You're bound to find something you do like and support the bitcoin circular economy, save sats, and send me a little percentage of sales. I also want you to create your own referral link too and share it with other people. I'm not saying you'll earn enough to quit your job, but maybe you'll get more people interested in using and saving sats. This is not financial advice, but that's got to be better for the value of bitcoin than dorks doodling dumb-ass charts.
#### The Bitcoin Company
Don't have an AeroPress? Get 1.3% sats back when you buy an amazon gift card with [The Bitcoin Company](Buy a gift card from [The Bitcoin Company](https://app.thebitcoincompany.com/giftcard/GiftCard_49d2dc07acd9).)
Don't have a cheap meat thermometer?
Get 0.6% sats back when you buy the cheapest meat thermometer I could find.
ome places might give you more cashback, but not all that glitters is digital gold. The Bitcoin Company pays out bitcoin to your own wallet over the lightning network. **Have you seen on-chain fees lately?**
## Details
- ⏲️ Prep time: 5 min
- 🍳 Cook time: 5 min
- 🍽️ Servings: 1
## Ingredients
- coffee
- cold water because hot water tastes like water heater.
## Directions
1. Fill tea kettle with 8 oz. or more of cold water.
2. Set the thermometer to 175° F. Insert the probe into the kettle.
3. Turn on the burner at a medium heat.
4. Meanwhile, assemble the AeroPress. Insert the coffee filter and set on top of the coffee cup. Add a scoop of coffee.
5. When the alarm of the thermometer goes off, remove from heat. I like to watch it and turn the flame down to the lowest setting as it approaches the temprature.
6. Pour the water into the AeroPress. Do not overfill.
7. Stir coffee and the water for 10 seconds.
8. Insert plunger. Slowly press down on the plunger from 20-60 seconds. Squeezing the delicious coffee oils out.
9. Enjoy. Post a picture on #coffeechain and tag me.
10. Clean up is easy. Just throw away the filter and grounds and rinse it. It's also dishwasher safe.
-
@ 44dc1c2d:31c74f0b
2023-12-12 20:18:07
## Chef's notes
If you want to kick it up a notch instead of using EVOO or butter, get about 6 slices of bacon and at the first step just cook off the bacon and use that as your cooking fat.
If you want a more crispy biscuit, cook them separately instead of cooking them in the filling. If you do this, simmer the filling on low for an extra 10 ish min, or just until the potato are tender.
If you prefer to make the pot pie in a casserole dish, you can. Simply pour out the filling into a greased baking dish and top with biscuit dough and continue with the recipe as stated.
The filling tends to bubble and make a bit of a mess, so I recommend placing your skillet or baking dish over a sheet pan covered with tin foil to catch any drips and messes.
## Details
- ⏲️ Prep time: 30 mins
- 🍳 Cook time: 45-50 mins
- 🍽️ Servings: 4-6
## Ingredients
- roughly 1lb of chicken. (Use whatever I prefer thighs)
- 1 medium size onion, peeled and diced
- 2 medium size carrots, peeled and diced
- 2 celery stalks, diced
- 3 cloves of garlic, peeled and minced
- 2 heaping tablespoons all purpose flour
- 2 cups chicken stock/broth
- ½-1 cup whole milk
- ¼ cup chopped fresh parsley
- 1 teaspoon fresh thyme plus more for garnish
- 2 bay leafs
- 2 mid sized potatos chopped into small cubes.
- Salt and pepper to taste
- 3-4 tablespoons of olive oil or butter
- For the Drop Buttermilk Biscuits
- 2 cups all purpose flour
- 1 tablespoon baking powder
- ¼ tsp baking soda
- ½ tsp fine sea salt
- 6 tablespoons cold unsalted butter, cubed
- 1¼ cups buttermilk + 2 tablespoons for brushing biscuits with
## Directions
1. For the Filling
2. Heat your cooking fat. If using uncooked chicken, add chicken pieces to the pan. (If using pre-cooked chicken, don’t add it until later) Cook sautéing chicken for 2-3 minutes per side tell golden brown
3. Add onion, celery, carrots, garlic and potatos. Cook for 5-7 minutes, stirring often until the veggies start to become tender. Make sure to season well with salt and pepper.
4. Sprinkle flour over the veggies and chicken and stir vigorously for 1 minute to cook the flour a bit.
5. Slowly pour in the chicken broth followed by the milk while stirring. Raise temperature up just a bit if needed and let it come to a very gentle boil. Once it reaches a boil reduce the heat to a simmer and let cook for 5-10 minutes, or until its has reduced and mixture has thickened a little
6. Add the chicken if using precooked or rotisserie, parsley and thyme. Let cook until the veggies are tender, chicken are heated through, and mixture is nice and thick or has reached your desired thickness, about 3-5 more minutes (feel free to loosen up sauce a little adding more milk, cream or broth as needed). Season with salt and pepper to taste. Remove from heat and set aside.
7. For The Buttermilk Drop Biscuits
8. Preheat the oven to 425ºF while preparing the drop biscuits
9. Add the flour, baking powder, baking soda, salt, to a large bowl and whisk to combine or pulse to combine in a food processor. Scatter the butter over the dry ingredients and rub together with your fingertips, until it forms a sandy-looking texture with some pebble-sized pieces or use a pasty cutter. If using food processor pulse a few times to achieve the same texture.
10. Pour in the buttermilk and stir until it just comes together into a thick dough and there are no visible signs of flour. This step should only take a minute: be careful not to overmix the dough. (I usually pour out my flour and butter into a bowl from the processor and stir in the buttermilk by hand with spatula instead of pulsing it in)
11. Assembling & Baking
12. Use large cookie scoop or 2-3 heaping tablespoons (or approx ¼ cup) to scoop out dough. Drop dollops of the dough over the top of the pot pie filling to mostly cover the surface. Flatten them out a bit if you wish. Brush the tops of the biscuits with remaining 2 tablespoons of buttermilk.
13. Transfer the skillet to the oven and bake for about 20-25 minutes until the biscuits are golden brown and fully cooked through and the filling is bubbling. I typically loosely cover pan with foil for the last 5-10 minutes of baking so they don’t brown too much - but are fully cooked through. Feel free to broil for the last minute to get the biscuits deeply golden.
-
@ 55b17d41:d6976606
2023-12-10 01:25:43
## Details
- ⏲️ Prep time: 15 min
- 🍳 Cook time: 1 hour
- 🍽️ Servings: 12
## Ingredients
- 2/3 cup creamy peanut butter
- 1/2 cup powdered sugar
- 1/4 cup graham cracker crumbs
- 1 pinch of salt
- 1 12-oz bag of chocolate chips
## Directions
1. In a large bowl, mix peanut butter, powdered sugar, graham crackers, and salt until well combined.
2. Melt the chocolate either with a chocolate melting pot or in the microwave in a medium size bowl. If using the microwave, cook for 30 seconds and stir. Add more time if needed until the chocolate is melted.
3. Line a 12-cup muffin tray with cupcake liners and fill each one with ½ tablespoon of melted chocolate. Spread the chocolate around to cover the bottom of the liner. Place the tray in the fridge for a few minutes to let them set. Doing this prevents the peanut butter filling from sinking to the bottom of the chocolate.
4. Place a tablespoon of the peanut butter filling on top of the chocolate, spreading it around to form a circle and then slightly pushing it down into the chocolate. Top the peanut butter with another ½ tablespoon of melted chocolate. Smooth out the top and make sure it completely covers the peanut butter underneath.
5. Refrigerate for an hour or until the chocolate has hardened. You can enjoy them cold or at room temperature. Enjoy!
-
@ ee6ea13a:959b6e74
2023-12-08 22:45:00
## Chef's notes
I recommend using olive oil for frying to get the best results. If you’re using a different type of oil, make sure you are aware of its smoke point. You should keep the temperature between 350-375°F (175-190°C). Olive oil will begin to smoke if it goes above 400°F (200°C), so keep a close eye on it so you don’t burn the oil.
## Details
- ⏲️ Prep time: 20 minutes
- 🍳 Cook time: 30 minutes
- 🍽️ Servings: 6
## Ingredients
- 4 large russet potatoes, peeled
- 2 large eggs, beaten
- 3 tablespoons matzo meal or unbleached flour
- 1/4 cup white or yellow onion, grated
- 1/2 teaspoon salt, more to taste
- 1/4 cup olive oil for frying, more as needed
## Directions
1. Slice peeled potatoes and run through a food processor fitted with the grater attachment. If you don’t have a food processor, use a box grater.
2. Place shredded potatoes in a cheesecloth or several paper towels and squeeze over the sink, removing as much liquid as possible.
3. Place drained potatoes into a large bowl. Add eggs, matzo meal or flour, onion, and salt, and stir until completely combined.
4. Heat 1/4 inch of olive oil in a large frying pan over medium-high heat, being careful not to let the oil burn. The oil will be absorbed into the pancakes, so you will need to add more as you go. Make sure you allow a couple of minutes between batches for the cold oil to heat up.
5. Place large spoonfuls of potato mixture into the hot oil, pressing down on them to form patties about 1/2 inch (1.25 cm) thick. Cook until golden brown, 4 to 5 minutes per side.
6. Flip and repeat on the other side.
7. Remove and place gently on a paper towel-lined plate to let the oil drain while you cook any remaining latkes. You can also keep them on a baking sheet in a low-temperature oven while you cook the remaining batches. (Never microwave them!)
8. Serve hot with fresh applesauce and sour cream, or your favorite topping.
-
@ d4338b7c:f1d23a5b
2023-12-08 01:55:53
## Chef's notes
2oz Whiskey
1oz eggwhites
.75 lemon juice
.5 demerara
Angostura bitters
## Details
- ⏲️ Prep time: 5
- 🍳 Cook time: 5
- 🍽️ Servings: 1
## Ingredients
- Whiskey
- Eggwhites
- Lemon juice
- Demerara
- Angostura
## Directions
1. Add ingredients to shaker tin
2. Shake for 30 sec
3. Strain into coupe
4. Add Angostura bitters on top
5. Garnish with a lemon wedge or dehydrated lemon/lime
-
@ f647c956:90f43673
2023-12-05 22:19:26
## Chef's notes
The contrast between the hot coffee and the cold, floating cream is what makes Irish Coffee so delightful. It's the perfect way to warm up and relax. Enjoy responsibly! ☕
## Details
- ⏲️ Prep time: 5 min
- 🍽️ Servings: 1
## Ingredients
- 1 cup of hot brewed coffee
- 1 1/2 ounces of Irish whiskey
- 2 teaspoons of brown sugar (adjust to taste)
- Freshly whipped cream
- Coffee glass or mug
## Directions
1. Brew a cup of hot coffee.
2. While the coffee is brewing, warm your coffee glass or mug by filling it with hot water. Let it sit for a minute, then pour out the water.
3. Add the brown sugar to the warm glass.
4. Pour the hot brewed coffee over the sugar and stir until it's dissolved.
5. Add the Irish whiskey and give it another gentle stir.
6. Carefully pour the freshly whipped cream over the back of a spoon so that it floats on top of the coffee mixture.
7. The cream should rest on the surface; don't stir it in.
-
@ 4657dfe8:47934b3e
2023-12-05 11:55:25
## Chef's notes
👩🍳 Dear Honeys
We're thrilled to share this bee-kissed recipe with you! These cookies are not just treats; they're tiny, edible pieces of holiday joy... like bitcoins. Each cookie is unique and holds its value in every bit.
Whether you're baking for family, friends, or just treating yourself, remember that each cookie is a canvas for your creativity. Enjoy the sweet aromas filling your kitchen and the smiles these cookies will bring.
Happy Baking and Happy Holidays! 🎉🎁
## Details
- ⏲️ Prep time: 80
- 🍳 Cook time: 10
- 🍽️ Servings: 6
## Ingredients
- 1 cup honey 🍯
- 3/4 cup brown sugar 🧂
- 1 large egg 🥚
- 1 tablespoon lemon juice 🍋
- 2 3/4 cups all-purpose flour 🌾
- 1/2 teaspoon baking soda
- 1 teaspoon ground cinnamon
- 1/2 teaspoon ground cloves
- 1/2 teaspoon ground ginger
- 1/2 teaspoon nutmeg
- Pinch of salt 🧂
- Powdered sugar for buzz ❄️
## Directions
1. Preheat Oven: Preheat your oven to 350°F (175°C). Line baking sheets with parchment paper.
2. Mix Wet Ingredients: In a large mixing bowl, combine the honey from friendly honeybees and brown sugar. Beat in the egg and lemon juice until well blended.
3. Combine Dry Ingredients: In a separate bowl, sift together the flour, baking soda, cinnamon, cloves, ginger, nutmeg, and salt.
4. Combine Mixtures: Gradually add the dry ingredients to the wet mixture, stirring until a dough forms. If the dough is too sticky, add a little more flour.
5. Chill the Dough: Wrap the dough in plastic wrap and refrigerate for at least 1 hour.
6. Roll Out Dough: On a floured surface, roll out the dough to about 1/4 inch thickness
7. Cut Out Cookies: Use hexagon-shaped cookie cutters to cut out shapes and place them on the prepared baking sheets to look like a honeycomb
8. Bake: Bake for 8-10 minutes or until the edges are just starting to brown.
9. Cool and Decorate: Let the cookies cool on the baking sheet for a few minutes before transferring to a wire rack to cool completely. Dust with powdered sugar to add some buzz.
10. Enjoy your honey-infused Alby Christmas cookies with a warm cup of tea or coffee!
-
@ 1b0706e7:ec11b9b3
2023-12-05 05:29:42
## Chef's notes
## Details
- ⏲️ Prep time: 20 min
- 🍳 Cook time: 30 min
- 🍽️ Servings: 4
## Ingredients
- 4 whole chicken breasts
- 2 TBS Olive oil
- 2 tbs butter
- 6 shallots, chopped
- 2 pared carrots, sliced into 1/4 inch rounds
- 1/4 cup brandy or cognac
- 1 cup dry white wine
- 1/4 cup chopped or 2 tsp dried tarragon
- 1/2 tsp dried chervil leaves
- 1/2 TSP salt
- 1/8 tsp pepper
- 1 cup light cream
- 1 egg yolk
- 1 TBS flour
- 1/4 lb. Mushrooms
- 2 more TBD butter
- Springs of fresh tarragon
## Directions
1. Photo in notes.
-
@ 7f21affa:57e19174
2023-12-04 15:03:18
## Chef's notes
Intermediate baking skills needed or not...
Be sure to use a mixer to mix ingredients together.
Dough gets pretty sticky, be sure to use flour for dusting
## Details
- ⏲️ Prep time: ~ 2 Hours 30 Mins
- 🍳 Cook time: ~ 30 Mins
- 🍽️ Servings: 16
## Ingredients
- 1 Packet of Yeast
- 1/4 cup Warm Water
- 1/2 cup Milk (whole/skim/half/evaporated)
- 2 eggs
- 1/2 stick (1/4cup) Butter
- 1/3 cup Sugar
- 1 tsp Salt
- 3 1/2 - 4 cups - All Purpose Flour
- Oil for Frying (Olive/Avacado/Vegetable/Ghee)
## Directions
1. Mix 1 Packet of Yeast & 1/4 cup Warm Water in a small bowl,
2. Cover & let sit for 5-10 mins
3. Use a Hook attachment & Mixer for best results,
4. In mixing bowl, add 1/2 cup Milk, 2 eggs, 1/2 stick Butter, 1/3 cup Sugar, 1 tsp Salt, & 3 1/2 - 4 cups All Purpose Flour.
5. Mix for 10 - 20 mins , dough should not stick to the side of the bowl, but stick a little at the bottom.
6. Cover, & let it double in size for 45 mins - 1 hour .
7. Dust rolling area with flour & roll out the dough to 1/2inch thickness
8. Lay out parchment paper on a surface to put donut shapes on,
9. Cut out donut shapes as desired, (If there is more dough, roll out again & repeat)
10. Cover donut shapes & let rest for 1 hour.
11. Medium Low; Heat up oil to fry donuts!
12. Enjoy!
-
@ fe2d5cf6:0c59303d
2023-12-04 04:35:44
## Chef's notes
Bitcoin Only Pleb’s #weedbrownies recipe:
Need about a half ounce to an ounce of Vaped weed OR decarbed weed to start. (Look up online how to decarb if you don’t have vaped weed)
Dump that out into a stainless steel sauce pan large enough to hold everything..(stainless or cast iron will do, no non-stick bc you’ll be simmering for a long time and PUFAs are no joke)
Find out how much the brownie box calls for in oil and then add slightly more of that to the pan with the weed. You’ll want to use oil with a high smoke point, I prefer avocado oil (example: If the recipe calls for 1/2 cup of oil, add a little under 2/3 of a cup to the pan with the weed as you will lose some in the next steps)
Cook weed/oil mixture on simmer (very very low heat) for 2-3 hours, let it cool down to room temp when done.
Take a coffee filter and fix it around a drinking glass (might need someone to help you with this next step), pour the weed/oil mix through the coffee filter and let it drip through. This step can get messy, if you’re impatient like me, twist the open mouth of the filter closed and squeeze everything out carefully. Or if you have time let it drip through.
Take that oil and use it as instructed in the brownie mix.
Pop those bad boys in the oven and enjoy when cool. Remember to never “guess” your edible intake. Better to start small.
Love y’all🧡💜
## Details
- ⏲️ Prep time: 3 hours
- 🍳 Cook time: 30 min
- 🍽️ Servings: 10
## Ingredients
- Follow brownie mix ingredients on box after making infused oil
## Directions
1. Bitcoin Only Pleb’s #weedbrownies recipe: Need about a half ounce to an ounce of Vaped weed OR decarbed weed to start. (Look up online how to decarb if you don’t have vaped weed) Dump that out into a stainless steel sauce pan large enough to hold everything..(stainless or cast iron will do, no non-stick bc you’ll be simmering for a long time and PUFAs are no joke) Find out how much the brownie box calls for in oil and then add slightly more of that to the pan with the weed. You’ll want to use oil with a high smoke point, I prefer avocado oil (example: If the recipe calls for 1/2 cup of oil, add a little under 2/3 of a cup to the pan with the weed as you will lose some in the next steps) Cook weed/oil mixture on simmer (very very low heat) for 2-3 hours, let it cool down to room temp when done. Take a coffee filter and fix it around a drinking glass (might need someone to help you with this next step), pour the weed/oil mix through the coffee filter and let it drip through. This step can get messy, if you’re impatient like me, twist the open mouth of the filter closed and squeeze everything out carefully. Or if you have time let it drip through. Take that oil and use it as instructed in the brownie mix. Pop those bad boys in the oven and enjoy when cool. Remember to never “guess” your edible intake. Better to start small. Love y’all🧡💜
-
@ 9bc2d34d:d19d2948
2023-12-03 13:10:23
## Chef's notes
I made this about four times already since Thanksgiving, so if you hate those jars from the market as much as I do, here is the perfect laziest recipe to follow for a better version. Also if you can get the items on sale or buy one get one free, you can make a batch for about $3. The supplies, especially the mayo and buttermilk, will go a long way (OR until expired). But seriously, go make this instead. Add herbs if you want...chives are recommended for that oniony, cheesy vibe. Add some seasonings like garlic powder. It is yours to doctor up!
## Details
- ⏲️ Prep time: 5 mins (leave in fridge overnight)
- 🍳 Cook time: 0
- 🍽️ Servings: 8
## Ingredients
- half a container of sour cream
- two big spoonfuls of mayo
- a wedge or half a wedge of bleu cheese (YOUR CHOICE)
- a large splash of buttermilk (add more if you want to make it thinner)
## Directions
1. Put Sour Cream, Mayo, and Buttermilk into a bowl; mix
2. Crumble in the Bleu Cheese
3. Mix The Bleu Cheese into the Sour Cream, Mayo, Buttermilk Mixture
4. Cover the bowl
5. Refrigerate overnight so it can get married.
-
@ 3c72d552:e392ef72
2023-11-30 08:27:10
## Chef's notes
I’m not chef. Just a Thai guy from
## Details
- ⏲️ Prep time: 10
- 🍳 Cook time: 20
- 🍽️ Servings: 1-2
## Ingredients
- 200 g ground beef
- 2 garlics
- 4 red chillies (fresh or dried or both)
- 1 table spoon of Oyster sauce
- 1 table spoon of Green cap seasoning sauce (Golden mountain brand)
- 1 table spoon of White soy sauce
- 1/2 table spoon of Black soy sauce
- 300 ml of soy oil (or sunflower oil, palm oil, olive oil)
- 1-2 eggs (chicken or duck)
- 2 handful of Thai basil
## Directions
1. Slice the chillies into pieces
2. Prepare the garlics by roughly pound it into pieces or finely chopped it
3. Turn on the frying pan and add soy oil then let it heated
4. Fry an eggs into the hot oil. (With much enough oil over an egg and fry it until the egg white is crunchy)
5. Take fry egg out of the pan to set aside. And left some of used soy oil in the pan (about 1 table spoon)
6. Add prepared garlics and chillies in the pan and stir until it smell good (you may sneeze more than one time lol)
7. Add ground beef and stir to mixed them together with garlics and chillies. don’t let the beef stick together.
8. Add all Oyster sauce, Green cap seasoning sauce, White soy sauce, Black soy sauce and stir to mix it well.
9. Taste it and add some seasoning you want.
10. Add basil leaf and its inflorescence and stir to mix. Then turn off the fire.
11. Serve in the dish topping with fried egg
-
@ df47809c:1a3a0ee5
2023-11-28 05:15:47
## Chef's notes

## Details
- ⏲️ Prep time: 20 minutes
- 🍳 Cook time: 1 hour
- 🍽️ Servings: 6
## Ingredients
- 4 tablespoons butter (divided)
- 2 carrots (diced small)
- 2 stalks celery plus their leaves (diced)
- 1 cup frozen onion
- 1 1/4 cup all-purpose flour (divided)
- 4 cups low sodium chicken stock/broth
- 1 cup whole milk (divided)
- 1 teaspoon kosher salt
- 1 teaspoon baking powder ((see notes))
- 1 teaspoon chopped fresh thyme leaves (or 1/2 teaspoon dried, plus more for garnish)
- 2 cups cooked diced or shredded chicken
- extra salt and pepper
## Directions
1. Sauté veggies in butter.
2. Sauté the carrots, celery, and onions in 2 tablespoons of the butter in a large pot over medium high heat until softened a bit and beginning to brown (about 3 minutes).
3. Add flour.
4. Add 1/4 cup flour, stir to coat.
5. Add broth.
6. Add chicken broth (4 cups) and bring to a boil.
7. Add milk and chicken and season.
8. Turn the heat down to simmer and add 1/2 cup milk and the chicken. Season with salt and pepper.
9. Mix dumpling dough.
10. Meanwhile, to make the dumplings, mix together the remaining 1 cup of flour, 1 teaspoon salt, 1 teaspoon baking powder, and 1 teaspoon fresh thyme leaves. Stir in the remaining 2 tablespoons of butter, melted, until flour mixture is crumbly looking. Add the remaining 1/2 cup of milk and stir until JUST combined. Do NOT over mix, or your dumplings may be dense.
11. Drop dumplings in.
12. Add spoonfuls of the dumpling mixture to the simmering pot- I recommend using a small cookie scoop for this (a tablespoon can also be used).
13. Cover and simmer until dumplings are cooked.
14. Cover and simmer on low for 15 minutes, or until dumplings are fluffy, cooked, and float to the top. No peeking!
15. Serve garnished with extra fresh thyme and fresh ground pepper, if desired.
-
@ df47809c:1a3a0ee5
2023-11-28 01:13:38
## Chef's notes
- If you're busy:
- Replace all the seasoning with a packet of taco seasoning or a 1/4 up of the Costco size taco seasoning. Watch out for the added sugars these companies tend to throw in them..
- You can also use frozen chicken and pressure cook it in an Instant Pot for an hour.
- Substitute 1 medium chopped onion for a cup of diced/frozen onion.
- Use store bought chopped garlic.
- You can also use tortilla chips instead of tortillas, preferably seed oil free.
## Details
- ⏲️ Prep time: 15 min
- 🍳 Cook time: 30 min
- 🍽️ Servings: 6
## Ingredients
- 1 medium onion (chopped)
- 3 garlic cloves (minced)
- 1 jalapeno pepper (seeded and diced)
- 1 tsp ground cumin
- 1 tsp chilli powder
- 1 lb chicken breasts ((2 medium))
- 20 oz can crushed tomatoes
- 32 oz chicken broth
- 14 oz can black beans (drained and rinsed)
- 14 oz can corn (drained and rinsed)
- 1/2 cup cilantro (chopped, divided (reserve 1/4 of it for garnish))
- 1 tsp salt (or to taste)
- 1/4 cup olive oil
- 8 corn tortillas ((6" tortillas))
- 1 large avocado (diced)
- 2 limes(1 juiced, 1 cut into wedges, to serve)
- sour cream
## Directions
1. Preheat a pan with 1/4 cup oil over medium-high heat. Cut tortillas into thin strips and fry them in batches in the hot oil until crisp. Remove from the pan and allow them to drain on a paper towel. Repeat with remaining tortilla strips, adding more oil as needed then set aside.
2. Add whole chicken breasts, corn, beans, chilli powder, cumin, crushed tomatoes, salt, ¼ cup of cilantro and chicken broth. Bring to a boil and let simmer for at least 25 minutes.
3. Shred Chicken with a fork or those bear claw shredder tools.
4. Remove chicken from the pot and shred it using 2 forks. Add shredded chicken back to the soup and simmer another 5 minutes then add lime juice. If using the Instant Pot, let it slow release for about 20 minutes to avoid getting splashed.
5. Serve the soup with some tortilla strips, pieces of avocado, fresh cilantro and lime wedges.
-
@ d4338b7c:f1d23a5b
2023-11-27 18:52:35
## Chef's notes
ANTIQUES SYRUP
3 parts fig puree
1 parts balsamic vinegar
ANTIQUES TINCTURE
Equal parts peppercorn and rosemary
tincture
PEPPERCORN TINCTURE
2:1 Everclear to Water - 48hr soak
ROSEMARY TINCTURE
In quart deli container, cover 10 sprigs of
rosemary with everclear and infuse for
10 MINUTES ONLY!!
FIG PUREE
Cut fig preserves with 50% hot water and
blend gently until well combined
## Ingredients
- Beefeater
- Benedictine
- Cynar
- Fig puree
- Balsamic vinegar
- Lime juice
- Peppercorn
- Rosemary
- Everclear
## Directions
1. Shaken
-
@ df47809c:1a3a0ee5
2023-11-27 13:52:26
## Details
- ⏲️ Prep time: 20 mion
- 🍳 Cook time: 30 min
- 🍽️ Servings: 4
## Ingredients
- 4 (4-oz.) cube steaks
- 2 3/4 teaspoons salt, divided
- 2 1/4 teaspoons pepper, divided
- 1 sleeve saltine crackers (approx. 38-40)
- 1 3/4 cups flour, divided
- 1/2 teaspoon baking powder
- 1/2 teaspoon ground red pepper
- 8 3/4 cups whole milk, divided
- 2 eggs
- 4 cups avocado oil
- Fresh parsley
## Directions
1. Sprinkle 1/4 tsp. salt and 1/4 tsp. pepper onto cube steaks, flipping to season both sides.
2. In a large bowl, combine one sleeve (approximately 38-40) crushed saltine crackers, 1 cup flour, 1/2 tsp. baking powder, 1 tsp. salt, and 1/2 tsp. pepper. Whisk to combine. Add in an additional 1/2 tsp. of both salt and pepper to the combined cracker mixture, and stir in 1/2 tsp. ground red pepper.
3. In a separate bowl, combine 4 3/4 cups milk and 2 eggs, whisking until eggs are completely incorporated.
4. Coat each cube steak in flour mixture, then milk mixture, then flour mixture again, making sure that steaks are completely covered.
5. Heat 4 cups of avocado oil (or preferred frying oil) in a large skillet or Dutch oven, until oil is at 360˚F. Place prepared steaks in hot oil, frying for about 10 minutes until steaks are golden brown. Remove from oil and drain on a wire rack-lined jellyroll pan.
6. FOR GRAVY: In a large bowl, combine 3/4 cup flour, 1 tsp. salt, 1 tsp. pepper, and 4 cups of milk. Whisk ingredients together. Pour into a skillet with about 1 Tbsp. of remaining frying oil, and whisk on medium heat for about 10 minutes or until mixture has thickened. Pour warm gravy over country-fried steaks. Sprinkle with fresh parsley if desired.
-
@ df47809c:1a3a0ee5
2023-11-27 04:54:57
## Details
- ⏲️ Prep time: 20 min
- 🍳 Cook time: 30 min
- 🍽️ Servings: 4
## Ingredients
- 1 tablespoon olive oil
- 1 medium white onion, peeled and diced
- 1 medium white onion, peeled and diced
- 1 (4 ounce) can diced green chiles
- 2 (15 ounce) cans beans, rinsed and drained (I used one can pinto, one can black beans)
- 1 (8 ounce) can whole kernel corn, drained'
- 3 cups (about 1.5 pounds) shredded or diced cooked chicken
- 3 cups red enchilada sauce, homemade or store-bought, divided
- 12 corn tortillas, halved
- 3 cups shredded Monterrey Jack or Mexican blend cheese
- toppings: chopped fresh cilantro, diced red onion, thinly-sliced green onion and/or diced avocado
## Directions
1. Heat oven to 375°F. Mist a 9×13-inch baking dish with cooking spray; set aside.
2. Heat oil in a large sauté pan over medium-high heat. Add onion and bell pepper and sauté for 6-7 minutes, or until softened. Stir in the diced green chiles, beans, corn, chicken and 2 cups enchilada sauce, and stir to combine. Remove from heat and set aside.
3. Pour about 1/2 cup of the remaining enchilada sauce in the baking dish, and spread until the bottom of the dish is evenly coated. Top with a layer of about 8 tortilla halves, so that the entire dish is covered. Top evenly with 1/3 of the chicken mixture, followed by 1/3 of the cheese. Repeat with another layer of tortillas, chicken mixture, and cheese. Followed by a final layer of tortillas, chicken mixture, the remaining 1/2 cup of enchilada sauce, and cheese.
4. Cover the pan with aluminum foil, then bake for 20 minutes.
5. Remove pan and remove aluminum foil. Uncover and bake for 10 more minutes, until the cheese is thoroughly melted.
6. Remove from the oven and serve warm, garnished with your desired toppings.
-
@ df47809c:1a3a0ee5
2023-11-27 04:32:36
## Chef's notes
## Details
- ⏲️ Prep time: 20 min
- 🍳 Cook time: 10 mion
- 🍽️ Servings: 4
## Ingredients
- 4 large boneless, skinless chicken breasts
- 1 teaspoon salt
- 1/2 teaspoon pepper
- 1/2 teaspoon smoked paprika
- 1/4 cup butter
- 1 can (14 oz) chicken broth
- 1/2 teaspoon dried thyme leaves
- 1 jar (14 oz) marinated artichoke hearts, drained
- 3 tablespoons cornstarch
- 1/4 cup cold water
## Directions
1. Preheat the pressure cooking pot using the sauté button. Season the chicken with salt, pepper, and smoked paprika. Melt butter in the cooking pot. Add 2 chicken breasts and brown until golden on both sides, about 2 minutes per side. Remove to a plate and repeat with remaining chicken breasts.
2. Add chicken broth and thyme to the pressure cooking pot. Add browned chicken. Lock the lid in place. Select High Pressure and 5 minutes cook time. When the cook time ends, use a quick pressure release.
3. In a small bowl, dissolve cornstarch in cold water. Push chicken to one side of the pot and add cornstarch mixture and stir to combine. Select Sauté and stir constantly until sauce thickens and boils. Stir in the artichoke hearts
4. Serve chicken and sauce over prepared rice or pasta.
-
@ df47809c:1a3a0ee5
2023-11-26 23:09:16
## Chef's notes
You can [grow green onions from kitchen scraps](https://www.allrecipes.com/article/save-money-diy-fresh-green-onions/)
## Details
- ⏲️ Prep time: 10 min
- 🍳 Cook time: 20 min
- 🍽️ Servings: 4
## Ingredients
- 8 bacon strips, chopped
- 1 lb medium fresh mushrooms, sliced
- 1 lb medium fresh mushrooms, sliced
- 1/4 teaspoon salt
- 2 teaspoons butter, divided
- SAUCE
- 2 tablespoon butter
- 2 tablespoon almond flour
- 1 cup 2% milk
- 3 tablespoons shredded cheddar cheese
- 2 teaspoon shredded Parmesan cheese
- 2 teaspoon taco seasoning
- Optional toppings: Shredded lettuce, chopped tomatoes and thinly sliced green onions
- 4 egg whites
## Directions
1. In a nonstick skillet, cook bacon and mushrooms over medium heat until mushrooms are tender and bacon is crisp, stirring occasionally. Remove with a slotted spoon; drain on paper towels. Discard drippings.
2. In a small bowl, whisk eggs and salt. In the skillet, heat 1 teaspoon butter over medium-high heat. Pour in half of the egg mixture. It should set immediately at edges.
3. As eggs set, push cooked portions toward the center, letting uncooked eggs flow underneath. When eggs are thickened and no liquid egg remains, spoon half of mushroom mixture on one side. Fold omelet in half; slide out of pan onto a plate. Repeat to make a second omelet.
4. For sauce, in a small saucepan, melt 1 tablespoon butter over medium heat. Stir in flour until smooth; gradually whisk in milk. Bring to a boil, stirring constantly; cook and stir 2-3 minutes or until thickened.
5. Stir in cheeses and taco seasoning until cheese is melted. Serve with omelets and toppings as desired.
-
@ df47809c:1a3a0ee5
2023-11-26 23:00:35
## Chef's notes
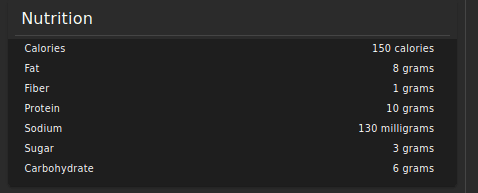
[Greek Yogurt Recipe](https://nostr.cooking/recipe/naddr1qqcz66twwd6xzmn594cx7apddehj6cn0d9kz67t0va6hyapdtd3k7mry94ehgctjwskk7e3dd45kc66aqgsd73uqnst393snzvhqjjf7xghacwnz4gcljukame8x83qjrgaqaegrqsqqqa28505fyq)
## Details
- ⏲️ Prep time: 15 min
- 🍳 Cook time: 3 min
- 🍽️ Servings: 6
## Ingredients
- almond flour 1/2 cup 1/2 cup
- erythritol or other sugar substitute (divided use) 1/4 cup plus | 1 1/2 tbsp | 1/4 cup plus 1 1/2 tbsp
- 1/4 tsp salt
- 1 tsp ground cinnamon
- 1 tbs espresso or strong coffee
- 2 cups plain nonfat greek yogurt
- 3 tbs mascarpone cheese
- 1 tbs dark rum
- zest from one orange
- 1 tbs vanilla extract
- 1 tsp cocoa powder
## Directions
1. In a medium skillet over medium heat, toast the almond flour for 3 minutes or until golden, stirring often to avoid burning.
2. In a small bowl, mix the toasted almond flour, 1 1/2 tbsp of the erythritol, cinnamon and salt. Add the espresso and stir. Divide between 6 serving glasses (about 1 heaping tablespoon each).
3. In a medium bowl, mix the yogurt with the mascarpone, remaining 1/4 cup erythritol, rum, orange zest and vanilla. Spoon about 1/3 cup on top of the coffee-almond base in each of the serving glasses. Dust each tiramisu lightly with cocoa powder just before serving.
-
@ df47809c:1a3a0ee5
2023-11-26 22:42:54
## Chef's notes
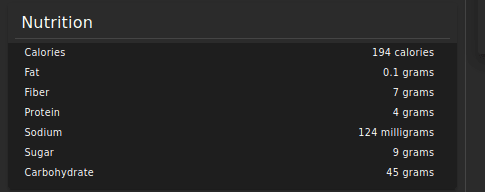
I think sweet potatoes are a yellowish white tuber, but some people seem to think they are orange yams. WTF? I'm not sure who's right, but I like both of them and use the same recipe to cook both.
the nutritional information obviously depends on the size of the potatoe.
## Details
- ⏲️ Prep time: 5 minutes
- 🍳 Cook time: 45 minutes(but i think they are better after about an hour and a half)
- 🍽️ Servings: 4
## Ingredients
- 4 medium/large sweet potatoes ((2 pounds potatoes))
- unsalted butter (optional for topping)
- chopped chives (optional for topping) I also suggest growing them in your own garden. Don't have land? https://www.ted.com/talks/ron_finley_a_guerrilla_gardener_in_south_central_la
## Directions
1. Preheat the oven to 400°F and line a rimmed baking sheet with foil or parchment paper for easier cleanup.
2. Thoroughly rinse and scrub the potatoes then pat dry with a towel and poke holes all over with a fork.
3. Set potatoes on the prepared baking sheet leaving some space between potatoes and bake for 45 minutes, or until easily pierced with a knife or fork.
-
@ df47809c:1a3a0ee5
2023-11-26 22:35:08
## Chef's notes
I got this from the 4 hour chef.
## Details
- ⏲️ Prep time: 5 mion
- 🍳 Cook time: 5 min
- 🍽️ Servings: 4
## Ingredients
- 1 bunch of Arugula
- 4 Roma Tomatoes
- Salt and Pepper to taste
- Sherry Vinegar
- Extra Virgin Olive Oil
- Avocado
## Directions
1. Cut the tomatoes with a sharp ass knife
2. Dump the Arugula in a salad bowl
3. Cut Avocados in half. Peel them. Then dice like a tomatoe. Add the to the greens
4. drizzle the extra virgin olive oil and sherry vinegar on the side of the salad bowl.
5. Toss the salad(No pun intended)
6. Eat it.
-
@ df47809c:1a3a0ee5
2023-11-26 22:28:03
## Chef's notes
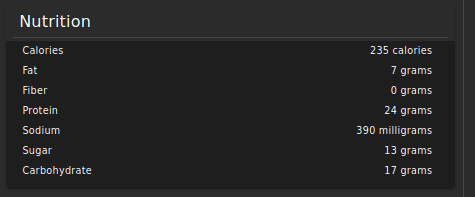
## Details
- ⏲️ Prep time: 30 min
- 🍳 Cook time: 10 min
- 🍽️ Servings: 2
## Ingredients
- olive oil 2 tsp 2 tsp
- lemon zest (grated) 1 tsp 1 tsp
- fresh lemon juice 1 tbsp 1 tbsp
- medium garlic (minced) 1 clove 1 clove
- fresh rosemary (chopped) 1 tbsp 1 tbsp
- salt 1/8 tsp
- 2 chicken breast halves (boneless, skinless, about 4 ounces each)
- nonstick cooking spray
- balsamic vinegar 1 tbsp
- honey 1 tsp
- BBQ Sauce
## Directions
1. In a nonmetallic bowl, stir together the oil, lemon zest, lemon juice, garlic, rosemary, salt, and pepper. Add the chicken, turning to coat. Cover and refrigerate for 30 minutes to 8 hours. If marinating for more than 30 minutes, turn several times.
2. Lightly spray the grill rack with cooking spray. Preheat the grill on medium heat.
3. Grill the chicken for 4 to 5 minutes on each side, or until no longer pink in the center. (The internal temperature should reach at least 165 degrees F). Transfer to plates.
4. Meanwhile, in a small saucepan, whisk together the barbecue sauce, vinegar, and honey. Cook over medium-low heat for 3 to 4 minutes, or until heated through, stirring occasionally. Spoon the mixture over the cooked chicken.
-
@ df47809c:1a3a0ee5
2023-11-26 22:19:20
## Chef's notes
"This Pressure Cooker / Instant Pot 15 Bean Soup is a hearty soup loaded with ham, fifteen different types of beans, and good-for-you veggies. "
OG recipe from https://hurstbeans.com/recipes/instant-pot-15-bean-soup
## Details
- ⏲️ Prep time: 6 min
- 🍳 Cook time: 1 hour 40 min
- 🍽️ Servings: 8
## Ingredients
- 1 package (20 ounce) [Hurst’s HamBeens 15 Bean Soup](/products/ham-beens-original-15-bean-soup) with seasoning packet
- 2 tablespoons vegetable oil
- 1/2 cup celery, diced
- 2 cloves garlic, minced
- 2 quarts water
- 1 ham bone, optional*
- 1 can (15 ounces) crushed tomatoes in puree
- 1/2 cup carrots, diced(used frozen if you're lazy)
- 1 cup onion, chopped(cup of frozen onions works for busy people)
- 1 teaspoon chili powder
- 2 cups spinach, roughly chopped
- 1 cup diced ham, optional
- 1 tablespoon lemon juice
- Salt and freshly ground black pepper to taste
## Directions
1. Set aside seasoning packet. Rinse beans in a colander and remove any debris.
2. Select Sauté. Add the vegetable oil, onion, and celery to the pressure cooking pot. Sauté for about 3 minutes until tender.
3. Add the garlic and sauté for 1 minute more.
4. Add the rinsed beans, 2 quarts water, and ham bone.
5. Lock the lid in place. Select High Pressure and 1 minute cook time. When the cook time ends, turn off the pressure cooker. Let the beans soak for 1 hour. *Alternatively, you can cook the beans on high pressure for 35 minutes with a 10 minute natural release.
6. After 1 hour, stir in tomatoes, carrots, chili powder, and seasoning packet. Lock the lid in place. Select High Pressure and 3 minutes cook time.
7. When the cook time ends, turn off the pressure cooker. Let the pressure release naturally for 10 minutes and finish with a quick pressure release.
8. When the valve drops, carefully remove the lid. Remove the ham bone. Stir in the spinach, ham, and lemon juice. Season with salt and pepper to taste.
-
@ df47809c:1a3a0ee5
2023-11-26 22:11:40
## Chef's notes
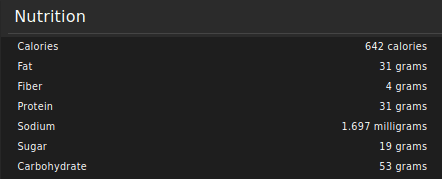
## Details
- ⏲️ Prep time: 20 min
- 🍳 Cook time: 1 hour 40 min
- 🍽️ Servings: 6
## Ingredients
- 4 tablespoons unsalted butter
- 1 tablespoon olive oil
- 3 pounds Vidalia (or sweet) onions (about 5 medium), halved lengthwise and thinly sliced
- ¾ teaspoon salt
- ½ teaspoon freshly ground black pepper
- 1 cup dry white wine
- 2 tablespoons all-purpose flour(substitute with almond flour for keto)
- ¾ teaspoon honey
- 6 cups beef broth
- 1 teaspoon Worcestershire sauce
- ½ teaspoon dried thyme
- 2 bay leaves
- 1 small baguette, cut into ½-in slices
- 1 tablespoon dry sherry
- 8 ounces Gruyère cheese, grated (about 2 heaping cups; look for one imported from Switzerland)
- ½ cup grated Parmigiano Reggiano
## Directions
1. In a large Dutch oven or soup pot, melt the butter over medium heat. Add the oil, onions, salt, pepper, and sugar. Cook, uncovered, stirring occasionally with a wooden spoon, until onions are deep golden brown and caramelized, 45 to 55 minutes. In the beginning, you will only need to stir the onions occasionally. As they start to brown midway through cooking, you will need to stir them frequently, scraping the fond (the brown particles) from the bottom of the pan. If the onions are browning too quickly, reduce the heat slightly or add a few tablespoons of water to deglaze the pan and continue cooking.
2. Add the wine and raise the heat to high. Cook, stirring with a wooden spoon to scrape any fond from the bottom of the pan, until almost all of the liquid has evaporated and the onions are jammy, 8 to 10 minutes.
3. Add the flour or almond flour and cook, stirring constantly, for one minute.
4. Add the broth, Worcestershire sauce, thyme, and bay leaves to the pot. Bring to a boil, reduce the heat to a simmer, and cook, covered, for about 30 minutes.
5. While the soup simmers, preheat the oven to 400°F and set an oven rack in the middle position. Arrange the baguette slices in a single layer on a baking sheet and bake until the bread is dry, crisp, and golden at edges, about 10 minutes. Set aside.
6. When the soup is finished, remove the bay leaves and add the sherry; taste and adjust seasoning if necessary. If the soup needs a deeper flavor, try a few shakes of Worcestershire sauce. If it's not quite sweet enough, add ¼ teaspoon sugar.
7. Adjust an oven rack 6 inches from broiler element and heat broiler. Set individual broiler-safe crocks on a baking sheet and divide the hot soup among the crocks (be sure the soup is very hot as it won't warm up much in the oven). Top each crock with 1 or 2 baguette slices (do not overlap slices) and sprinkle evenly with Gruyère and then Parmigianno Reggiano. Slide the crocks into the oven and broil until the cheese is melted and bubbly around edges, 3 to 5 minutes. Let the crocks cool for a few minutes before serving. (Alternatively, if using regular soup bowls: Top each toast slice with some cheese and return to broiler to melt, about 2 minutes more. Divide the soup among bowls and top each serving with two cheese toasts.)
8. Make-Ahead Instructions: The soup can be made and refrigerated up to 3 days ahead (without toasts or cheese), or up to 3 months ahead and frozen. Toasts can be made (without the cheese) and kept sealed at room temperature for up to 3 days.
-
@ df47809c:1a3a0ee5
2023-11-26 21:48:57
## Chef's notes
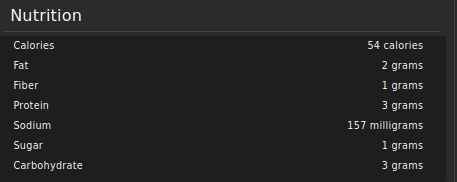
## Details
- ⏲️ Prep time: 20 min
- 🍳 Cook time: 3 hours
- 🍽️ Servings: 16
## Ingredients
- 2.5 - 3 pounds (1198g) bones ((combination of 554g pork, 644g chicken))
- 5 - 6 (212g) chicken feet
- 2 (252g) onions (keep the outer layers, roughly diced)
- 2 (215g) celery stalks (, roughly diced)
- 2 (265g) carrots (, roughly diced)
- 2 (8g) garlic cloves (, crushed)
- 2 bay leaves
- 1 teaspoon (3.5g) whole peppercorn
- 8 cups (2L) cold water(water from the water heater leaves a funny taste)
- 2 tablespoons (30ml) fish sauce (or regular soy sauce)
- Your favorite fresh or dried herbs (Herbs from a garden are best)
- 1 tablespoon (15ml) apple cider vinegar
- 1 tablespoon (15ml) olive oil
## Directions
1. Grow some garden herbs. Don't have any land? Watch this: https://www.youtube.com/watch?v=EzZzZ_qpZ4w
2. Optional Step to Enhance the Bone Broth: Heat up your pressure cooker over medium high heat (Instant Pot: press Sauté button and click the Adjust button to go to Sauté More function). Make sure your pot is as hot as it can be (Instant Pot: wait until the indicator says HOT).Add 1 tablespoon (15ml) olive oil in the pot and brown the bones for 3.5 minutes per side. You may have to do it in two batches. Pour in ½ cup (125ml) cold water and completely deglaze the pot by scrubbing all flavorful brown bits with a wooden spoon.
3. Pressure Cook Bone Broth: Add 5 - 6 (212g) chicken feet (optional) and the rest of the ingredients in the pressure cooker. Close lid and pressure cook at High pressure for 2 hours + Full Natural Release (~45 mins). Open the lid carefully.
4. Strain Bone Broth: Strain bone broth through a colander or mesh strainer to discard the solids. Set aside the bone broth to cool.
5. Skim Fat: Use a fat separator to skim the fat. An alternative method is to place bone broth in the fridge until the fat rises to the top and form a layer of gel. Then, skim the layer of fat with a spoon. A gel-like texture after cooling is a good indicator of an excellent gelatinous bone broth.
6. Enjoy Bone Broth: Season with salt (if desired) and drink it directly. Or you can use the Bone Broth in place of stock.
-
@ df47809c:1a3a0ee5
2023-11-26 21:38:03
## Chef's notes
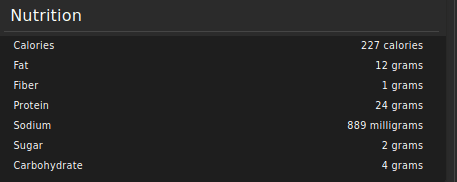
## Details
- ⏲️ Prep time: 10 min
- 🍳 Cook time: 25 min
- 🍽️ Servings: 4
## Ingredients
- 1 pound large shrimp (peeled and deveined)
- 3-4 cups chopped zucchini (or your favorite vegetables)
- 4 cloves garlic (minced)
- 2 tablespoons minced cilantro (or parsley)
- 3 Tablespoons olive oil
- 1 teaspoon paprika
- Salt and Pepper
## Directions
1. Add all the ingredients to a large bowl. Mix to combine.
2. Place four 18x12-inch pieces of heavy aluminum foil on counter. Place the shrimp and veggie mixture on the foil. Fold the foil over the shrimp to seal.
-
@ df47809c:1a3a0ee5
2023-11-26 21:32:28
## Chef's notes
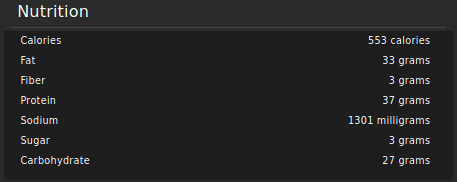
## Details
- ⏲️ Prep time: 10 min
- 🍳 Cook time: 20 mon
- 🍽️ Servings: 4
## Ingredients
- 2 Large Chicken Breasts ((filleted into 4 pieces))
- 2 Potatoes ((peeled and slice into 1/4" slices) )
- 2 cups Frozen Green Beans
- 4 tsp Ranch Seasoning Mix
- 4 Tbsp Butter
- 1 cup Shredded Cheddar Cheese
- 4 slices Bacon ((cooked and chopped))
- 1/2 tsp Pepper
- 1/2 tsp Salt
## Directions
1. Coat 4 large pieces of heavy duty foil with a non-stick cooking spray.
2. Place 1/2 a potato (peeled and sliced) in the middle of each foil.
3. Top with 1/2 cup of frozen green beans on top of the potatoes.
4. Place on chicken breast on top and season with the salt and pepper.
5. Sprinkle 1 teaspoon of Ranch Seasoning Mix and place one tablespoon of butter on top for each foil packet.
6. Add 1/4 cup of shredded cheese and the crumbled bacon.
7. Fold up the sides of the foil. Then fold up the other sides to make a foil pack.
8. Place on the grill over medium high heat or an campfire.
9. Open the foil packets carefully and enjoy dinner!
-
@ df47809c:1a3a0ee5
2023-11-26 21:18:26
## Chef's notes
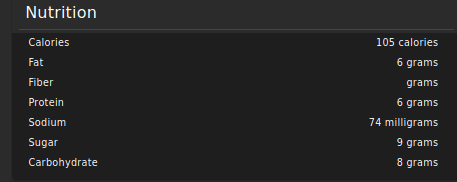
## Details
- ⏲️ Prep time: 8 hours
- 🍳 Cook time: 8 hours
- 🍽️ Servings: 8
## Ingredients
- 52 ounces Milk (Ultra-Filtered & Pasteurized, like Fairlife Milk or Natrel (Canada's version))
- 1 Tablespoon Fresh Yogurt ("Starter") (live cultures)
- 1 can Sweetened Condensed Milk(optional)
## Directions
1. Optional step: Clean and sterilize your Instant Pot by adding one cup of water, closing the pot and pushing the sterilize, pressure cook or manual button and setting the timer to 1 minute. Carefully release the pressure and dump out the water.
2. Place cooking pot into refrigerator to cool off or put a few ice cubes into the pot and then dump out.
3. To Make Cold Start Yogurt: Add cold milk and 1 Tablespoon of yogurt starter (any yogurt with active cultures to the Instant Pot.
4. Whisk the milk and yogurt together well.
5. If sweetening the yogurt, add the sweetened condensed milk or the Natural Bliss now and whisk it in very well.
6. Push the Yogurt button and then use the +/- buttons and set time to 8 hours. Make sure the Yogurt setting says "Normal."
7. When Yogurt cycle is finished, remove cooking pot and transfer to refrigerator to chill overnight. Transfer Yogurt to containers and enjoy.